ASL19 – BACKS TO THE SEA
Legion attacking as the Germans
Peter Kossits / peterk1 defending as the US
ROAR (US:G – 46:62) – 4th November, 2006
Peterk1 is playing through all of the Paratrooper Scenarios and was looking for an opponent, I replied to his request and this was the scenario he suggested. I chose the Germans. I had played this one some time ago, but I cannot remember how it went.
Initial Thoughts
I have 7 turns to make it across 1.5 boards with at least 8 of my 18x 2nd line 447 Germans. My opponent has just 8x 667 to oppose me. We both have a pair of Lt MTR (though obviously the US 60mm is preferable to the Germans 50mm) but I have the added bonus of of 4x LMG and 3x MMG… quite some advantage. This is important as the limited number of US forces means that should I concentrate my forces then he will most likely be forced to counter-attack… the MMG will come in most handy then.
In terms of terrain the ground has been greatly transformed by shellholes (by SSR) but there is a large wooded area in the central area where boards 16/19 meet. This will allow me to get off the setup board (if he doesn’t defend the woods) with my first move. There is little in the way of non-shellhole cover in the central areas of the 2 boards… basically the only cover available is the woods or shellholes (SSR replaces all buildings, woods, crossroads and grainfield as shellholes). On top of that all walls/hedges are bocage… hmmm… it makes for a messy map, and will mean some hearts in the mouth stuff as I rush across the open spaces if I use any speed.
US Setup
The US commander has made some pretty fatal errors in his setup and it will be easy for me to exploit them. Peter says that he is being experimental, so I am sure that this is a part of the plan but he has basically left the majority of his force exposed and used his ? to create dummy stacks… A quick perusal of the exposed units shows only the slightest uncertainty about where his ‘real’ units are… thus he must have the majority of the Western side of the board covered with dummy stacks! He must be very confident of his ability to reinforce quickly… or he thinks I am not likely to notice the mathematical disparity between numbers of stacks and numbers of concealment counters vs exposed units!
Disposition
[Square brackets = information revealed later]
(Round brackets indicate stack height in the case of concealed units)
Lt MTRs 16M2, 16Z1 [both manned by HS]
Concealed 16C8 (3), 19Z1 (2), 19X10 (3), 16K9 (2)16L10 (2), 16BB8 (3), 16CC9 (2)
[19X10 turns out to be 667, 7-0]
[16BB8 turns out to be 8-1, 667]
[16CC9 turns out to be 667]
16R3 667
16T7 667
16X4 9-1 (2) [with 667]
16AA8 Hero (2) [with 667]
16DD9 667
German Setup
18x 447
8-1, 3x 8-0, 7-0
4x LMG, 3x MMG, 2x 50mm MTR
My setup has focussed on 3 main ideas…
1. I have set up both my MTRs as well as 2x ldr/MMG combos in the back line… they will go Opp Fire in the first turn to force him to think about exposing his men from their ? cover. I will have plenty of time for me to rush them forward after his initial line if defence is cleared up (probably by the 2nd turn).
One of the MMGs is way over on the Eastern side, despite the majority of my men being in the Centre/West. This is because he has setup almost all his men in the East and I want to force them to either move slowly through the shell holes or to risk my fire. Tying up or even losing this 447 MMG and 7-0 is worth it if I can force him to waste time and men so far away from the real battle
2. I shall be making a major thrust down the centre of the board. These troops will be aiming for the area between 19O-S and consists of 8-0, 6x 447, MMG, LMG, 2x 237. I will not be CX-ing them as these guys are going to have be doing the job of stopping any attempts he makes to reinforce the West with his mass of Eastern troops.
3. An 8-0, 4x 447, 2x LMG, 237 are going to head down the Western edge of the boards with the intention of making a run for the victory board (Bd. 7) as soon as possible. From here they will be able to cover the approach of the other forces as they break away from the US defence.
The Game
TURN 1
German forces jump up from their start points and stream towards the suspected US positions while the MG gunners and MTR teams sit behind their weapons and wait for an opportunity to fire. He holds back on his shooting until the Defensive Fire phase and as a result I am able to escape with not much more than a single broken 447. My return fire starts off with a 50mm MTR CH; random selection chooses both the 7-0 and 667 in this hex (19X10) – the 7-0 ends up as a 6+1 and the 667 CRs to a 347 – after the 8-1, 2x 447, MMG, LMG nest (19CC5) fire at them the HS is also eliminated and the 6+1 is wounded. A SAN result exposes a dummy position, but it is worthless as I can already see his entire force distribution; for some reason he had chosen to leave the majority of his forces unconcealed, preferring (I assume) to try to influence my setup with many dummy stacks. There is just a single MTR wielding HS between 16 A-Q; in this same area (19 & 16 A-Q) I have 14.5 GO Squads and 3 leaders – this game is going to descend into a race as I run for the unguarded victory board and he rushes West to try to stop me.
None of this is being made easier by his own shooting. Prep brings a few 60mm MTR pot-shots down on my positions, but it also calls a SAN result which ends up finishing off the wounded 6+1 followed immediately by a Malfunction! At least he is able to score an ELR break with a long-range shot at one of my 447s (19T10), he follows this up with another attack that ends up CR-ing him. My own foolish misunderstanding of the WA rules in regards to Bocage (B9.5) when another terrain type is present (B9.322) loses me plenty of fire opportunities… I am thankful to Peter for his patience and assistance with clarifying my errors.
US: 6+1(wnd), 667
German: 236
TURN 2
There is no let-up for the poor Americans… one of the MTR crewmen forgot to bring any ammo (16Z1) and this has forced the removal of one of the corner-stones of the US defence… Masses of German troops are swarming across Bd 16 towards the victory board while I have the centre held tight against any attempts to move to the attack. For some reason Peter is delaying his shots till Defensive Fire rather than taking the FFNAM/MO opportunities I am offering; admittedly I am moving my forces in a way that will prevent any SFF, but they are not taking the shellhole TEM when moving and surely a chance for a KIA is better than the single break he got this turn.
Prep for his turn causes the breaking of 2 more of my fragile 447’s while I can only manage to break the HS with the last MTR (while also breaking one of my LMGs). At least his movement remains conservative. Things being as they are I am likely to have 5 of the required 8 MMC on Bd. 7 by the end of next turn with another 4-5 squads moving into position to also join the victory celebrations. In the Centre and on the Eastern flank I shall have a pair of MMGs forcing him to move with his head down or face some serious FP. The only worry I have is 3.5 MMC being broken, and all of these in the Centre – I need some of this FP back!
US: 60mm Mtr
TURN 3
The turn starts off well with a 447 self-rallying and my LMG being fixed immediately. All my men move this turn, I am flooding onto the victory board with as many MMC as possible while setting up my MMGs in positions to stop him crossing to counter-attack. Mostly it goes OK though I suffer 2 ELR breaks (447, 237) in the process, yet even these allow me to move them onto the victory board in Rout. To get to my men he has to run his remaining 7MMC through 2 MMG + LMG combo’s as well as the 1 non-dm MTR I have covering all his men’s positions. Even if he runs the gauntlet I have 5.5 unbroken MMC and 2x LMG in North-Western corner, the only area he can attack. The 237 was ELR broken as it made a dash for the US 60mm MTR which is unattended (16M2) if I had managed to grab this and fire it till it busted then I would have been a happy-chappy indeed. He is sure to try to get men to it, so it will be nice bait for my MMGs.
Again I am very lucky, I have managed to get an 8-0 to the 1.5 broken MMC I have in the middle forest (19O10) both of them rallied! Despite the high number of ELR breaks I have suffered I have nothing to complain about at all as far as the Rally Phase is concerned. He on the other hand fails to self-rally the ex-MTR carrying HS (7S1); he really needed this guy up to keep the pressure on me, he was the only guy who could get to my men on the victory area without facing FFMO attacks. For some reason he used the MPh. to send all his men towards the opposite corner of the victory board and thus away from me… I guess he wants to re-form for a counter-attack… but to get to me he is forcing himself to move through a bottle neck (the 16T0 area) which I already have well-covered and soon will be all over like a rash. To add insult to injury he got totally smashed with the DRs this turn… 1FP long-range LMG shots scored NMCs (breaking a 667), a Lt. MTR shot at maximum range managed to score a straight KIA thanks to airburst (killing a 347) and finally my MMG/LMG 8-1 combo CR a broken 667 (16Q2). Peter really is in dire straights. He doesn’t have a single GO unit West of row 16W, I have 14 squad-equivalents. To make matters worse I shall be able to move with impunity next turn as he has hardly anyone within even long-range of my troops.
US: 2x 347
TURN 4
The US have basically pulled back to the woods surrounding 16Y1 which puts them out of the ability to long-range fire at the majority of my troops, thus I have an almost stress-free Movement Phase. The only shot I took was a complete miss. I wish I had moved these guys too but I have been putting my MMG/LMG into positions of strength and then handing them both over to a single MMC, this has allowed me to free up another MMC to rush to the victory area. Anyway I need those MMGs to stop him making it across the killing ground between 7S and 7N. I end my turn with 8MMC equivalents in the victory area, though 1.5 of those are not in GO. I have all his approach routes covered (3x MMG, 2 of those stacked with LMGs) and the area of my force concentration is a mass of units staring down on the 7W1 hex, the hex he is most likely to have to move through to get to me. In my back lines I have freed up 4 more MMC equivalents and they are starting the long move towards board 7 – these guys will be staggered across the board, to stop them he will have to leave some men behind, thus weakening the counter-attack on my main mass of men.
Peter’s moves are immediately hit with MMG fire and this causes one of the 667s to break at the cost of a German 8-0 lost due to SAN. The US loses mount up as the Germans attempt to pick off the Rangers (3x HS) while they try to run away but again the dice are a double-edged sword as a 2MC yields a HOB result making a formerly broken 347 Fanatic and thus no longer broken – forcing me to fire at him with 2x MMG/LMG stacks to re-break and finally CR him. Their SAN wakes up long enough to break a conscript HS of mine too! There was a lot of low DRs this turn but they evened out in the end, it was really a combination of ROF and limited targets that led to this slaughter; the US have no place to run to when broken and most of the shots against them were free of TEM restrictions. I don’t see that the US have any chance of winning now… even a long run of poor German DRs and fantastic US rolls is not going to save this game
US: 3x 347
German: 8-0
TURN 5
I am able to rally a conscript squad in the victory zone and then enter another during the Advance phase. I am now a HS above the victory requirement. This spare man came from charging another 447 with the sole operation of a MMG and LMG, I now have 2 of these MG squads (16L5, 16M6). Prep breaks a 667 and Pins another but I also lose a 237 due to K/2 result in Defensive Fire, the remaining HS breaks as well – effectively putting him out of the game. Still… my hold on the game is now even tighter…
In the first bit of good news for a while Peter has 2x 667s rally… this is quite helpful… if he could only stop them from breaking this game would be a lot closer. He takes a shot in Prep and breaks a HS – to do this instead of moving that 667 suits me fine! Mind you, maybe movement isn’t the best thing either… he moves a 667 and 9-2 and they get hit with MMG fire that causes the 9-2 to break while the 667 HOBs to become Fanatic! The DR fun continues with a NMC from a 50mm MTR Airburst (16T0) that breaks another 667… these Rangers are not having a good day! More pain comes when a stack (2x 667, hero, 8-1) moves through the MTRs RF and suffer a NMC; the 2x 667 and 8-1 are broken – a horrific result and I am just glad that it wasn’t me who rolled those DR! In the Defensive Fire phase my men suddenly go off the boil… up till now they couldn’t miss, now they cannot hit… and with all those target ripe for the CR-ing I miss a golden opportunity to end this game!
German: 237
TURN 6
With the rallying of a HS on the victory board I am now a whole squad above the victory requirement… there is no need for me to expose my men to further danger as I cant afford to have many of my men broken… so I pull my men back to out-of-LOS positions, they can still cover the killing ground he will have to cover should he attempt to rush my position. He had left a 667 exposed to my 3 MMG positions and relentless pounding finally CR-ed him to KIA status… there is no coming back for him at all I think – especially since I am able to put another 1.5MMC on the victory board by the end of the turn.
Again Fate goes against Peter as a rally attempt comes up boxcars and eliminates a HS! Even though he manages to rally a 667 and 8-1 he is now down to just 4 squads. This is further reduced by a FFNAM/MO MTR hit on a stack containing 2x 667 and a 9-1; a 667 is CR by the K/1 result and the remaining HS and the ldr break as well… As he attempts to rush the killing ground a mass of RF is laid down, like a bullet-minefield… and the mass of shots ends up KIA-ing a 667. In Defensive I take a shot at his Hero and a broken 667… the 667 rolls boxcars and ends up KIA, the Hero is wounded. He sends an 8-1 and 667 to the East to try to stop my HS there… a bit of a waste, but it does guarantee that he will have someone on the board at games end! I have 10.5 GO units in the victory zone.
US: 3x 667, 2x 347
TURN 7
I have a HS rally, but I lose a MMG to malfunction in Prep Fire as I try to finish off his wounded Hero. Nothing else happens in my turn – it doesn’t need to and there are no targets to shoot at!
He makes a final rush, figuring that if he can brave 2x MTR and 2x MMG (my other MMG did not repair) then he can still win with a nasty enough shot on my concealed largest stack! As the US I would have surrendered long ago but Peter is playing this through to the end – that’s guts! When a HS blasts his Hero to oblivion he is nearly rewarded; a SAN result KIAs the 8-1 manning the MMG/LMG combo… ouch. He attempts to rush the 9-1 and a HS to attack my ? 3x 447 stack (7U1) but a CH with a 50mm MTR Pins the ldr and breaks the HS (16T0). This just leaves the final 8-1, 667 who make a run at the HS on the East of the board… these guys end up Pinned for their trouble. I attempt to finish his 9-1, HS off in Defensive and end up calling another SAN – this one breaks a 447 on the victory board…ouch, but I do kill the HS which is the last effective move of the game.
US: Hero, 347
GERMAN: 8-1
The Germans end up with 10.5 squads on Board 7
GERMAN VICTORY
Conclusion
Before anything else I would like to say that the malfunction and loss of the 60mm US MTR was tragic for the US. Sure it has a B11 but to immediately follow that with a ‘6’ was unfortunate. Even though it was the one most distant to my men’s intended area of attack it’s loss still allowed much more latitude of movement than I would have had before. On top of that the DRs certainly favoured me… I was getting low chance hits and he was failing MC after MC. The most effective attacks he had came from the Sniper! The DRs just got worse for him as the game went on… but I was doing the vast majority of the shooting…
However, this is where the touchy-feely stuff ends… I know Peter was trying out an idea for a new defence, but it did not work, plain and simple. He used his ? counters to create a bunch of dummy stacks while placing the majority of his forces between 16R-CC, which would have been fine if I decided to run into them… I did not. After only a few combat results I was able to deduce which stacks were dummies… in essence he seemed to set up with the intention of scoring a great first turn and this did not happen – I was in no rush, there is plenty of time in this scenario for the Germans to systematically reduce any US opposition. If he had fired with DFF as my men we moving across the OG towards the Bd 19/16 woods then he could have gained more from an up-front defence and 2nd line Germans with poor ELR, but my MTR and MMG Opp Fire seemed to force him to pull his head in. A single 447 MMG and 7-0 was able to stop his weighted flank from moving fast enough to cover the gaping holes left by the loss of the dummies.
Do not think for a second that I did not make mistakes too… after so many years of playing this game I wonder when I will ever come to realise that the Scenario Card has to be read completely. For some reason I did not register that the walls/hedges were Bocage. This is funny now, but it was a potentially fatal mistake. I did not notice my error till mid-way through the first turn. I am not experienced with Bocage rules and this game with Peter has helped me come to a better understanding of them (thx Peter for your patience). By the end I was able to use the Bocage to set up a most lethal pair of MG nests (16L5, 16M6) and I feel ready to play some more of this tricky terrain type!
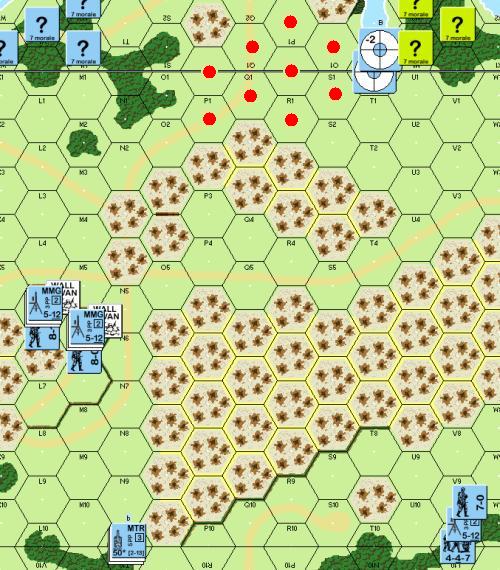
The MG nest was a great position. Safely placed behind the bocage and using just 2 leaders and 2x 447’s each manning a MMG + LMG I had the ‘kill-ground’ that he needed to cross (7S to 7N) completely sewed up with 8FP -2 and possible ROF… 2x 50mm MTR covered the wood’s jump-off point (16T0) with -2aqr and airburst while another MMG covered his movements to the jump-off point and then the killing-ground again. This was one of the most complete defensive positions I have ever managed to set up in the course of a game. The illustration here shows the interlocking defence with the red dots being the kill zone that needed to be crossed at -2 FFNAM/MO before he could attack my force
This would have been a demoralising game to play as the US but I really enjoyed Peter’s jokes and enthusiasm even as D-Day was crumbling around him! This game is winnable for the US… but it needs good US luck, bad German luck and a setup that can hold the Germans off long enough for the US to reinforce in ‘depth’. As the US I would consider a deeper defence, with maybe 2x 667 up front, the rest back… The up-front 667 could force him to keep his head down, while the others could move to cover the line of attack… there is no doubt in my mind that the US should take the balance in this scenario though.