ASL20 – TAKING THE LEFT TIT
Legion defending as the Germans
Roger Whelan attacking as the US
ROAR (US:G – 34:24) – 7th November, 2006
Played with 100 VASL logfiles from 10 Jan – 19 Jun, 2007
I love Night games and lets face it – to play CGs you either gotta learn to love Night games or cross your fingers every time a Night CG Date comes up as you hope you opponent takes Idle too! I have been itching for a game and when I crossed paths with Roger on the forums I suggested we play. He wants the experience and a chance to learn some more about Night… I want an interesting game and to keep adding to the collection of Yanks! scenarios I have AARs for…
Initial Thoughts
Outnumbered 2.5 to 1 but with a bunch of lovely mines, some Wire and free foxholes this is an interesting scenario for the Germans. I have 2 ways to claim victory… either stop him getting 4 or more squads off the North edge or, if I cant stop him, then make sure I have more GO MMC on lvl 2 hexes than him…
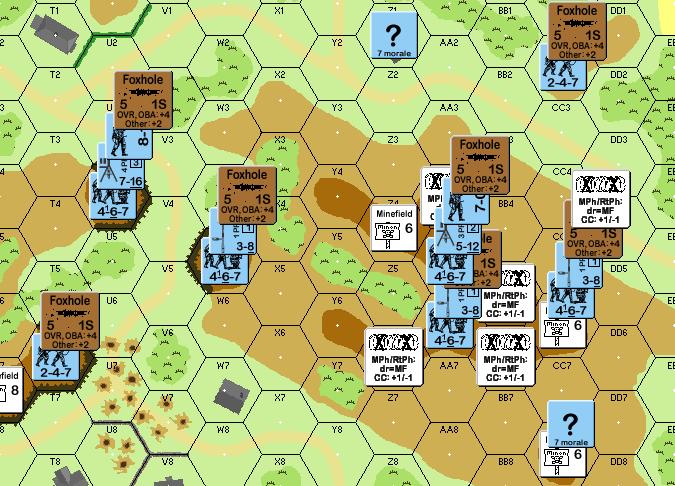
German Setup
With plenty of mines and Wire to create a little havoc I shall be setting up a hedgehog on ‘The Hill (538 – 2BB5)’. I am not too worried about him getting men off the board, I would rather hit them as they take to the level 2 hexes. To achieve this I shall be placing my HMG/MMG back to stop him going for some sneaky lvl 2 grabs, as well as ensuring that I have some FP to guard the Hill itself.
Mines – I have placed these to stop him grabbing easy lvl 2 hexes…
6FP: Z4, CC6, CC8
8FP: S7
Wire – All must be on Hill 538, I have placed them to slow him down enough for my FP to deal with.
Z6, AA4, BB5, BB6, CC6
T6: HIP 247 – A bit more FP to hold this lvl2 hex (along with the 6FP mines in CC8)
U4 HMG 467, 8-1 – HMG nest to cover the T2 road network and support the Hill defence
W5 LMG 46 – Covering the lvl2 hex here and to support the Hill
Z1 3x dummy – To make him think that I have this flank covered
AA5 MMG 467, 7-0 – The main defensive position on the Hill, rally point for AA6
AA6 LMG 467 – Holding the Hill
CC2 HIP 247 – Mainly to allow early use of Starshells, or for attacking the US rear
CC6 HIP LMG 467 – A nasty surprise, under Mines and Wire he is a sacrificial unit
CC8 3x dummy – To slow him down, this ‘unit’ is on a 8FP minefield
I am happy with this setup, I have ample opportunity to fire some early starshells and that will slow him down dramatically (at least if he doesn’t want to have his Cloaking Counters revealed). There are a few nasty surprised for him – especially with CC6 holding a HIP 467 LMG, Wire and 6FP mines! Due to the change in Routing rules at night this is bait to make him come for CC!
With 7.5 Turns in this game there seems to be a lot of time, but once those Cloaking Counters are gone he is going to either have to move slowly and safely, or quickly and take risks… either way can work for me.
US Setup
One straight line across their start row…. hardly a surprise there… with all those Cloaking Counters it is hard to see what he has and where, maybe if I ask nicely?
The Game
TURN 1
The US start their cautious movement across the board, they are trying to keep out of possible Starshell activating hexes but make the mistake of getting too close about mid-way through the move, my HIP unit at the front of the hill (2CC6) starts the game off by popping a starshell pretty-much mid-board. The US are forced to split their attack in half to avoid the illumination; though tactically I made a blunder by revealing this HIP too early.
Nothing happens in my turn, I am still under No Move and he is not risking firing any Starshells, let alone firing at me!
TURN 2
My starshells are terrible, I only get a single one which illuminated the centre of the board but also blinds me to any moves along the flanks. This will further channel him to the sides of the hill – and that appears to be his plan anyway, by the end of his movement he has almost completely bypassed my hilltop units and I am in real trouble – unless I get a useful starshell soon I have a great chance of losing this game without firing a single shot! [edit: This is where I started to erroneously think he could win just by exiting 4 units off the North edge!]
My own turn allows me some useful starshells and I have to open up with almost all my non-HIP units in an attempt to strip some cloaking counters and create an opportunity for my own men to move. The only Cloaking Counter I am able to strip is on a Dummy stack, alas…
TURN 3
Things are really not going well for me. His force is split in 2… there is a force at the top of the board and a force along the bottom edge, and I need some pretty impressive starshell action to be able to stop them. Unfortunately while I get some excellent coverage along the top edge, thereby causing him to stop or at least slow down, I have not a single Starshell along the bottom, by the end of his movement he has just a single movement phase separating him from probably victory and there is nothing I can do about it! I expose another Dummy when he enters the HIP 247’s hex (2CC2) but this doesn’t help me much – my men are just watching as he waltzes on by! Even the highly illuminated area cannot stop him as the game’s 7½ turns ensure he has plenty of time to wait for a gap in the illumination.
With the German’s turn comes little starshell luck, the units to the East of the hill end up with a bit of illumination but again the Western guys are completely illumination free, unless I can gain some Freedom of Movement, I am finished. My Prep Fire is also totally useless and my revealing of the HIP in 2CC2 does nothing to his adjacent men, so again my men are stranded with nothing in LOS. It is only the opportunistic attack against my just-fired ex-HIP unit that provides a glimmer of hope – I can now start to roll for Freedom of Movement, and the 237 which survived the attack is able to reveal 2x 666, Baz in CC.
TURN 4
I was rechecking the AAR I had written when I suddenly realised that I am actually winning this game! The VC makes it clear that the US have to have more GO MMC on level 2 hexes than the Germans; for some reason I had forgotten this part of the Victory Conditions and was giving up the ghost (funnily enough Roger also missed that part of the VC!) With this realisation I also gain a useful bunch of starshells and gain Freedom of Movement for some units – not that it matters now… he has just 4 turns to come and get me! He starts by using a gap in the illumination to run a bunch of units off-board and then tries to position his men to attack the hill, losing a HS in the process as he charges into my HMGs LOS. He is trying to assault from the East of the hill but to not lose concealment he is moving cautiously… this slows him down and will put him right on top of the Wire very soon anyway. When things turn against you it can go all the way, this is what happens for the US Commander with my first shot being snake-eyes causing an ELR break to a 666, then a dummy wanders onto the first minefield exposed during the game (2S7 – 8FP).
My turn is short and not-so-sweet… the single starshell I pop flies right away and illuminates absolutely nothing! I don’t move… now it is truly a case of waiting for him to come to me!
US Exited Units: 2x 666, 60mm MTR (2 MMC total)
US Losses: 346
German: 247
TURN 5
His turn starts off with a near miracle as one of his men only JUST misses out on a Rally… On the other hand my men discover a cache of Starshells and drop them on our own position, thus lighting up the whole of the hill and turning it into a death-trap (assuming my shots hit, which they don’t!) He moves another 2 MMC off-board to fulfil that part of the VC. The rest of his move is Advances and AM’s taking him as close to Level 2 hexes as possible.
I get more starshells but again my shots are so poor that I wouldn’t have got any results even if his men were not concealed! On the other hand the US shoot for the first time and manage an amazingly lucky hit that breaks my HMG MMC.
US Exited Units: 2x 666 (4 MMC total)
TURN 6
My man rallies immediately – what pain the dice-bot giveth, the dicebot taketh away! Mind you, that doesn’t stop my starshells going totally awry and leaving huge corridors open for him movement. Roger takes the AM option to send an exposed 666 up to the ridge line, he bumps straight into 6FP AP-Mines (2Z4) and is broken but in doing so he has released all my men from their No Move restrictions; this attacking unit ends up being CR-ed by my adjacent MMG. The US do finally claim a Level 2 hex this turn (2R5). I have done well though with a HMG shot on a slow moving Cloaking Counter (2X4) causing the exposure of 2x BAZ 666; one of the 666 is CR and they are both broken – A SAN is also generated which DMs a broken MMC (2CC1) – the next shot finishes off the HS and CRs the Squad. He Advances into 2T6 but his unit is a dummy and removed immediately.
I open up with enough starshells to provide some good targets but miss with all my shots… even worse is the loss of my vital HMG to malfunction (U4) with a concealed 666 and 3 Cloaked units right on his doorstep. I do no movement (apart from a dummy stack) as my defences are proving to be relatively water-tight.
US: 2x 346, 666
TURN 7
Things start poorly for me thanks the NVR dropping to just 2… at least the HMG squad knows what they are doing and are able to repair this very essential SW. Then my starshell supply runs out leaving me with just one (on the vital HMG position) – in the terrible NVR this gives the US a lot of manoeuvre options. He advances another Cloaked unit onto T6 and the dummy unit is eliminated – he has done this before, but the game has dragged on so long that he must have forgotten! I blast away with my HMG at a concealed 7-0, I Pin him and then fire again to ‘finish him off’ – instead I roll HOB and make him an Heroic 8-0. Question: does a pinned 7-0 who HOBs to a Heroic leader lose his Pin? I assume so. I am able to strip another cloaked unit of his concealment thanks to a PTC. I have one of my Dummy stacks eliminated, but this is not a bad thing, in taking this unit out he has wasted the movement of a HS that could have tried to take to the Hill.
My Starshells are absolutely terrible again. I get a single shell and all it manages to do is blind my HMG position!
TURN 8
It is the US last turn and they have to crash onto the hill… again I am not well-favoured by the Starshell Gods; something particularly worrying considering that the NVR has dropped to 1, but in the end I do well enough to have almost the entire level 2 area bathed in light… now he is going to have to face the music and hope he can get lucky. Mind you, with him really only needing to Advance units onto the hill if he has the numbers close enough under Cloaking Counters then I might be in trouble! I have done the maths and it is just a single HS that puts me ahead in the MMC count!
Firstly, and very importantly, the US fail their SR attempt; this is to be expected, but a really lucky DR could have given him another MMC. His first move is to rush a HS to the hill, he draws MMG fire (2AA5) and ELR breaks, but in the process I lose ROF with my MMG. He does make it to 2R2 with his Heroic 8-0 leader and thus he has proved that 2 hexes on the hills (R2, Y4) are free of mines but he doesn’t move anymore, knowing that he can Advance safely now. My Defensive Fire scores a NMC on his ‘most-stacked’ hex (2Z3) and the 2 Cloaking counters reveal 1 dummy and 1 with a stack (8-0, 2x 666, MMG(dm) Baz) – the NMC results in the leader breaking and then one of the 666’s going Berserk – which means he is no longer Good Order and is thus useless for claiming territory. Roger finally decides to attack back in Advance Phase (why not he has guys exposed and if he can break my guys then he might have a chance of winning); he reveals a cloaked stack in 2X3 (2x 666) and fires, but the shot is a miss which calls a Hot SAN – the Berzerker is CRed by the shot as is a broken HS when RS comes up doubles and another Hot SAN is rolled – not that this will have any bearing on the game now.
With that we are left with Advance and there is obviously only a single Cloaked guy with any ‘real’ units – this is the Cloaked Counter who had used a gap in the starshells to get to 2R5. I get a bit of a shock when they are revealed as 2x 666, MMG(dm), HMG(dm). But I am sure he will be disappointed with my HIP HS being revealed in 2T6 – as this guy would have been easily wiped out if he had attacked him! With that the game ends and the counting starts…
US Losses: 2x 346
Germans on Level 2 Hexes: 5.5
US on Level 2 Hexes: 5
The Germans have more MMC on the Level 2 hills.
GERMAN VICTORY
Conclusion
Obviously a large part of this game being lost was due to Roger misunderstanding the VC. And this happened in part due to the extreme length of time that it took to play this game. 6 months for a log file game is about the average time it takes to play a whole CG date. I am sure that if he had not lost sight of the need to take the hill then I would have easily been beaten. Even though I too lost the plot for a while there, as the defender my plans were already set, so in the end it cost me less.
This scenario is pro-US but to win they need to co-ordinate their attack with some supporting fire as well as moving Cloaked troops. It is interesting to note that the US hardly fired at all through the whole game, and while Night does require a lot of stealth and careful movement, a bit of fire might have helped keep the German’s head’s down. Maybe part of the decision not to fire was due to the high German SAN (6). Certainly as a US player I would not pull the units off the North edge until they had no more targets to shoot at.
In general I was pretty happy with my defence, though next time I would consider ways to slow his movement across the flanks as relying on Starshells is too risky. Mind you, I lost track of it towards the end there and should have left my safe foxholes to force him to face more fire as he Advanced onto the hill too easily. Also isolated units (the HS on the 2CC2 Hill) were very easily swamped and if he had known how lightly defended the 2T6 hex was I am sure he would have swallowed that up in no time at all. The 2AA5 position was a great on for holding off a frontal attack but near useless for an attack from the rear or the flanks – next time I would put him in 2Z4 or 2AA4.
My starshell rolls were generally very poor… but that is a Night game for you… still, by the games end I figured that my leaders only managed to score starshells at or under 50% of the time, which is pretty poor considering their 66% chance!
So, there we go… it was an interesting game and despite the very long time it took to play it was fun. I am still shocked at how close it came to be in the end, but that really captures the essence of Night for you… it is so hard to know what is going on when the enemy keeps his units Cloaked.