ASL25 – GAVIN’S GAMBLE
Legion defending as the Germans
Peter Kossits attacking as the US
ROAR (US:G – 16:18) – 26th November, 2006
I have played this scenario before, but it was a long, long, long time ago… I just remember my Germans massacred the US troopers as they floundered in the water… since I am playing the Germans again I hope that ASL history repeats itself! I will concede one thing though… my ASL knowledge in those days was a LOT different to now… I am sure that there were many mistakes made by me and my opponent which led to the game being so one-
sided.
Initial Thoughts
I can see why people don’t play this scenario, there are a lot of SSR and it uses everyone’s least favourite chapter… the dreaded Chapter E. To be honest, I love chapter E, it is what gives ASL it’s flavour.
In this scenario we have the US troopers, straight out of “A Bridge To Far” (the movie, not the HASL), attempting to cross a river to capture the Waal Bridge in the face of some very stiff German resistance. The river crossing is made in paddled Assault Boats, the paddlers are inexperienced (pre-move dr: 5= half MP, 6= no move) and the current is heavy… this could be a nightmare, especially since the boats move at only 2MP. The victory conditions specify that the US must exit 20CVP off the map, with the North-East side of the map (opposite to the flow of the current) being worth 1.5x CVP.
To achieve this the US have 26x 747, 9x 337 and a whole slew of leaders… (I would make Robert Redfern the 9-2 myself), they are also allowed to set up IN the Assault Boats, which means that their initial placement is Cloaked to my men… we don’t know what is in the boats we are shooting at. To support the assault they have 4x M4A2 and an 81mm MTR. The other big help they have is a SMOKE screen of +3, which decreased by -1 each turn until it is gone and which also gets patchy from the beginning of Turn 2. If the US troops do make it to the other side they automatically become Fanatic on dry land.
Against this we have the Germans force, and it is not insignificant either… The main piece is their 88L FlaK 18 which will assist the SMOKE screen by turning some of the M4A2s into burning wrecks. I also have 2x 20L FlaK 38 with an IFE of 6 (ROF 3) and an 81mm MTR of our own – if we manage to hit any boat with the Vehicle or Infantry TH line then that boat is automatically destroyed, even with just a 20L… I also have 7x 548, 5x 447 and 9x 436 but am light on leaders and don’t have the traditional 9-2. SW are HMG, 2x MMG and 5x LMG as well as a potentially devastating 80mm OBA with field phone… ouch if that hits, even with water halving the FP (E5.5) that is still a ‘7’ to get a result… i.e., 50% of the time… Harassing Fire only needs a ‘5’ for a result!
This has all the makings of a slaughter… and in real life it was. This scenario is one of the most heroic actions of the whole Market Garden battle as the US paratroopers battled as hard as they could to come to the aid of their British counterparts. Peter chose to play the US and I salute his courage…
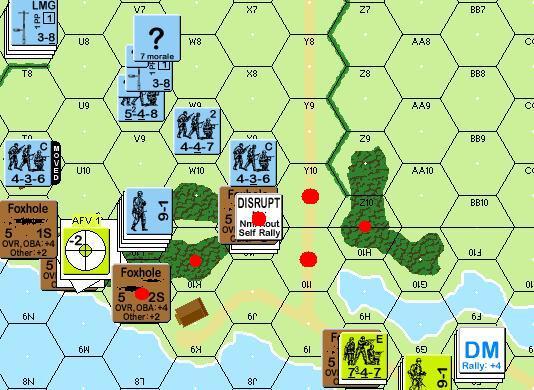
German Setup
7C10 2S Foxhole, 2x 436
7D7 436
7G10 HIP 81mm MTR 228
7H8 1S Foxhole, 447
7J10 1S Foxhole, 436
7L9 2S Foxhole, 2x 548, LMG, HMG, 9-2
7M10 1S Foxhole, 436; HIP 20L AA 228 – AP for boats and HE CH attempts for infantry
7N10 1S Foxhole, 436
16S5 1S Foxhole, MMG 447
7P10 HIP 548, LMG, 8-0, Field phone 6+1
7Q10 1S Foxhole, 447
16N10 1S Foxhole, 436, 8-0
7U10 HIP 88L AA 228 – AFV killer and stack suppressor
16L7 1S Foxhole, LMG 548
7V9 436
7W10 1S Foxhole, 447
7Y9 MMG 548, 436, 8-1
7Z8 1S Foxhole, LMG 548
7AA9 1S Foxhole, 447
7FF9 HIP 20L AA 228 – AP for boats and HE CH attempts for infantry
7FF8 1S Foxhole, LMG 548
I have gone for an up-front defence. My rationale is that while he is likely to be attacking with a view to landing in the 7D7-7R10 region, he might get tricky and attempt to land much further down (I know I would!) so I have to spread my men out. I am going to hope that the SMOKE screen covers me as much as it does his boat, for this reason I have set my men up right on the waterline. I might have sold myself short on the backline of my defence, but I hope that I can stop him before he even gets that far!
US Setup
7DD3 2x MMG 337, 8-1
7R1 50 Cal. 337, MMG 337, 9-2 (looks like Robert Redford doesn’t wanna get his feet wet)
7D2 2x MMG 337, 50 Cal. 337, 8-1
I can see the thinking… suppressing fire might be valuable in this game.. but that is half of his leaders (including -4 of the -5 mods available to him) and 3.5 squads stranded away from the action and the mods for them are the same as for me +3 in the first turn etc. With 4 x M4A3’s available (7O3 – stacked with 81mm MTR; 7L2 – stacked with 60mm MTR; 22Z0; 7F2) and the 3 MTRs (the other 60mm is in 7U2) I would have thought he already had enough FP to make me pay for shooting at the boats.
The boats themselves are spread all along the Eastern side of the board… from row B-Q… this is naturally to make sure he doesn’t drift too far down the river… I am surprised he didn’t stick some boats around the AA row… the river is narrowest at this part and surely some men on the opposite bank is better than floundering in the water. If I recall the last game had a similar boat disposition… the width of the river here (4 hexes at the narrowest, 9 at the widest) gave a lot of opportunity for mishaps with the Inexperienced Paddlers.
The Game
TURN 1
German hopes of holding off the US attackers are dealt an early blow with the Disruption of a Conscript MMC… I guess his death stars are something to worry about after all… at least the massive SMOKE screen is affecting his shots as much as mine, most of his attacks miss terribly. His men bravely jump in the boats and then the mess begins… boats are floundering all over the place like ducks in a shooting gallery. My OBA is able to place a SR, but it lands over on my side of the river – at least he will take some hits from this next turn though as the area I chose (essentially middle of the map) is ripe with targets. I lob some MTR rounds at his 9-2 death-star (7R1) so that I can hit him with some more SMOKE a little later in the game but miss and even lose my ? in the process… this is repeated when I try to do the same with an 20L AA – not good; my final 20L AA Gun takes a shot at this same unit (want to scare him into moving away) and manages to make it to -2Aqr and keep his ?. My 88L opens up at an M4A2 (703) and turns him into a burning wreck which will also obscure the Fire of the 81mm MTR stacked in this hex; I did not get ROF, but I did not lose ? either.
The first action of the German turn is the OBA and it comes down with a pop not a bang… it drops off-target, managing to eliminate only a single boat (7K3). Unfortunately the rest of my shots are pretty useless too, I try to hit the main death-star with SMOKE but someone forgot to pack the shells. The only bright note is my 88L killing another M4A2 but he loses his ? counter in the process… thus-far the boats have been pretty-much un-molested. Peter uses the chance in Defensive to dismantle his 81mm MTR, it is pretty useless sharing a hex with a burning AFV – and who knows if that wreck will turn into a Blaze. His other MTRs all start using my 88L AA for target practice but only succeed in calling a hot SAN result which CRs the occupants of a boat (E5.54), an M4A2 repeats this when he fires to aqr, this time the warm SAN does nothing due to it being a Pin result on the same target. Advance Phase is not kind to the US with a boat drifting into the OBA and getting eliminated
US: 2x M4A2
2 Boats Eliminated (contents unknown), 2 Boats CR (contents unknown)
German: 236
TURN 2
The SMOKE screen is affected by the appearance of a 3 hex wide gap, this is centred on Row ‘o’; it also drops down to a +2 LV hindrance. This gap is not overly useful to him, but does help me slightly. Unfortunately I suffered a big reverse when my 88L AA crew was broken by a well-placed 60mm MTR shot… hmm, not good. It happened early on too which left plenty of time to direct FP enough to kill the crew… hmm… not good at all… in fact the US (who haven’t been able to hit all game) have gone on a bit of a ROF rampage this turn with almost all their weapons getting multiple effective shots.
The OBA restores a bit of German pride with it falling right on a cluster of 4 boats taking out 2 of them and then a 3rd when a boat drifts into it. Everything else misses easily with the exception of the MMG/LMG stack in 7L9 which goes on the German version of a tear which ends up eliminating a boat, Pinning the 9-2 leader and breaking both HS in the vital 7R1 hex. I hit this hex again with my 81mm MTR and this time am able to break the leader and eliminate both HS thereby taking out a lethal stack; the MTR then switched his fire to a pesky 60mm MTR (7U2) and broke him into extinction as well. A burning M4A2 causes a blaze in his hex (7O3) and that destroys the 81mm MTR left behind here when his crew had to rout away.
Unfortunately the Germans lose OBA due to a Red chit draw… bother… things are not going to plan! This is not helped when I malfunction an LMG too. I gain quite a few Aqr’s (on a 60mm MTR crew, and the 20L AA on 2 separate boats) but no further kills. I start moving some units over to the Eastern side of the board as this is where the majority of his forces will be landing and will be channelled along the road at I9. When Defensive comes along I suffer another setback as he scores a 2MC on my 81mm MTR crew from an M4A2 shot, this breaks them easily, they are finished off by MG fire from the 2x MMG, 50cal, 8-1 death star in 7D2.
US: 3x 337
4 Boats Eliminated (contents unknown) – 6 Total
German: 436, 228
TURN 3
The SMOKE screen drops down to a +1 now. While my Germans are not having much luck, the same cannot be said for the US! For the 2nd turn in a row a 7MTH with +3 shot by one of the M4A2’s manages to hit; my 8ML crews have yet to pass even a NMC, let alone the 2MC results that often come from these shots. He has a MG group go on a ROF spree as my men go on a MC failing spree (with the exception of HoB result that results in a Berserk 447 (7H8)).
His men finally beach on the other side of the river and are met with some shots that manage to break one of the Amis and then cause it’s elimination through Failure To Rout – it was adjacent to a Berserk Unit, one that could not take a prisoner, so does this still invoke A20.3 No Quarter?. I had rushed a conscript crew to the un-manned 88L AA and they are able to zero in on an M4A2 and take it out but my 20L AAs are struggling to prove their worth as the only non-broken one fires and misses its floundering target. He reveals a 747, 8-0 in one of his beached boats and enters my Berserkers hex for CC to eliminate my unfortunate 447.
Things are not going so well for the poor German defenders, the new OBA comes down right on top of the killer stack – but it rolls so high that there is not even a PTC roll! ARRGG! At least an AA Gun is finally able to score a kill, it hits a boat, and that means automatic death. My 88L fires again but misses, there is not much chance of a hit, but the -2 Aqr on his last deathstar is going to have to make him think about staying or going. I continue moving units around to the vital ‘breakout zone’, he had another 747 broken in here leaving about 5 units still able to move, not enough to win the game, but enough for me to need to do something about them; by the end of this turn I shall have enough FP on the choke-point hexes of this spit of land to make movement out of here very hard indeed (assuming there is not another super-ROF tear from the deathstar!). His Defensive Fire cleans up the 2x 436 (7C10) who were coving the ‘spit’ of land, and then he goes on a firing spree at the already broken 228 who was crewing one of the 20Ls; this I cannot understand, I have adjacent to this a much more important 548, HMG, 9-1 – surely the amount of lead he has wasted firing at an already broken unit would have been better off being flung towards these guys… they are going to be the central pivot of my initial layer of defence (the J10 woods). He doesn’t even fire his deathstar at them instead he uses them to further CR the already badly smashed up conscripts (7C10)!
Movement off of ‘The Spit’ will be difficult indeed
My Advance phase allows me to set up a strong defensive position to cover the possible movement of any troops off of ‘The Spit’ they will have to either brave the woods (2x 548, LMG, HMG, 9-1) or cross open ground in front of a number of MMC LMGs and a MMG position on the elevated road. Advance for him sends another boat careening into OBA where it is CR-ed. He now has his force effectively split in 2; there is one of 6MMC landed on the ‘spit’, another set is still in 10 boats way over on the other side of the river.
US: M4A2, 747
2 Boats Eliminated (contents unknown) – 8 Total. 1 Boat CR (contents unknown)
7 Boats beached (7×747; 8-0, 9-1; 2x Baz) – 7 Total
German: 447, 436, 236, 228
TURN 4
The US turn begins as the SMOKE screen finally dissipates leaving us both with a clear field-of-fire for the first time this game. His initial Preps are still at the broken 20L AA crew – though now there is little else to shoot at, he also finishes off the 236 broken in the last turn. His boat movements are still towards The Spit… If his units there are unable to clear my defenders out (and time-wasting is on my side here) then this is going to be a massacre. US movement along the narrow land is dogged by fire leaving him with one 747 PINned and another 747 broken but then it gets much worse. When a 9-1 and 747 enter a 1FP RF hex they suffer a NMC result which results in them both rolling Boxcars – the 9-1 is wounded, the 747 is CR-ed, then another 747 enters a 2RF hex and also suffers a K/ CR which leaves the remaining HS Pinned! He lucks out when my 16FP OBA fails to even Pin his last MG stack, but then it all goes bad again when the 88L AA (manned by conscripts) scores a hit that breaks the 8-1 and the 3x 337 HS in this stack. This has been a horror turn for the US and he is looking susceptible to a German counter-attack at this point. Peter gets some revenge when he shows a disrupted conscript No Quarter.
The dice are being fickle this game, my first roll of the new turn eliminates one of my 20L crews due to Fate. My OBAs FFE:C is converted to a SR and moved, I am going to use it to hunt for some more of his boats. My move brings move of my men to The Spit area, I now have it cordoned off nicely and he has very little chance of making it out without facing devastating firepower… I shall not hunt for him, I will be happy just to make him try to breakout or waste time edging closer. Peter is still taking shots at my Gun ‘crews’ (2 of the 3 are now manned by conscripts) and they take a terrible beating both conscript squads being broken – in part due to C11.2 which states that Squads do not use the +2 for emplacement, one of those conscripts is also CR-ed by M4A2 fire. One of his broken HS have managed to get to the 16Z10 woods, this means that he has a chance to run for the board edge that gives 1.5x Exit VP but I am not too worried.
US: 2x 337
German: 436, 2x 236, 228
TURN 5
As the turn passes it is obvious that Peter wants to land the rest of his men on The Spit… I have half a mind to allow this; it makes my job so much easier. To welcome him to these shores I drop my OBA right slap-bang in the middle of the river hexes he must cross to approach; eliminating another Boat and CR-ing another (he suffers another CR when he drifts into the OBA in Advance Phase). I have little other effect on him this turn. I had sent a Conscript to 16Y8 to cover the road along its full length and to hopefully make it to the 16Z10 woods, unfortunately his sole remaining AFV broke him in no time; these conscripts are dropping like flies.
He starts my turn with a frenzy of successful rallies; I have been lucky that his men have stayed broken so long, on my side of the river they are Fanatic and yet most guys are staying broken for ages. I had a single conscript rally, but he is too far away from the battle to be of much use right now. My Prep is a bit of a mixed bag, I relocate the OBA to try and hit a pair of Boats but it drifts meaning I can only attack 1, and that attack is a miss… Then my other weapons and men start to do alright; I Pin one of the pesky 60mm MTR crews with my 20L AA, then my 88L AA gains -2 Area Aqr on the 50 cal hex… ensuring his now rallied MG units are not going to be going back in there, finally a 548 LMG is able to kill a Boat while another is CR-ed to extinction. My final piece of luck is a pop-shot from the MMG on the elevated road (16S5) who is able to break a 337 (16I10) – unfortunately this will allow him to Rout to the 16Z10 woods, which takes him closer to his objective. He keeps blasting away at The Spit’s defenders managing to CR a conscript but another Boat blunders into the OBA and is eliminated.
US: 4 Boats Eliminated (contents unknown) – 12 Total. 1 Boats CR (contents unknown)
German: 236
TURN 6
Thankfully the US Rally woes continue; the vitally important Self-Rally attempts are not working for him! I lose another conscript who was manning the 88L AA Gun to a MTR ROF tear… the US MTRs have been great for him mostly due to the many woods hexes that the Germans are forced to setup in to get LOS to the river. His moves have played into my hands with 12-hex range shots breaking a lethal MG stack (8-1, 2x 337, 2x MMG who were FFNAM/MO in 7EE3) and wiping out an 8-0 leader as well as CRing a 747 through FATE while leaving the HS Disrupted (7G8) – his units on the German side of the river have suffered terrible luck. He attempted to rush 2.5 units and a wounded leader through the vital 7I10 bottleneck hex, this left 1.5 squads Pinned, but did create a chance to actually make it to the open terrain past The Spit. OBA killed another boat and ensured that yet another will have to drift through the FFE; another boat is killed by lucky LMG fire – his boats are still getting slaughtered. The low-light for me is a K/2 attack which leaves the only unit of mine that would have been clearly able to cross the 7I9-16Y5 road as a broken 237.
Now I am the one with the terrible Rally luck, not a single unit rallies for me; at least I can rely on my OBA which smashes another Boat. I open fire with my elevated road MMG (16S5) and he manages a hit that yet again Fate’s out to CR a 747 and leave a Disrupted HS behind, he is immediately eliminated by the next shot… a bit of dice-bot magic. I send more men over to cover the exit point of The Spit, next turn I shall have a string of units able to fire upon the exit road hex and the adjacent Woods hex.
US: 747, 337, 8-0
3 Boats Eliminated (contents unknown) – 15 Total
1 Boat beached (337) – 8 Total
German: 237
TURN 7
Unbelievably Peter’s men again fail to self-rally… don’t forget that they are Fanatic and in woods with a 7/8ML! His DRs which have been poor on the German’s side of the river actually get worse and even his boats fail to move much. My attacks stay about the same too… reasonably lethal; an MMG toting 337 gets eliminated when he attempts to run across a road on the South bank and another 337 is pinned when he attempts to leave The Spit. My OBA also scores another black chit (making it 5B:1R) to rain down even more death on his boats. I do not see the US as having any chance of winning this game now.
I blast away with little effect… his men are either too far away or their Fanatic bonus has allowed them to escape their just-deserts. At least he managed to rally a unit or two this time! I have started sending a few men towards the elevated road area to try to cover the escape zones for the US… just in case their run across the open ground in front of my 16S5 MMG doesn’t get enough of them… one of those units (a conscript) was gunned down by the newly re-crewed 50 Cal (7R1) – this unit has reasonable LOS to any German units trying to switch his defensive axis. The rest of his shots are just the usual firing away at Gun crews or broken units. Peter has built up enough men (in 7G10) to make the games end reasonably close, but he will have to brave 2 turns of movement in OG to get to his closest exit point – he must take his men to the 1.5x VP exit points to give himself a chance.
US: 337
2 Boats Eliminated (1 contents unknown, 1 empty) – 17 Total.
German: 238
TURN 8
The Rally woes for the US continue with there still being a vital HS un-rallied. If he is going to make a run for it he needs as many men as possible to swamp my defenders. He does make a limited run for it… he sends 2x 337 off down the far Eastern side of the board… I hold my MMG fire thinking that the 747’s are coming next, but he doesn’t move those out of LOS cover! Tricky fellow! Other events of the turn are my 88L malfunctioning because of my conscripts inexperience as a crew and my 20L AA scoring 4 CH’s on a pesky MTR and 9-2 with none of those attacks actually causing more than a Pin! Peter lands another boat and a 747 elatedly kisses the dirt – my Germans are going to make him eat it soon enough!
It all starts off joyously enough with a Rally turning a conscript HS into a 237 and giving me a Hero as well from HOB! I am then finally able to unveil the HMG 9-1 as they attack a unit that the US has obligingly put in LOS of 4 defenders; unfortunately while I am able to break them I lose a LMG in the process – the Fanatic bonus makes the broken US 747s very difficult to reduce. With the final boat being eliminated by some MMG sharpshooting I am now free to concentrate on the race for the exit area… and as a result I move every single free unit I have towards the East but it is of no concern now… the win is mathematically impossible for the US with just 11CVP of non-disrupted units on the North of the river even the 1.5x VP area is not enough to score a win now… should he succeed in rallying and exiting the disrupted unit that is not going to change the maths… this is a win to the Germans.
US: 1 Boats Eliminated (1 contents unknown) – 19 Total – I must have got the count wrong somewhere!
1 Boat beached (747) – 9 Total
TURN 9
Unless he wants to have his men stranded he has to make a rush for the exit edge now. The HS he had moved last turn make a run for it, one of them is Pinned on the Elevated road by a long-range shot from a 447. With time running out he has no time for subtlety; the 667 who beached last turn Double Times it for the safety of the 16Z10 woods but is Pinned in the open by a 2MC, his Fanatic bonus is really saving his bacon (this unit Voluntarily Breaks to get to the leader in the Woods)!. When Peter starts to make a run for it from the safety of his woods with the rest of his units I am stunned when my MMG shots go wildly astray… then my LMG hits at long-range (both shots taken from 16S5) but the target passes his MC with style!
For my turn I am now only focussed on getting as many men back as possible to influence his units trying to escape… He wants to make the end score respectable, I want to stop that! I go through a blizzard of fire from the lethal MG stack (now in 7C3) with an 8-0 LMG 548, my MMC break, but no great loss. As it is I have 6 different units/stacks that are able to influence any moves he makes to try to get to the extra VP exit zone, though he could just wander off-map from his current position to secure some exit points
TURN 10
The US make their Prep shots, including using a just-rallied unit in the 7G10 woods… that was a surprise… I would have tried to get him off… as it turns out he scores a useful CR break against one of my LMG units on the Eastern side of the hedge. Actually Peter’s men get a lot of hits on my guys but all of a sudden they are passing MCs with ease… quite unusual in the context of this game. My first shot is a poor omen with and LMG breaking down immediately! He actually gets kind’a cute and moves one MMC away from the board edge to draw my fire, but I don’t worry too much about him… another guy (747) gets to the top of the elevated road but is immediately Pinned by leader directed HMG fire, a 337 that follows is also broken and saved from ELR only by his Fanatic bonus.
And it was here that the game ended with the US getting 3CVP off-board.
German: 238
The US are unable to exit 20VP of units.
GERMAN VICTORY
Conclusion
The first and most important point I want to make is that this scenario is certainly winnable by the US… I started setup with the idea that this was going to be a white-wash… and it could have easily become a US victory. The German player really needs to be aware of the difficulty of hitting and killing those boats (assuming the US player foolishly leaves the defender’s Guns and Infantry unmolested), and then aware that once on the other side the US troop’s Fanatic bonus makes them hard to break and even harder to CR.
OBA won this game for the Germans, there is no doubt about that… the attackers in-river losses were about 75% due to the ‘King of the
Battlefield’ with 1 boat being lost to an AP hit from a 20L AA and another 4 from LMG or MMG fire. I was very, very lucky with my missions, if I had red-chitted early then this game would have been a US victory for sure due to my poor troop deployments.
I made quite some mistakes with my setup. I really did not explore the options available to me and I assumed too much about being able to stop him in the river… as the game turned out I could have set everyone back and left the river to just the OBA! Peter on the other hand had obviously considered the fire coverage that he would be needing once the game got going… it was just lucky for me that once the US on the other side of the river cannot see any Germans then they are reasonably useless, though they do influence any sideways reinforcement. I was also lucky in the US focussed on hitting Gun crews rather than my MGs and leaders… with the amount of FP he had available and the number of shots he could have taken I was in some danger of taking serious losses.
The landing options for the US are limited and in most cases the attacker will head for The Spit. The difficulties this presents for a breakout are obvious but don’t forget that a broken US unit will often be able to Rout into the 16Z10 woods which still serves to get them out of harms way. The Germans should position units to cover these woods from both sides (why not from 16FF10), the US should position units on the other side of the river to smash those defenders. Other options for landings include further down the river, though this does take away the 1.5x CVP exit option and also makes drifting boats more likely to fall off the edge of the world. Even if the US try for The Spit the Germans are still going to have to spread defenders over the whole of the board… I suggest setting a core of them up behind the elevated road to allow them to reinforce quickly and without interference.
The defender’s Conscripts are extremely brittle and Disrupt at the sound of a loud cough… DO NOT base a serious defence on these guys… they might be useful up closer to the river’s edge – as foxhole creators. Or they might be useful behind the elevated road as a ‘Fire Brigade’ though their limited range and movement will be a hindrance to them in this role. On the other hand, and as previously noted, the US Para’s are very hard to crack with the Fanatic Bonus, especially when broken due to their increased Broken Morale.
Please do not discount this scenario because of the Chapter E rules. they are not as hard as they seem and you would be missing out not only on a great scenario but also on understanding a version of the difficulties faced by some very brave paratroopers in Operation Market-Garden.