ASL3 – THE CZERNIAKOW BRIDGEHEAD
Legion defending as the Soviets
KC attacking as the Germans
ROAR (G:A – 67:72) – 18th November, 2007
Played with 97 VASL Logfiles (Nov 2007 – April 2008)
Fresh from his first victory against me KC wishes to again fight in the city, and why not… when you are on a good thing and climbing that steep learning curve so quickly why not stick with it! We are playing another Beyond Valour scenario and I have a memory of attempting to play this nearly 18 years ago, but not getting too far into the game as my opponent was tediously slow! I know that wont be the problem with KC and me, so game on!
Initial Thoughts
What an interesting game… the Germans have to fight their way across a canal and through Bd 20’s dense city environment to get at least 20FP worth of forces onto Bd. 8. Against this is a nearly 2:1 force of Russian 447 and Partisan 337. As usual the Germans have really excellent leadership and SW; they even have 228s to man their HMG and 2x MMG but the difficulty for them will be capturing a bridge fast enough to stop themselves being swamped by reinforcing Allied forces.
On the negative side for the Allies is Ammo Shortage for the Partisans (though they do have Mol and Sewer Movement capability) and the fact that the Russians must make a NMC (with all the possible ramifications of that) at the end of the German’s first Rally Phase… this could lead to disastrous holes in the defence.
This game has 10 turns available, so the Germans do not need to rush, they can use their superior FP and leadership to take out the Allied forces who are arrayed against them.
Allied Setup
I have 2 armies to setup, Partisans and Russians.
Russians
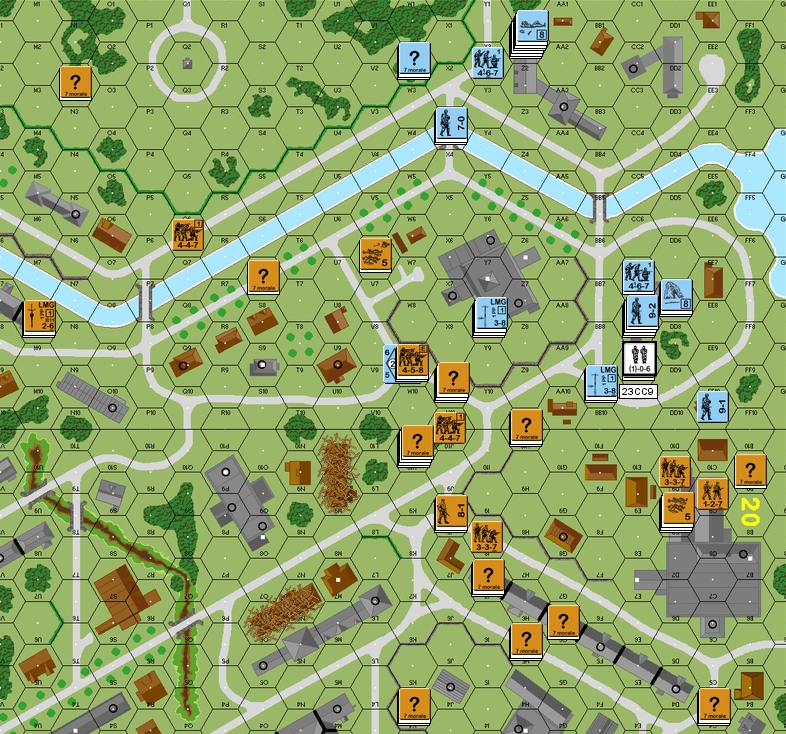
The Russians must start on Bd. 23 with a maximum of 1 MMC per hex. After the German Rally Phase all the Russian MMC must make a NMC and I have noted the results of those rolls next to them.
447: F4, G6 (pin), H5 (pin), M8, N9 (broken), Q9, W6 (Hardens to 458), X6 (broken, ELR), Y6 (broken), Z6 (pin), Z7 (broken), CC7 (broken), CC8 (pin)
7-0: Y7
LMG 447, 8-0: O10 (broken)
LMG 447, 9-1: D6 (broken)
Obviously I have tried to cover the bridges, these are going to be the weakest points of the German attack. He will have to choose a bridge and then try to hit the defenders while crossing with enough men to force the issue. While doing this I can move in with as many forces as possible.
Partisans
The Partisans start on Bd’s. 20 or 8. I have placed all of mine on Bd. 20 to start with.
C10: 337
F9: 2x 337, LMG, 9-1
J7: HIP 337
Q9: 3x 337, 8-0
R8: 2x 337, LMG, 8-1
X9: 337
Z4: HIP 337
AA10: 337
My Partisans have been stacked with leaders to give them as much movement as possible. This will allow me to get them to wherever the Germans anticipate breaking though.
My plan is simple: Hit the Germans at the bridges and try to cut off any crossings. Once they are across it is going to be much more difficult for me, so I need to do as much damage, and waste as much time as I can in these first turns. The NMC to start the game does put the onus on me to make some good DRs, but he must set up for his entry before he sees the DRs, this means that at least he cannot take advantage of a collapse in any one sector (unless he has a crystal ball!)
German Setup
He is not being subtle, KC has set up to hit the BB5 bridge hard!
P4: 2x 467, MMG 228, 8-1
X1: 2x LMG 467, 8-0
Z1: 3x 467, 7-0
Z2: 2x 467, 8-0
AA3: 3x 467, 8-1
BB3(0): 3x 467, 2x LMG, 9-1
BB3(1): 2x 228, HMG, MMG, 9-2
The Game
TURN 1
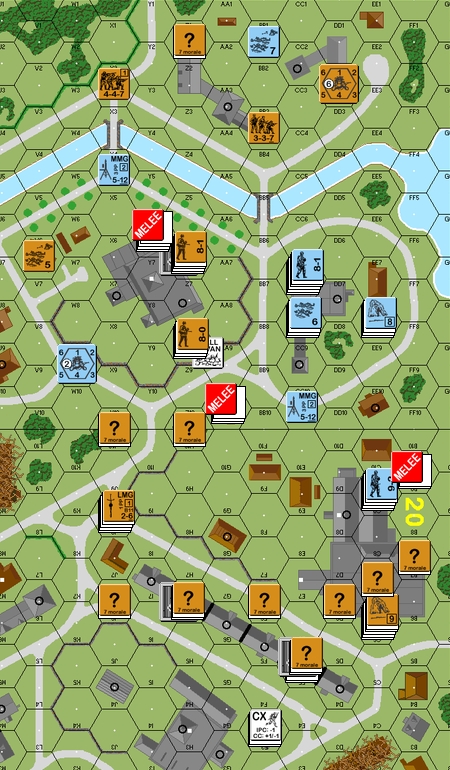
I do my NMC DRs as per SSR2 and I don’t do as well as could be expected (33% Pass, 46% fail 21% Pinned), I end up with all of the most important bridge’s defenders failing or Pinning (60% fail, 40% Pin). This gives him a huge advantage should he decide to either shoot or scoot across. He shoots and smashed my 9-1, 2x 337, LMG stack which puts me in a terrible position. KC is able to send a 467 straight across the X3 bridge but it is broken on the other side by SFF; a follow-up 7-0, 2x 467 has both 467 broken as they cross the bridge with its -1TEM. On the other hand he does get 2x 467 across the now almost totally undefended BB5 bridge but suffers some Pins and a Broken 8-1 too and this ends up blocking movement due to the overstacking problems. My Rout allows me to try to get men back to where they can rally for at least his next Player Turn.
I have only a single shot, at his overstacked hex – and that is a total miss. Movement is attempting to get as many men over to cover the breakthrough bridge as possible, though I also try to keep a presence on the other bridges as well as send a few MMC over to the other side of the canal on the unguarded bridge… I want him to feel under-pressure and choose to either counter this mini-attack or to leave broken units behind to be eliminated. My men are so scattered though, it will not be until my next player turn that I can start to put up a serious defence. Unfortunately it is all a disaster again, his 12FP and 16FP shots would take some effort to miss and my men fail their 1MC easily, even the ones that pass are Pinned making my defence much more difficult next turn.
TURN 2
My Rally Phase starts bringing some of the troopers back but it looks like my bridge defence is sure to fall this time, thus allowing him to flood through. He scores a 1,1 SR result to gain an extra leader, thankfully it is only a 6+1. His Prep Fire is useless, which is a huge relief, even though he was mostly shooting at dummies. Movement doesn’t go too easily for him either, edging through the buildings is not a problem for the Germans, but when he tries to move some guys off of the bridges and into my lines via the roads they suffer from the poor TEM and all end up broken. After this though he has a free run and by the end of his Movement he has about 50% of his force across the river in the 23Y7 and 23 CC7 buildings. I lose another 447 to an ELR break, but I think I might have bought enough time to start to hold him off a little.
My Rally Phase brings me up to nearly full strength and again I move as many men as I can over to to cover the break-though. I flood more men over to cover the Bridgehead and to make sure I can also watch against any sudden changes in the direction of attack. Unfortunately one of the few units I had to move through open ground got caught in a good MMG tear and was Eliminated. Then KC shows what a bully he is by picking on poor Broken Squads – has he any mercy in his cold, black heart? I am able to kill a 467 in CC, but in doing this I risk being seriously bypassed by his units though the 23Y7 building, he gets revenge by killing one of my CC 447s too.
Allied Losses: 236, 237, 2x 447
German Losses: 467
TURN 3
I am disappointed to lose a dummy stack to an illegal shot, I lose another to a correct shot too. This has shown him that my front line facing down the 23BB5 bridge is an empty-threat. His men try to move forward but continue to suffer from Broken or Pinned units clogging up movement through over-stacking. By judicial use of terrain black-holes and knowledge of the few places he can cross the river I am able to hold off his massively superior force with just a few units (and the -1 Bridge TEM). However I cannot stop his men who have already crossed and they are moving slowly but inexorably forward. He throws a whole Platoon into CC to try and kill a 447, 7-0, and succeeds with no loss, but in doing so limits his ability to interdict my approaching troops.
The slow escalation of his attack and the positioning of his men in CC has allowed me to really bring in all the troops to severely lock down his attack. A lot of my defensive positions are smoke-and-mirrors though; I am using a LOT of dummies to try and create the impression that I have more of a defence than I do. As it is, I have been able to cover most of the ways he can exit the buildings he holds on my side of the river.
Allied Losses: 447, 7-0 (236, 237 Surrenders 6x Dummies removed)

Most of the concealed units are Dummies
The German attack is stagnating as they have little problem in the buildings but face multiple fire when they cross the roads.
TURN 4
The Germans really try to move forward now but KC is starting to suffer from a common problem with newer players on the attack. Despite there being a fair amount of time he is trying to push forward while still leaving quite a number of men way back in their starting positions on the other side of the canal. This has led to the initial units suffering all the Defensive First Fire as there are no supporting troops to put me under threat. He has also made the mistake of moving men in stacks, which is a recipe for disaster in this case as he must cross Open Ground to get to me; this resulted in an ELR CR against a unit in a stack of 3x 467, 8-1 who moved in the open – even at long range I was able to smash this stack and a number of other units. If he had waited a turn he could have pushed me back with accumulated force; live and learn.
The Allies are in a strong position for the moment, but the placement of his 2x 228, HMG, MMG, 9-2 right up near the front lines is a worry and I cannot afford to risk putting even concealed units in his LOS as losing men is not an option for me; I will Advance Concealed units and dummies into his LOS though, I want to hold him in place by causing him to Prep Fire against useless targets! My men make it to their positions with little worry and no counter-fire, the defence (such as it is against the massive German FP) is finally settled and set. I advance into CC with a Stealthy Partisan MMC against a solitary un-concealed German leader – Ambush is easily achieved, but I roll so high that I fail to kill the leader, or even Wound him… we end up in melee, what a disaster!
German Losses: 247
TURN 5
The Rally Phase is not to bad for the Germans, they Rally a leader with a 1,1 and he becomes Heroic but the Prep Fire he lays down is anything but heroic. As expected he used his 9-2 leader and MMGs to blast my dummy stack, this is exactly what I wanted, the rest of his men shoot and miss at concealed targets. In Movement KC shows that he still has some lessons to learn about moving in stacks – 3x 467 move adjacent to an LMG 447 but the MCs are wonderful and he only has a single break – the Final Fire does CR the broken 467 and ELR breaks another. He loses a 228 to a FFNAM/MO shot though and then an 8-1 and LMG 467 break from a 1FP -3 shot. Unfortunately I am not quite so lucky in Defensive Fire as I score hits while he gets some useful MC rolls for no net gain on my behalf. CC Phase drops a 467 right onto a 337 but we end up CRing each other (poor KC has not had much luck this turn) and ending up in HS melee. At least my other 337 finally kills his 9-1 leader. KC now has brought up his big guns and big leader to the battle, and though it has taken too long he now has a chance to force the issue as there is no way I can afford to stay in the LOS of this massive fire group.
I just manoeuvre my men to close any gaps and to get out of the way of as much FP as possible. He still has to come to me so I attempt to inter-lock my FP but I have to admit that the time for me to move back and form a new defensive line is close approaching. On the flanks and in the rear of his attack I still have some good units free to move and they are pushing hard to try and prepare for any broken Germans who may need their Rout opportunities blocked!
Allied: 127
Germans: 228 Crew, 467, 9-1
TURN 6
KC is finally in the place where he can start to push hard against my line – he is not aware of where the real and the dummy units are, so it looks like I have a deep defensive line; in actuality my strongest positions are on his flanks. Again he gets bold, but with the majority of his men up close it is something he can now afford to be. His first units does well, pushing onto Bd. 20 and activating my 6SAN as per SSR6. His next unit is not so lucky and suffers a Fate result from a 1MC. Other moves are hurt by the -2TEM mods from moving out in the open, but when he gets very bold and moves his 9-2 MG stack he gets off relatively lightly with just a MMG 228 being broken, while I suffer a LMG lost through Ammo Shortage and have a 337 split into HS as a result, however this does call the newly awoken Sniper into play and this causes the loss of a 7-0. The movement of his 9-2 stack was a strong one, with just one bold stroke he has entered the 20D9 building and weakened a major part of my defence. KC has been able to weather the Fire along my line and now he rushes into CC against me, this nets him 2x HS and also scores him a 8-0 through a Leader Creation result but it also locks up 2x 467 in Melee which is a positive for me.
The first action of my new turn is to kill one of my own HS in Rally Phase through Fate. Now that he has broken through to the 20D9 building I know he is going to have to break out of it again too! He has precious little time left to try and get his 20FP to Bd. 8, all I will have to do is delay him a little longer for the win; as a result I will be covering the roads he needs to cross with as many men as possible… he also has an impressive screen of dummies ahead of him to make him nervous about the attack. I have finally got men behind his lines to force the FTR results I need to keep the pressure on him and my few moves are to attempt to make the noose as tight as possible. I do spread my men out a bit to try and save them from his impressive FP, but I need not have worried as his men cannot shoot straight and miss with all their shots. My men have no such worries and are able to kill a MMG carrying 228 which locks down movement from the 23CC8 building to the 20D9 one. Despite scoring an Ambush I am unable to get any kills in CC this turn.
Allied: 2x 127, 237, LMG (4x Dummies removed)
Germans: 228, 247, 467, 2x 7-0
Again a massive screen of dummies mixed with a few real units stands between him and the entry/exit of the 20D9 building
His forces are split up, spread out and have Allied units nipping away at their rear and flank.
TURN 7
I manage to rally my Partisan 9-1 and some Squads/ HS, this will help the defence that I have setup in the main building. I also luck out and repair my LMG which is useful as he tries to run past it and I am able to ELR break a HS and leave a firelane as a result (Firelanes are OK for Russian units as they are not under Ammo Shortage). The rest of his men are heading towards the huge 20D9 building and they are moving in stacks to cover as much ground as possible, he really does have to watch the timing now as he has not moved far enough yet. I have a number of -3 TEM shots vs. a pair of 8ML leaders and a MMC but miss with them all, except for a single NMC result that Battle Hardens an already Heroic leader! However, KC makes a big mistake when he moves his vital 9-2 led stack out of the cover of the 20D9 building to try and get across to the 20B4 wooden building which would cut off my reinforcing of the front lines; my first attack (4FP -3) is only able to force some Pin results, but the second (1FP -2) is able to break the 9-2 leader and ensure that the whole stack is now pinned in place out on the road – this could be the nail in the German coffin.
It was indeed at this point that KC conceded the game. Although enough turns were left for there to be a slight chance of a win we had seen the game slow down to the point where we were getting only a logfile done every few weeks. I think that it would have been very hard in any case for him to salvage a win from this game so I accepted the German surrender.
Germans: 237
Germans Surrender
ALLIED VICTORY
Conclusion
We used the -1 Bridge TEM in this game. It did not have as strong an effect as it could have though this was due to my units facing down the bridges hex lanes being broken immediately. It did make his initial turns quite difficult and the few units that were pinned on the bridge suffered for it in the next turns. It is hard to know how much of a difference the -1TEM for the bridge would have made if my initial bridge defences were not so comprehensively smashed before they got to influence the game at all. The result in this game was not changed in the slighted by this TEM. I was often aiming to get RF down on the bridges ASAP due to the awareness that even 1FP RF with -3 is still a pretty fair chance of a result, so in this way the influence of the -1TEM was noted.
Probably the biggest influence on this game and the one that caused the majority of the problems for the Germans was the inexperience in attack shown by KC. He is a player who generally learns from his mistakes and even in the few games we have played together I have seen him markedly develop his tactical skills. However, he made a number of mistakes in this game and they were solely due to his inexperience.
– He did not keep his attack together, rather than preparing a solid base for an attack through his massive FP and range advantage he moved units forward in a haphazard way with more focus on how far they could get rather than on what they could achieve from their new positions.
– He continually moved in stacks through -2 and -1 FP terrain. This is ALWAYS asking for trouble and that is exactly what he got.
– He did not secure his rear or his flanks. The German attack was predictable, as were their next objectives. He certainly suffered some bad luck when it came to attacking the 23Y7 building, but I would have put more units in there and possibly tried to get some men up on the level 1 and 2 locations so they could punish any Allied units moving across to reinforce.
While ASL is a game that emphasises movement, Fire & Movement are still inseparable when it comes to planning ones attack (or even defence). The correct application of these two principles is really only something that experience can teach.
This was an enjoyable game only marred by both of us having situations in our personal lives that took the focus away from the battle. The SSR that forces the Allied units to take a NMC prior to the game start is a tough one… I got massacred by that rule and it took me 3 turns of mad movement to finally fill the gaps created through MC failures. I dare-say that any game of ASL3 is going to have the initial stages of the game, if not the result of the scenario decided by SSR2 and the German response to it.