ASL45 – REVENGE AT KASTELLI
Original Version – prior to Doomed Battalions 3 Reprint
Legion attacking as the Germans
Rami defending as the Greeks.
ROAR (Gr:G – 35:26) – 16th August, 2008
Played with 92 VASL Logfiles (Aug – December, 2008)
I wanted to give Rami a chance to put into action some of the lessons he learned though our game of The Guards Counterattack and this looked like an interesting enough way to do it.
Initial Thoughts
What a fascinating Scenario. Greeks are attacking Germans despite being setup first. The Greeks are forced to begin in and around a central village while the Germans must have their forces split in half by SSR. Essentially this is a scenario forcing the Greek player to make decisions for their attack based upon the terrain they are likely to be fighting over as they know that the Germans are going to have 6 Squads to take on in each half of the board but don’t exactly know their composition due to the Germans starting under Concealment.
The forces themselves are interesting too. The Greeks have just 6 units which can out-range the Germans (1st-line 457s) while the rest of his force (which outnumbers the Germans by 1½:1) are Green 437s. The Germans have a company of 548s to represent Paratroopers who have already landed and are about to be attacked by the furious Greeks. Leadership is similar for both sides, though the Greeks 4 leaders include an officer from New Zealand whose breaking will not effect the units stacked with him – other than that he is treated as a Greek leader. The Germans also have 4 leaders (of very slightly better quality).
SW are 2x LMG each side.
The terrain is hilly with a lot of LOS obstacles. The main piece of importance as far as the maps are concerned is that all Woods are Brush for this scenario.
Victory in this game is to be achieved by the Greeks fulfilling a CVP total of 20 or more… the game ends immediately should they succeed.
Greek Setup
The Greeks have Germans to the North in mountains and to the South in hilly open terrain.
He has 3 main problems to face in his attack.
#1 Low FP: All his units have lower FP than the Germans. This is going to be compounded by the extra penalties his Inexperienced units will suffer when Cowering and also in CC where he will always be at a disadvantage without numbers on his side.
#2 Slow Moving Green Units: Those 3MF turns all start to mount up after a while. The lack of movement from his Green troops can cause his much more useful 1st-line troops to reach the battle first without the supporting numbers he will need to break the German Defenders.
#3 Rout Routes are hard to organise: Due to the Direction of Rout rules the positioning of the Greeks between the 2 German forces can present some real problems to Broken units.

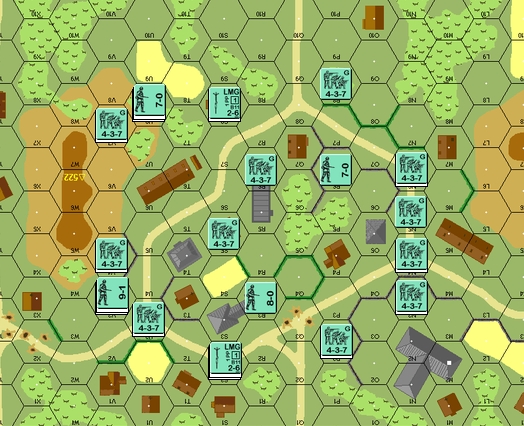
German Setup
The Germans have 2 areas to defend. They have the Northern Mountains and the Southern Hills. All German units start the game Concealed.
The Northern Mountains
Here my plan is to use the LMG 548 with -1 leaders to interdict the approaching Greeks as they attempt to climb the hills. Attacking cover is slight and his ELR of 3 and 7ML will make him vulnerable to good breaks. I shall probably focus on the leaders and stacks (obviously) but if easy shots are available I will take them too. My other units will (if time is permitting) dig foxholes on the rearward slope of the Mountain to protect my men against the close-in fighting which is sure to come!
The Southern Hills
Again I have just 2 units facing down his line of advance, I run the risk of being swamped if he is willing to take risks though the Green Squads will be much hindered by their lack of MF. Once again I shall use the units I have left back to dig foxholes with which I can form a stronger defence than the terrain otherwise allows. I am making the Stone building here the centre-piece of my final defence.
The Game
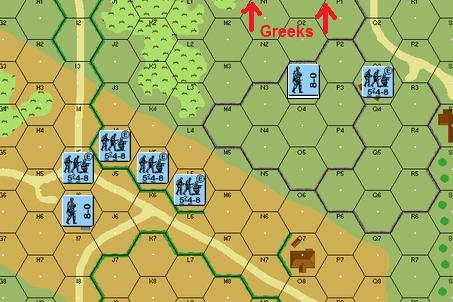
The Northern Mountains
With a large amount of Open Ground to cover before he can seriously threaten my positions up here on the Mountain I have the chance to really hurt him. Also with the CVP split ensuring that he must get some CVP from both parts of the battle I know that this must be my hold-out position. When the game starts though I see that Rami is a quick learner as he immediately splits his forces into a minor frontal assault with a pair of ‘pincers’ to envelop my positions and thus attempt to go for the Failure To Rout kills. This cannot happen if his men do not survive to get around behind me and I start feeling confident as he is forced to move into my LOS and LoF (Line of Fire) – my confidence is short lived as my dice are absolutely terrible and he makes some fairly large gains in territory.
I have to content myself with digging foxholes (which I do well) and wasting shots as my men are missing what should be easy hits. By Turn 4 I have scored a few breaks and sent a Green Greek Squad Berserk (he is picked off with difficulty as he rushes toward 2J4, this loss does weakens the Eastern flank attack though). My defensive position is strong, but this is of no use to me if I cannot hit with basic 4FP -1 shots. In fact by the end of Turn 4 he has lost a single 437 up here while I have called a Sniper to wipe out one of my own 8-0’s down in the Southern Hill Defence. He has had some breaks but his blatant and brazen moves across Open Ground deserved to be punished, not let off scott-free.
Rami’s attack here is starting to bog down as my men are able to break his units (in dribs and drabs) which causes him to realise that a few more losses will leave him open to a counter-attack. His previously confident men are now forced to AM and Advance across the Open Terrain as he discovers that flanking me is not going to be as easy as he thought. Also, by this stage of the game he has become aware of the dangers of being broken in the ‘middle’ of the boards, this leaves his men with no-where to run to due to my command of the LOS and the FTR rules. I have managed to Wound a 7-0 on the Western flank attack and am picking off the units which are moving close enough to take serious shots at – Rami has failed to keep cohesion with his unit’s movement and that means I can generally prioritise by only hitting the units which are at a decent range.
As the battle grinds on Rami sees that out-flanking me is not going to be successful at all and starts to head straight for my defenders. This is also going to be doomed to failure because, despite my absolutely terrible dice, the sheer number of defenders and the terrain (-1 leader, -FFMO) means that I am breaking an attacker a Turn. The ridgeline here has excellent overwatch of the whole terrain on this board and is very hard to hit considering the Greek forces available. Even though I have had truly terrible DRs (my average for the game was ~ ‘9’ in Attack DRs) Rami has had to concede that an attack up this Mountain is doomed to failure and spent the last half of the game just trading shots with my men… and that was a battle I won. By games end I had broken all of his units on the Western Hill 538 but was unable (and unwilling) to sincerely counter-attack.
Even worse for him was that his Eastern attack had all but collapsed by Turn 5 though it required I use all my available FP to achieve this and that left me with no possibility to counter-attack when he was at his weakest. Unfortunately when I DO counter-attack over here his Self-Rally DR for a Green Squad allows him to bring it back up and this caused one of my precious 548 to be locked in Melee for 4 Turns until HE captures ME! I then had to manoeuvre to attempt to re-capture this Squad as all hell had broken loose in the Southern Hill Defence and this one Captured Squad could make all the difference. In the VERY last turn of the game (with help from a lucky Sniper shot) I am able to free the Captured Squad thus saving 4CVP.
Result of The Northern Mountain Battle
I had no option to counter-attack towards the South. The scenario begins with what are two separate battles which are essentially unable to mutually support each other in any way. As a result there is no doubt I won this part of the scenario because all I had to do was defend with superior troops in a superior position. My men held firm despite absolutely terrible luck with my shots and great luck for Rami with his MC, Rally and CC rolls. I was able to set up a fairly complete defence right from the outset and the only changes were the addition of Foxholes to the initial defensive structure. By mid-scenario his Eastern Flank attack had been wiped out to the extent that I was able to counter-attack, though again luck saved him and put me in the terrible position of needing to save one of my own Captured 548… something I was barely able to do by games end.
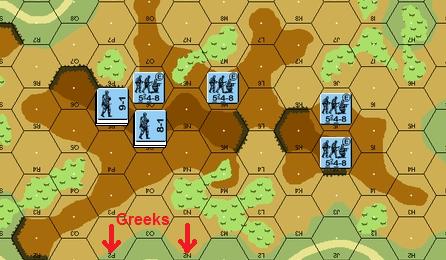
The Southern Hill Attack
Without a doubt the main strength of the Greek attack was coming down towards the Southern Hills Defence, and why not? I don’t have anywhere near the options available to my men up in the North and he has a much better chance of overwhelming me with numbers. If he is able to do it quickly enough then he can send his men streaming up to the North and help out the attack there. Again he is using a flanking attack to threaten me, though this time he is weighting the attack directly from my front. He is moving his attackers cautiously as the Brush offers little protection and he is attempting to keep them as close together as possible to form multi-hex FG when possible. This is a great tactic for him as I am only presenting a Squad or two at a a time to his men and he is much better off attempting to hit them with large FP against the +2/+3 TEM I have at my disposal.
I dig foxholes to support my final defensive positions and do quite well. The foxholes are placed to not be of any use to him if/when he over-runs them. Unlike the Northern battle the luck is initially quite poor down here for the Greeks. He malfunctions his LMG, loses a leader to a SAN result and often loses pivotal units in his multi-hex FGs as I attempt to reduce the amount of FP available to him by striking at the ‘anchoring’ units in the FG. My foxhole digging goes exceptionally well and I have the full complement dug by the end of turn 4… it is also by this point that the FTR effects of being sandwiched between 2 opposing forces has made itself felt with a few minor FTR results.
It is from Turn 5 that things start to go hay-wire. Like the other part of my defence all of a sudden my men cannot hit to save themselves (which is precisely what they ARE attempting to do). Rami is brazenly able to waltz up to my units and I am missing with 4FP -2 and 2FP -2 shots as I begin what turns out to be an almost non-stop run of ‘9’ and ’10’ DRs. He SR’s units and also fixes his LMG, with so many men I am limited in my coverage of his line of advance and before I know it he is able to sneak men into the mass of Western Brush (11F3). Rami also sends units around the Eastern edge of the hill and I am forced to send a single 548 to try and stop them from 11O8. About the only positive for me is that his shooting in this part of the battle has also been terrible.
Then, all of a sudden, my line breaks.
Finally Rami’s men start to score hits, whilst my units continue to roll the same rubbish. His superior numbers of inferior troops swarm my men and I am forced to take FPF shots (which I naturally fail!) and with his units all over me I am unable to Rout away or even get into a position where I can be eliminated for FTR… he starts Capturing Germans and I realise with horror that I could actually lose this game with ease if he keeps this up. The Greek swarm grinds forwards picking up the rapidly surrendering German forces and Rami has decided that his only chance of victory is to jump into Melee and attempt to Capture my remaining 2x 548 and 8-0 – even then the odds are on my side as I only need a 7 or less to hurt him while he need a 4 or less to Capture… after 4 Turns of CC I have managed to kill a single 437 while he has captured the last 2x 548!
Result of The Southern Hills Battle
I really messed up. There is no denying that I got absolutely destroyed by the terrible attack DRs I made – however this is really no excuse. The Germans COULD have and SHOULD have won this game, I failed because I did not recognise the Capture threat. If I did recognise the threat then I would have given my men a way to pull back, even to form a hedgehog to allow for the FTR KIA – that would only be a 2CVP loss/unit, not the 4CVP thanks to Surrender. Despite the poor DR it was really my own lack of forward planning and a too-static defence that lost me the game. That Rami was able to recognise this and capitalise on it shows just how well he has developed as an ASL player in such a short time.
The Butcher’s Bill
German Losses: 2x 548, 2x 8-0, LMG (5x 548 Surrenders, 1x Squad Escapes)
Greek Losses: 5x 227, 2x 237, 5x 437, 457, 7-0 (wnd)
CVP: 6 (+16) = 22
The Greeks have >20 CVP at Game End
GREEK VICTORY
Conclusion
There are 3 major considerations for anyone playing this scenario:
1. Rout is difficult for the Greeks – In the initial part of the game the Greeks must setup right between the 2 German positions, this can allow the Germans to exploit the Direction of Rout rules to force the Greeks to lose time, cohesion and possibly even units.
2. Surrendering Germans are going to decide this game – Learn from my mistakes! DO NOT allow your Germans to be in a position where they can be swarmed and Captured. If you don’t have any units surrender then you will force the Greeks to have to aggressively attack both Defensive positions and that is something the Germans can easily handle.
3. The Greeks need to attack with cohesion – The difference in this game between the Northern Attack and the Southern Attack was vast. The Northern Attack was separated and lacked the tactical cohesion of the Southern Attack because it moved as fast as possible. The Southern Attack moved slowly so all the units arrived at the same time in the same place. With 10 Turns at your disposal there is no need for the Greeks to rush their moves and those 3MF Green Squads should pace your attack.
While this was not a bad scenario at all it really dragged on VASL. I would only consider playing it again as a FTF game. It does have re-play value but perhaps lacks some of the ‘zip’ of other scenarios.