ASL55 – RETRIBUTION
Legion attacking as the US Army
Colonel Custard defending as the Italians.
ROAR (I:US – 56:59) – 25th January, 2010
Played Face-to-Face (4 hours, Jan 2010)
It is time for Colonel Custard to learn about Guns and for this reason I chose this scenario as it has a single INF Gun which is not vitally important. It is also evenly balanced and will give us a true indication of his development as a player. I chose the US for myself in this game as I wanted him to learn how to use the Gun properly. Another reason why I like this scenario is because it uses the Italians and I quite enjoy their games.
Initial Thoughts
Looking at the ROAR rating it is clear that this is a reasonably balanced scenario with 100+ playing’s and roughly equal results. However I am willing to bet that my experience with city fighting and his inexperience with the Italians is going to make this easier for me than ROAR might suggest. The biggest danger for me is going to be on the approach to the village, but even then his range is pretty much limited to the 2x MMG as the Italian FP and Range is just so shockingly bad. The fact that there is nearly 2 whole Companies of Italians (1 of Superior Quality) outnumbering the reinforced Company of Americans even though the Italians are in defence shows how imbalanced the individual Squads are.
The US must take 6 of the 8 multi-level buildings on the map, with Rowhouses counting as a single building. While doing this they must keep a 1.5 advantage measured in CVP.
To be honest this is not a tough ask. The Italians are going to have to outnumber the US 2:1 to achieve parity of FP and the US have 2x MMG and 2x HMG (which start dm) as well as 4 leaders with -3 leadership mods in total (including a 10-2!). The Italians have a measly 2x MMG, 4x LMG (all with B11) and also have 4 leaders, though their total mods are +0 (thanks to a less-than-useless 6+1). When you take into account the US range of 6 vs the Maximum Italian range of 4 this all starts to look a bit grim.
The ELR structure of the game is also telling. The Superior 1st-line Italians have ELR 3, as do the leader, but the normal 1st-line Italians have an ELR of just 1! This will see half his force melt away quickly.
To win this scenario the Italians MUST play for time and CVP. I would forget about the buildings. I would choose a few locations and arm them to the teeth whilst trying to pick off the US forces as they move forward into attack. As always in WW2 the Italians will do well if they can AVOID as much combat as possible!
Italian Setup
The Italian setup is shown on the picture below. The most interesting points are the MMG too far forward in 12T7 and the lack of men in Upper Level locations. Otherwise there is a fair spread of units between the 3 most important areas on the map; these are centred around: the Graveyard Building (12V4), the Marketplace Building (12Q8) and the Rear Building (12O4).
US Army Setup
The biggest danger would normally be on the approach to the village, but even then his range is pretty much limited to the 2x MMG and since he has them on the ground level I wont have to make any tough choices about attacking them first up or not.
In the end I chose to send about a third of my force through the graveyard side of the village thanks to the Gully whilst the other side will use the standard City Fight tactics of concentrating fire on the strong points to support infiltrating infantry. There is little cover available to me, but my leaders and his poor FP and range should still give me good freedom of movement. Also with his men all setting up on Ground Level I am going to be free from all but the most obvious FFNAM/MO attacks
The Game
My men start off by moving along their intended paths, I want to neutralise his 12T7 MMG nest first so the 2x MMG and the 9-1 are placed in a location from which they can do this safely. I know that it will take me a turn to get the HMG into play, but the 2x 667 with the 10-2 leader are still a potent enough force, thus I send them to 12T10 from where they can support the attack on the Italian MMG but also affect his positions in the village. The few shots Colonel Custard takes are poorly affected by the various hindrances and his own uncertainty about how to face my Death Star (I define a Death Star as being at least 2x HMG with a -2 leader), he is also thrown off-balance by the aggressiveness of my attack.
In response the Italians decide that waiting for the hammer to fall on them is not a smart idea so they stream forward to meet my attacks. The Battle breaks into two distinct areas: The Graveyard Attack and the SE-Village Attack.
Diagram of the Initial Setup and the flow of the battle

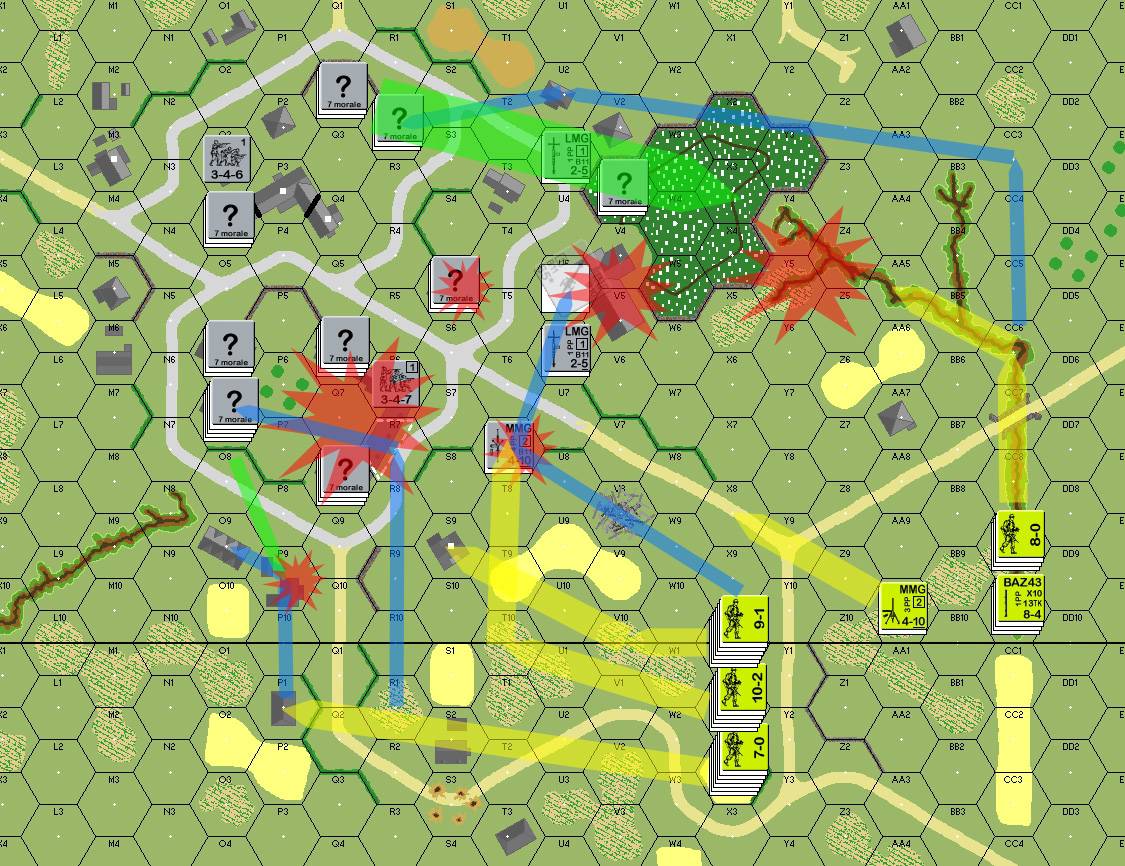
Yellow Lines indicate US Positioning Moves
Blue Lines indicate US Tactical Breakthroughs and Attacks
Green Lines indicate Italian Counter-thrusts
Red Stars show Major Battles
The Size of the Image indicates Relative Importance or Numerical Strength
The Graveyard Attack
The Italians thrust through the Graveyard to cover the Gully and are initially blunted when my 3x 666 ELR Break his units here at 12X3.
To counter this he moves his remaining men (~ 4 Squads and the 9-1, 8-0 with ~ 2x LMG) out of LOS either INTO the Gully at 12Y5 or keeps them in the Graveyard at the likely exit points. This would be a good move with a competent force but the Italians are not able to hold their own when there is a parity of Squads. I decide to take the risk of moving this entire forward stack (3x 666, 8-0) out of the Gully as a AM move. I survive the paltry attacks I must face as a result. Then in Advance I jump back INTO the Gully right onto his 8-0, LMG 347 – they are wiped out in CC. To prove that it is not all smooth sailing a simple 2FP -2 shot breaks the other 2x 666 in the Gully who were trying to manoeuvre closer to the Graveyard and these units are lost to me for the rest of the game as they are forced to aimlessly Low Crawl their way towards some sort of cover. At least the Baz ’43, 346 with them moved away first in an attempt to draw enemy fire and this HS is now attempting to make his way around the graveyard to the North of the Village.
Seeing his men melt in front of my fire and now drastically alerted to the danger of CC the Italian Commander has no option but to withdraw as fast as possible. He does so and pulls his men back to the 12V4 building, but I am hot on his heels and a single LMG 346 left behind to slow me down fails to hit me with his Adjacent shot and is ELR CR in return. His men in the building are in disarray as I have broken though his lines to the rear of this building and he is now faced with front and rear attacks, he also has my HS working his way around the back of the village and the only unit able to stop him here (a 346) is ELR broken by the first MC he suffers. This lone US HS ends up capturing a VC location (12R2) by Mopping Up while the remaining units in the 12V4 building are eliminated without loss to me, this building is claimed too.
The Graveyard attack is a US success with 2x VC buildings captured and a third of his force annihilated at the cost of 2x 666 broken.
The Village Attack
I have positioned myself so that I have a number of ways to deal with fire points in and around the village.
– My 2x MMG 667, 9-1 (12V10) are able to fire for effect on his forward MMG, and indeed on some of the Village as well.
– The 2x HMG(dm) 667, 666, 10-2 (12T10) are able to support this attack if needed or start working on his village defences.
– 2x HS, Baz ’43 (12R1) are in position to stop him coming forward to meet me and to rush into the Market Building (12Q8) as soon as an opening had been created.
– 2x 666 and the 7-0 (4P1) are ready to attack the rear of the Market Building
Like the Graveyard area Colonel Custard decided that attack was the best form of defence and he moved men into the Market building as well as sending 3x Squads and an 8-1 forward to engage me from 12P9. This was a bit of a surprise as I wasn’t expecting such a bold attack, but I also knew that that my opponent was over-estimating the effectiveness of his troops.
First to fall was the Italian MMG position, it never had a chance and since I had snuck a Baz ’43 HS and a 666 into the 12V8 Rubble I was able to rush this building once the pesky MMG was removed. Across the road he had a LMG but as happened all too often in this game the shots were ineffective. Since it was my Death Star which did the damage (while they re-mantled their HMG) I was able to rush the MMG stack into 12S9 along with a spare Squad from the Death Star stack, this building was captured in the Advance Phase but not before a lucky shot CR Broke one of my MMG 667 – this one of the few bits of luck for the Italians all game. I was able to Rally the Squad immediately though as the only place he could run was upstairs to the 9-1 leaders position!
The Italians who had bravely run into the attack at 12P9 attracted SAN fire all game and this was what started their fall… They were forced to pull back to a Crest Position in the 12N8 Gully, but this location did not last long and although the attack here (4P1 → 12O9) took a bit of time (i.e. 1.5 Turns) and cost me a HS KIA in the end it was able to account for a ¼ of his force KIA or Broken and placed me in the perfect location from which to attack the 12O7 building.
Once the 2x HMG were up and ready to go, and the 2x MMG in level 2 of 12S9 were also ready the game quickly fell apart for the Italians. He had squandered his men in fruitless aggression against an enemy whose morale was equally brittle but whose FP and effective Range meant that no attacks were going to be fairly balanced.
By the start of my 4th Turn his HIP INF Gun had been exposed and successfully fired on the units assaulting the rear of the Graveyard Building (12V4) but my men passed the 2MC against the odds and CC saw his Crew eliminated. With no enemies left here these units turned their attention to the 12S5 building, the sole unit here had been broken by MMG fire and this building was captured with ease.
I had decided to not bother firing with my Death Star as the units left in 12Q8 and 12O7 were all broken with the exception of the leaders, I moved this stack forward. At the same time I did a HS rush to capture 12O7 but his 2x 346 in 12O6 Pinned the first HS and left me with no choice but to use him to Mop Up the 12Q8 building! A solitary HS DID make it through the remaining shots from these units though and they forced the issue in 12O7, this building was taken and the units inside were eliminated or Captured.
By now the Italians were in complete disarray and they 3 remaining GO units from the 20 they started with were taken apart with clinical precision. The last Buildings were taken as a matter of course and this time the White Flags being shown were for real.
The US captures and holds 6 multi-level buildings (CVP Count 2:24)
ALLIED VICTORY
Conclusion
This was a short game. The Italian defence and counter-attack was taken apart with cold efficiency, but considering the many, many games and CGs I have played based on city fights this was not unexpected.
About mid-game I asked my opponent if he knew why it was going so badly for him, I asked if he could see what my strategy was for dealing with his defence: he immediately replied “Isolate and eliminate the strong points”. This heartened me, a loss is not a waste of time if you learn something and Colonel Custard certainly learned some lessons in this game.
I would like to point out that it was not all my own shining brilliance as an ASL player that won this game [yes, that was sarcasm]. The Italians suffered 4x 6,6 rolls for MC or Rally attempts. They also suffered 2x 1,1 results and with a +4 on the HOB table due to Italian (+3) and Broken (+1) these were as good as death sentences for the poor Defenders.
I have learned to base a city defence upon the lessons learned in 2x playing’s of the A Bridge To Far CG. In this CG the defence MUST be organised around city blocks as that is how terrain is Controlled. Thus it is in the defender’s favour to firstly hurt the attack as they are attempting to enter the block then to force the attacker to constantly move Adjacent to enemy defenders so that FP can always be applied with maximum effect, just prior to it being the Defenders Turn again.
Were I to have played the Italians in this game I would have firstly tried to control the roads with my MMG and LMG. I would have spread my forces out, this might have diluted the Firegroups but it would also reduce the losses. I would set units up on Level 1 locations and rotate them with units on the Ground Floor in the hope of maintaining as many concealed counters as possible. I would dig Foxholes in locations like 12P6, Q3, Q7 (which in all fairness my opponent planned to do but the game moved too fast for him) to get as much FP forward as possible but also allow for retreats. I would take as many 1 & 2FP shots as possible with -2 or -1 TEM, Snipers will always come, and the more MC the enemy is taking the more chance YOU will also gain a Sniper.
I would certainly NOT counter-attack the US.
Interestingly my opponent made the point that he would like to play this one again, and that is something I like to hear, it means he sees it much clearer now and wants to put that knowledge into action. He also said that he wanted to wait another year before doing so as he knows he has much more to learn… and that is the essence of ASL. I have played this for 20+ years and there is still much more to learn for me too!