J106 – MARDERS NOT MARTYRS
Legion attacking as the Russians
Chris W. defending as the Germans
ROAR (G:R – 24:40) – 23rd September, 2007
Played with 16 VASL logfiles (Sep – Oct, 2007)
There has been a lot of discussion about this Scenario, and a fair bit of controversy. The designer of the scenario has pointed out that this was originally designed for the Started Kits, to show the vulnerability of OT-AFV to even a 50mm MTR, but when they decided to not include OT-AFV in Starter Kit 3 this scenario was bumped up to a full ASL scenario.
Initial Thoughts
A straight-up Combined Arms bun-fight. The Russians have to get 17 of their 51 available VP off-board (23 Infantry + 28 AFV/crew) but not all of them can be AFV Exit VP. The map is tiny (24 hexes in length) but also reasonably open which will help his anti-tank assets and also make my infantry’s job more difficult. The Russian’s infantry sets up on-board while their AFV enter on Turn 1. The Soviets move first and there are 5.5 Turns.
The German force is quite small, nearly 2 platoons of 467s with only 2 leaders (9-1, 7-0). They have a nice combination of SW though with a HMG being available and also a pair of LMG. Their only anti-armour assets are a pair of Marder I; this is 1942 so the PF is just a dream.
Against that the Russians have an undersized 1st-line company. They also have 2 leaders (9-1, 8-0) and a MMG with a pair of LMG for support. They also have a 50mm MTR and from what I have read in the forums this MTR is the main anti-AFV killer since it is 2FP -2 (the Marder are all AF <5 and OT AFV) on the C1.55 AFV Area Fire TK table; that means the German AFVs are going to suffer Shock/Immobilisation/Elimination on a 5 or less – pretty nasty odds for a 3ROF weapon! There are 4 AFV available to the Soviets, they are KV-1E’s; nice AFV but very vulnerable to the Marder’s 75L (2ROF) guns.
To be honest I think this is going to be a Russian cake-walk. The Germans have some great SW and AFV, but if they are placed in a too-vulnerable position the Russians will walk all over them through numbers alone. Also there is no doubt that the Germans must make a choice between defending up-front and risking the loss of AFVs from the very start of the game, or of setting up the Marders in blind-hexes to keep them safe and to force the Russians to come to them…
German Setup
With a big sigh of relief I see that Chris has gone for the up-front German defence. This makes this game a dice-rolling competition and the odds are stacked in my favour here due to the modifiers for the 3ROF MTR.
K6 Marder I HD (to M5)
L4 Marder I, 8-1AL HD (to K5, L5 L6)
M7(1) HMG 467, 9-1
N0 LMG 247
N9 7-0
P7 LMG 467
R7 467
R8 467
S2 247
He has setup well with his infantry as I shall be forced to waste time Assault moving Adjacent to them in only +1 TEM terrain but otherwise I am very happy facing this type of defence
Russian Setup
X1 2x 447 – These men will try to slide along the North of the map for Exit VP
X8 3x 447, 8-0 – To attack in force against his men near the buildings
X9 3x 447, MMG, 2x LMG, 9-1 – To attack in force against his men near the buildings
CC7 50mm MTR 447 – An obvious position with great LOS
CC8 447 – Replacement MMC just in case the MTR MMC is broken
My opponent appears to have made a vital error in his defence with his Marder not having LOS to my AFV if they enter along the extreme North of the map due to his being on the Hill and the Orchards being in-season. For that reason I am going to enter all my AFV along the North edge, skirt past the Hill and go down the Orchard-road – he should only get a single shot at me in Z2
The Game
TURN 1
Well, the game is almost over before it begins. With my MTR having a clear shot at the Marders and a 50% chance of hitting with a 50% chance of retaining ROF it really was a question how the dice would fall. The MTR shot at his AL’s Marder (L4) and the first shot was a ROF miss, the second shot was a hit and that hit triggered off an Ammo Bin explosion from the shell landing right in the fighting compartment – one Marder down before my AFV even enter the board. The second one was hit but narrowly missed sharing a similar fate. My men advance forward into the Woods and my AFV stream on to take up position on the central road – they were totally free of attack due to the LOS obstacle created by the Orchards.
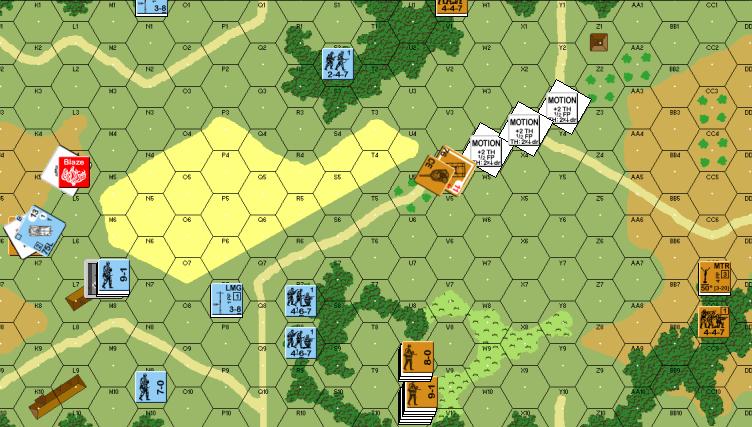
The situation at the end of the Russian’s First Turn Movement Phase
The game continues to go down-hill for the Germans with their HMG again unable to take out the MTR position. The other German units in the South pull back, obviously heading for the N9 Wooden Building but otherwise this is a pretty dull turn due to my MTR being Pinned and thus totally missing it’s target.
German Losses: Marder I, 8-1 AL
TURN 2
The MTR does well again and manages to Immobilise the other Marder which causes the Crew to scramble for cover and allows me to scoot past his 75L gun with the majority of my AFV. I position 3 of the KVs up North to ensure I can get units off-map up here, a single KV goes down South to target the Marder and put him out of business; I also want to stop any sudden moves to the North of the map. Advancing fire goes well for me with some enemy having their concealment stripped and the HS in the Woods to the North being Pinned and thence overrun in CC.
The German HMG again fails to hit the MTR and also fails to score ROF, the rest of his Prep Fire shots are also unable to make much of an impression – he Pins a 447 and breaks another. My Defensive Fire has the MTR firing so much that his barrel must be white-hot by now. With all the shells falling though only a single connects with the Marder (and the crew scrambling to enter it) and again causes a NTC due to another ‘Immobilisation’ result – the Crew (with their 8ML) fail and they are forced to again ditch the AFV. I shoot at the crew with one of my KVs and score a great hit; but the shell is a dud so it is to no effect! After that it all goes even more pear-shaped for the Germans as effective Russian infantry fire devastates the defenders facing them down – he has 3x 467 broken; 2 of them are ELR failures… this means that apart from a Concealed HS in the North and his HMG position in the South his Infantry defences have totally crumbled.
German Losses: 247
TURN 3
Chris is unable to rally any of his troops and this now allows me to ride rough-shod over them with my full complement of men. Firstly I am able to reveal the HS up North thanks to a Pin result, but the next KV that fires suffers a MA malfunction and my MTR doesn’t have any hits or ROF. Then I unleash the AFV in Movement: one of them sleaze-freezes the HMG position while the other scoots up the hill to get Adjacent to the other Marder; in Advancing Fire the last German AFV is ripped apart by a well placed shot. My men swarm forward under CX and surround his broken men, they are encircled and must Rout upstairs where they will be eliminated next turn.
The only Rally activity for me causes a HOB on a Squad – this unit is Disrupted as a result. But Chris has seen enough and Surrenders.
German Losses: 247, Marder I
The Germans Surrendered
ALLIED VICTORY
Conclusion
Despite the one-sided nature of our game I think there is a lot to like in this scenario, and a lot to learn from it.
By the time 1943 came around the Germans were facing a veritable tidal wave of Soviet armour, and the Germans were only just starting to get their soon-to-be superior weapons out on the field – but never with a superiority of numbers. How does one fight a war when you have the tools to do the job, but only in limited amounts? This scenario really does force the Defenders to think about this question.
DO NOT SET UP WITH THE MARDER ON THE HILL. It looks great because it give a huge chance of taking the KVs down when they enter… but you have to survive the first turn and while 50mm MTRs are not very effective most of the time they are exceptionally good at 2 things: Airbursts and hurting OT AFV. Their 3ROF is something that means they get a 50% chance of initially hitting with a 50% chance of another shot… those are really amazing odds when you consider they only need a 5 or less to severely mess up a Marder. If the Germans trusted their better weaponry to stand up and trade blows with the Russians out in the open the numerically superior Soviets would have been in Berlin a year earlier; it would have been The Battle of Kursk repeated all along the front.
If I were to play this game as the defender I would place my Marders behind the Woods (maybe Q1 and Q8) for a nice shot or two against the KVs when they move into view. Being behind the woods negates the MTR right from the start and forces the Russians to either risk HIS defensive luck or attempt to flush you out from the Woods before he puts his AFV in danger – it at least allows the Germans to have the Initiative. I feel this is not only the more effective tactic for this scenario but it is also historically closer to the way the Germans would have employed these Marder.
Give this little game a go, it is VERY short, in a FTF situation it would be over in less than 2 hours, you could play it twice in a night giving the chance to defend and attack. It is a clear example to the ‘obvious’ defence, and the ‘obvious’ strengths not necessarily being the ‘right’ defence or the most effective way to use those strengths