J108 – DANICA AIR
Legion attacking as the Partisans
JP defending as the Croatian 1st Light Parachute Company
ROAR (C:P – 8:2) – 22nd August, 2007
Live VASL: 2 Sessions, 5 hours
We are going to have another try to play a set of Journal Scenarios from the same Campaign. This set (J108, J109, J112) are from Journal 7 and are based on actions involving the 1st Croatian Light Paratroopers in their defensive actions against Partisans. I chose to play the Partisans, for no other reason than a need a change from Defending.
Initial Thoughts
When scenario J108 and J109 are played sequentially the Entrenchments and Pillboxes must stay in place for both scenarios, this is from the article in Journal 7 about the 1st Croatian Para and the scenarios.
This looks to be an interesting battle. There are 2 undersized Partisan companies attacking a full Croatian Para Company in their airbase. The Partisans also have access to Partisan 447 and 527 units though. Leadership is very poor for the Croatians, they have just the 2 leaders (9-1, 8-1) while the partisans have 4 leaders. Both sides are blessed with MMG and 50mm MTR as well as LMG. Prior to Croatian setup the Partisans must allocate their entry forces with a minimum being set for the amount of units attacking from the North, West and South of the Croatian airfield.
Overlooking the airfield is a portion of the Bd. 2 hills and generally the terrain crowds in close to likely defensive positions. However, victory is determined by control of 2 or 4 buildings and the capture and/or destruction of 3 of 5 Ammo Supply counters place on the airfield’s runway (which is -1TEM as per B7.3) and all of these objectives are surrounded by open terrain (with the exception of the 38N2 building. This looks tough, but do-able…
Partisan Entry Areas Setup
I have decided to split my forces in the following manner:
South Edge
2x LMG 447, 3x 337 – These units will be attacking the airfield, probably through the 38J3 Woods
2x MMG 228, 9-1 – I will hold his forces down with this MMG stack, it will be placed on high ground and his priority targets will be leaders first, then MTR and MMG positions.
West Edge
2x LMG 447, 2x 527, LMG, 3x 337, 8-0 – These units will be attacking the airfield, linking up with units from the North to push against the North-West corner of the airfield
North Edge
2x MTR 337, 2x 527, LMG, 7-0 – I shall use the MTR and the LMG with 2x 537 to pin down units on the North-West side of the airfield from the 42D1 Orchard Hill. The 2x 527, LMG can attack later in the game
3x 337, 8-0 – These will link up with the West Edge units to attack the North-West corner of the airfield.
This attack gives me a bit of manoeuvring option with my attack depending on his setup, while also meaning that I have 2 strong SW attacks (MTR and MMG) coming at him from the North and the South. If he sets up his pillboxes or his units in such a way to make either of these SW attack difficult to align, then I can easily move to other locations, the terrain here is very forgiving for the Attacking side.
My high priority targets will be the Croatian MTR; they are going to rip me apart as I attack through the trees, then the MMG; due to their FL and ROF threat. Finally I shall target the leaders whenever possible; he has just 2 of them, take them out and he is going to suffer when it is Rally Phase.
Croatian Setup
The Croatians have setup 2 main lines of resistance.
– The first line is between 38 B9-G6 and consists of 7 stacks/units; this line is obviously guarding the D7 and E6 buildings as well as the Ammo Boxes near here; I shall call this area the Dispersal Area (mainly due to the buildings here and the airfield theme).
– The second line of defence runs along the front of the Woods bordering Bd. 2 & 38; I will name this the Woods Defence. The units here are spread out but are designed to stop my infiltration of this area.
JP also has 2 Squad Equivalents available as HIP and numerous fortifications (which must stay in-place for the next scenario too as we are playing J109 immediately following this one), the fortifications are currently HIP as I am starting off-board, but they will have to be placed on-board as soon as I enter.. I expect the HIP to be a little more forward as he will want them to take the edge of any attack I make. As it stands, from his setup, there are 3 ammo boxes and 1 Victory building within reach of my men’s first 2 moves.
The Game Plan
My MTR units and the 2x 527, LMG are still going to take the 42D1 hill, though I shall be moving cautiously at first as the huge FP possibilities here has around in the Dispersal Area make losing concealment a not so attractive option. I have also tweaked my attack plans somewhat. I am now going to attack towards 38N2 with just 2x 527, LMG as I want to try and take this building, but want to pin his defenders here in place as well. If I can hold them top this area then I shall have done well I think. The units attacking from the South are going to be coming in from the South East. I want to force him to split his attacks in opposite directions and to make him pull out of the Western side of the airfield – this is to allow my Eastern attackers a little more grace in their movements. The Eastern attack is still coming on through the North East, but I will be hugging the grain as much as possible, I do not doubt that there are to be some HIP defenders over here. Finally I am bringing my 3x 337 in from the North with the idea of putting pressure on the 38 J8 building.
I have the numerical advantage and I also have have an advantage thanks to my leaders, bearing this in mind I will be sending units forward in an attempt to take territory through swamping isolated units. JP has done well in keeping his men together, his lack of leaders is behind this I think, it makes a direct attack against him very dangerous indeed.. but with a little luck I might not have to do that at all. His dispositions mean that he is the one who is going to have to react to my attackers and this allows me to put him on the back foot right from the start.
THE GAME
I enter the board with almost no worries, though to make the best use of terrain and to keep my concealment I am forced to move slower than I would have liked. He immediately starts to reveal fortifications (Trenches – 38 B9, F6, Pillbox – 38G6, 1S Foxhole – 38 C8, D5 F7) it is obvious now that he has few sneaky plans… his defence is almost totally centred around the Dispersal Area. I get a little aggressive with 2x 337 from the North who are trying to get closer to the 38J8 building and that cause him to reveal 2x 447, 9-1, MMG, MTR in 38F6, their fire breaks both the Partisan MMC and one of them is CRed thanks to a MTR shell.
I am not too encouraged by the start of JPs turn, almost all his shots thus far have been low DR attacks that have hit… he lobs a MTR round at the 2x MMG 228, 9-1 stack on the high ground in the South (2L7) and the MTR not only hits but it also manages to Pin the leader and break one of the crew – already I have lost a lot of my over-watch FP. At least he follows this mini-tear off with a malfunction for the pesky MTR. I get a little more luck flowing back when the sole GO MMG manages to reveal a dummy stack in the ‘Woods Defence’ – considering the positioning of his Entrenchments in the Dispersal Area I expect that a lot of the units guarding these woods will be dummies.
The Malfunctioned MTR rolls a ‘6’ and is removed, that is great! I continue to filter my men forward. I am using the grain and brush as well as the irregular LOS Obstacles placed all over the map to shield my forces from his not-inconsiderable defensive position. With the suspicion that most of his Woods Defence force are dummies I rush 3x 337 along the East edge towards the A4-B4 Woods; he has no effective LOS here and although the 2x ? here turns out to be a 227 crew they do not manage to hurt me at all; I put a 337 into CC with this crew unit there is no result. Getting behind his lines like this is a real bonus.
During his turn I eliminated his 227 in the CC Phase, but that was pretty much the entirety of the action for this turn. I have finally placed one of my MTR in position (in the 42E2 grainfield behind the wall) but the shots go wildly astray. He has started to tinker with his defence because now he can see the focus of my attack and can see me moving to rush the most distant Ammo Supply crates and the J8 + N2 buildings. I expect that the units surrounding the 38N2 building are dummies as they are not reacting to my units, they are just pulling back. I have sent 2x LMG 447 though the Woods down here in the South and are yet to meet any resistance.
My men move in closer, drawing in tighter like a noose. They surround the Dispersal Area from the South, North, West and South East, but the Western forces are far too distant for my paltry FP to have any effect on the battle. I am able to capture the 28N2 building but when I send 1.5x 337 MMC out to attempt to take the J8 building (the sacrificial HS drew a LOT of fire before becoming KIA, the 337 Dashed from the near-by Woods) I am thrown back and eliminated (snake-eyes) by a HIP 447 in this very building… what a bother. About the only good that happened this turn with JPs fire was the vast number of Cowered attacks he made… if not for the Cowering I might have suffered even more. However, I am noticing that he is really scoring low DR whenever he is taking low FP shots – and my men are not passing the NMCs. His high FP shots are not overly effective, but all the little 1FP and 2FP attacks are ripping through me.
Again I suffer from the low FP blues when another lucky shot CRs a HS, this is immediately followed by a 2MC which kills a 337 through Fate. We both trade a lot of shots, but without any real effect. He has few moves now, his defence is set and settled and he is ready to sit out the Partisan storm.
I get a bit of luck when my first attack breaks his 447 in the essential J8 building! Then my MMGs go on a bit of a tear, but they achieve nothing – he is passing most of the MCs with ease. I decide to try and take this game by the scruff of the neck and start sending forces out to capture the last building and the necessary number of Ammo Supply crates. I lose a number of units this turn, but in the process JP wastes a lot of shots as his dice finally remember that they are allowed to roll high once in a while! I have made a run for the least accessible Ammo first (38G8) with the intention of at least leaving a broken unit in his lines to stop Subsequent First Fire opportunities, but the units I send out get KIA when they finally fall. All of a sudden the dust settles and I have managed to somehow pass through the carnage with 2 units adjacent to each of 3 of the 5 Ammo Boxes (G5, M5, M8) – I need 2 units because capturing the Boxes uses the Recovery mechanic and there is a chance I might roll ‘6’ in Rally. I do not put men ON the Box hexes because I can enter in the Advance Phase without suffering the massive First Fire penalties (-3) for moving in the open across a runway. JP revealed his final HIP positions (2x HS in 38 M10 & G10) but the damage they cause to my men is minimal. In the end I have suffered a LOT of losses, but I have also managed to be one step away from fulfilling my victory conditions; I have control of 2 buildings and I should be able to control 3 Ammo Crates in the next Rally Phase. JP lost a LMG this turn to malfunction, but also continued his unsettling run of low FP attacks scoring lethal results.
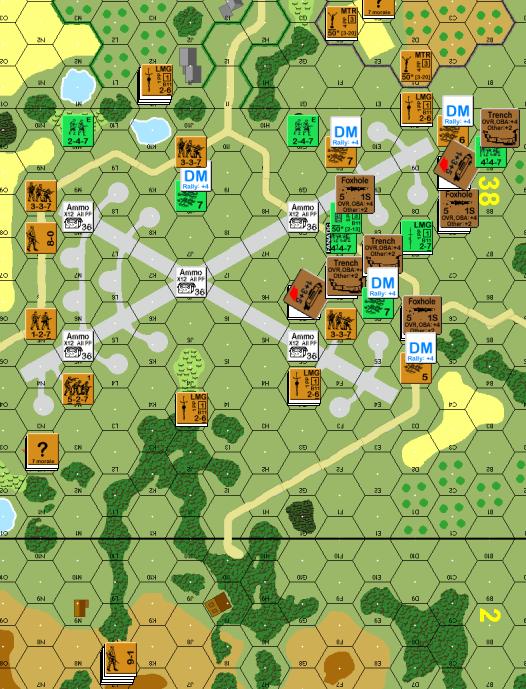
Prior to the Advance Phase in the Partisan Turn 4
The broken LMG is immediately repaired by the Croatians. All through-out this game JP has rolled 4’s with his DR and this Prep Fire of this 4th Turn is no exception – the only exception is that somehow my units managed to pass their MCs, not that this helps the CRed units. JP Malfunctions another LMG but then follows it up with a 50mm MTR CH that eliminates one of my LMG 447s. This guy was supposed to be guarding the J8 building which the Defenders are sure to attempt to take back; the MTR fires again and this shot breaks the other LMG 447 who was guarding J8 – man… this is starting to turn into a real dicing. In my Defensive Fire Phase I think I am due for a little pay-back when I CH the pesky MTR, but instead of him being wiped out by the K/2 he rolls HOB and ends up Fanatic… sigh… On the VC side I have managed to eliminate 2 of the 3 Ammo Supply crates necessary for victory, the other one is still under my Control (thus qualifying for the win) but I need to re-possess it due to the owning unit being broken and unable to destroy it.
After the last turn I am optimistic that I can pull back and set up a cordon around the most likely target for his counter-attack, the 38J8 building. Unfortunately this optimism is not mirrored by reality. I am unable to possess the final Ammo Box until the Movement Phase, and this means I cannot destroy it yet. My Prep Fire causes one of my MMG to malfunction; I had been thinking of moving the MMG stack down onto the plain, but it would have to be sited in the Woods and the way his MTR has been going that would mean certain death, also this would require nearly a whole turn to do before I could start to fire them again with effect. From my MCs in the Defensive Fire Phase a SAN is spawned and that SAN eliminates the 8-0 leader (he had only just Battle Hardened to an 8-1 Hero), the Croatian MTR also went on a tear which eliminated an LMGs 447 – that unit was one of the most important lynch-pins in the defence of 38J8. Lastly, the rest of his men’s Final Fire is one of the most consistent runs of low DRs I have seen for a while; at the start of this Phase I had 7 units able to strongly influence enemy movement towards J8 – by the end of the Phase I had just 2 units, even worse than that is that I have lost the 337 in J8, thereby meaning that only putting a GO unit adjacent to J8 will be enough for him to grab the building. I am able to Advance a few of my spare units to positions where they will have a chance of interdiction his Open Ground movement, but there is no denying that this turn hurt me terribly.
Things might be looking up.. my MMG repairs immediately. Unfortunately though JP is still not able to miss and though a few of my few units are Broken (with more snake-eyes) I do also have some Pinned, including 1 of my 2 my FL capable LMGs and this is a big blow. To get this result though JP has to shoot with so many units that he only has 5 units able to move to try and claim J8. The first to move, a HS, is KIA by one of the hill MMG. The next to move takes an NMC and rolls Fate, that is the end of him. Next to die is a 447 who takes a 2FP -4 shot from my sole remaining hill MMG, he drops with his boots on… Then we have a HS who runs across the seemingly open and free ground, only to fall foul to a LMG FL! This leaves just one unit to move… he goes CX, but to make it to the building he will have to take a 1FP -3 from RF… and the RF misses… AARRGGG… In Rout Phase my broken 337 (not a single Partisan unit managed to SR in the whole game) pulls out and the Croatians take the building back.
So now we are at the final turn of the game. The Partisans get to move last and to even have a chance they need to break the 447 in 38J8… the MMG stack fires and though it loses ROF it manages to hit the vital 447, and the Croatian Squad fails the MC! It is game on again! I have about 5 chances to re-take the building while JP has about as many units capable to stopping me. The first Partisan unit to move eats up some of the DFF, but in doing so he is KIA. This really has been the story of this game, rather than breaking my men are dying, a broken unit can stop SFF from getting past his range, but a KIA unit does not… So with this in mind I take my 7-0 and waltz him straight into the middle of JP’s units… he is not going to waste FP on this unit, but while he is there he is going to stop an SFF from being able to taken due to his proximity to the Defenders. Although this was a good plan it was not able to stop JPs dice from continuing their form… as each unit moved he was either blasted into oblivion or took a MC – I did not pass a single MC in this final turn.
Just like JPs turn it came down to a single unit left to move and there was a single attack left that could stop him… My man moved and was just 1 hex away from being safely home when JPs men pulled their dice triggers… and the DR came down as a ‘4’! Well, that really did sum up the game, if my SAN was 4 I would have been able to win this game with just my Sniper, but as it turned out this DR did not call a Sniper, but it did call a K/2; that 2MC DR was an ’11’ – Game Over.
Partisan Losses: 227, 237 9x 337, 527, 447, 7-0, 8-1 Hero
Ammo Boxes Destroyed: 3
Croatian Losses: 5x 447, 2x 227, MTR (8x dummies)
The Partisans Destroyed 3 Ammo Supply crates, but only Controlled 1 building
CROATIAN VICTORY
Conclusion
This was a great game, with the game being right on the edge of swinging either way for about 40% of the time. Both of us came close to winning and losing over the fall of a single dice, and in the end it was JPs luck that held firm.
Both of us admit that I got totally diced… the amount of ‘4’ DRs that came up was truly amazing, the amount of MCs that were failed on the Allied side was pretty extreme too and often this can sour a game, but this really wasn’t the case here. For some reason it just made it tighter and more intense. I am not saying that it is biased towards the Partisans and that a dicing is what is needed to make it balanced either… it is not like that at all. Often when JP shot at a unit he had numerous options… this was due to his setup position – a sort of Aggressive Hedgehog if you will – those sort of defences get a lot of shots by right. The funny thing was that when he had plenty of options, he usually missed a few times… but when he had just a single option then he hit, each and every time, and usually with catastrophic results! I think the close result was more a reaction to the very good defence and the very good attack we both put up. In spite of the terrible dice we both played a hard and tough game and that somehow managed to shine through.
There is a lot of replay value in this scenario, both JP and I agree with that. We both feel that either side has a damn good chance of pulling off a win here. I am surprised that it has so few playing on ROAR (as opposed to the other Journal 7 scenarios), is that because it has Partisans?
I would definitely play this scenario again… it is short (5.5 turns) and has enough scope for manoeuvre as the Attacker and Defender to make sure that it is going to play differently every time. Although it will often rely on who’s got the hottest dice when it comes down to crossing the open terrain to claim to various control locations this should not be too much of a problem due to the numbers of troops involved.