J39 – INDEED!
JP attacking as the Germans
Legion defending as the Allies
THOUGHTS
This scenario has a 16:0 ROAR rating in favour of the Germans but I don’t see how! The British have a –2 leader and a Hero and, given the fact that all buildings are wooden that means they are easily able to score K/ or KIA results on any German anywhere within range. The Germans have 3x 50mm Mortars which are useless in this town environment as they cant be fired from a building and would have little effect when fired at a building so I feel I will be dropping them all over the board.
SETUP
This is a sequential setup and it went in this order:
I selected the pier that I will enter from, I chose C4 even though it will be under fire from the multi hex building in 21Z2. I am of the opinion that I can assault down the EE and FF rows. This will protect me from and firegroups in the Z2 building and by placing a MG in 8F1 I can put a fire lane down the 8F0-21BB10 road to stop him re-enforcing any units defending the EE and FF rows.
He setup with units in level 2 on 21AA2 and 21Y2 (as expected, they should be standard setup hexes for the British in this scenario). And also had single squads on his extreme left and right flanks.
I did not want to let him know where I was entering so dispersed my troops across the front of board 8 with a squad and MTR in 8K2, another squad and LMG in 8G2 (with a view to moving to 8F1 to create the firelane). My last 2 squads and 9-1 leader are in 8B2 where they can fire at his second level units in the centre of the board – usually at 6 hexes so full fire power for me and halved for him.
The Norwegians setup with a squad, LMG and 7-0 ldr on his left flank and 2 squads on his right flank. That means I have 3 squads to break through on that side of the board to reach the exit hexes.
THE PLAN
I want to get my MMG into 8F1 by the end of turn 1 so it can fire at the level 2 units and also stop him re-enforcing across the 21BB1-10 road. I will then push hard down the EE and FF rows, take out the 3 squads and get to the end of the board in time to delay any of his troops falling back to cover the exits, I will need to be brutal and push hard to do so but once those 3 squads are out of the way I can run down the FF road safely and achieve the desired result. This is not about being pretty, its all about using overwhelming force to create a break through.
THE BALANCE
After Legion was told by the games designer that the game should be reduced by half a turn (so the British move last) we decided to use this advice – somewhat against my will but the ROAR rating kind of said it was one sided if we didn’t. (I lived to regret that…)
TURN 1
I tried to suppress the 21AA2 units with an 8+1 shot for no effect, as was the LMG shot from 8K2. my troops came onto the pier and got slaughtered… I lost 2 squads to KIA results (a 4FP –4 took out the 1st , I kind of expected a loss here, and the 2RF –2 killed the second which was not in the game plan at all!) worse still, the MMG was dropped in the pier hex. (it would be 3 turns before it finally arrived in its desired turn 1 location) the remaining squad and leader made it to the factory 8B2 but it has been an inauspicious start as I am unable to put any pressure on his right flank yet.
He started moving troops across to his right flank and surprisingly, moved his other big firegroup out of 8Y2 and moved it downstairs and across to his right – had that joined the –2 leader in AA2 the game could have been in serious doubt.
TURNS 2, 3 & 4
I kept the pressure on him but my shots were going astray, it took until turn 4 to finally break his first unit, one of the Norwegians on his right flank – 2 to go!. Unfortunately he also started moving his Hero, 2 squads and an 8-1 leader down the board to the exit area and there is nothing I can do to stop him. I also lost another squad and a half as they entered the pier and a pair of K/ results halved two more of my attacking squads. He is slowly pulling back on the right flank and I have finally got enough troops to charge into them with some hope of having some survivors to put pressure on them. My timetable is now hopelessly behind schedule and it is looking tough to win.
TURN 5
I finally broke a second unit on his flank (the other Norwegian) and have charged at his remaining British squad, drawing its fire and allowing me to send units down the FF road into EE7 and GG7 where they can start to put his troops at the exit areas under fire. The remaining British squad pulled back in its turn but it is now surrounded by my troops.
TURN 6
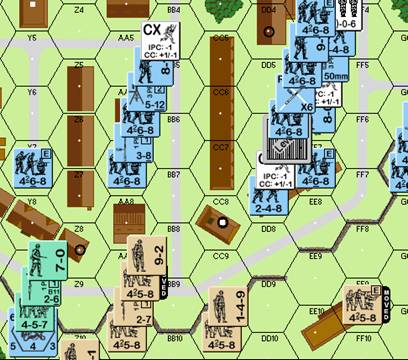
I still could not break the last British squad even with a 16FP std. shot at it and eventually advanced into CC to seal the deal where we both melee’ed (we lost a squad each in his CC phase). This has now set us up for my last turn. He has now been able to pull everyone back to the last hexes and, as can be seen from the picture below he has a formidable defence.
TURN 7
I ran a squad from GG7 to GG8 and popped smoke into FF8, then ran to GG9 where I survived his Def. First Fire and into GG10 where it broke on his SFF.
I then sent the unit in Y7 CX into AA7 with the intention of placing SMOKE on his 9-2 firegroup but it was pinned by the Y10 units.
A squad and LMG in AA7 went to BB9 with the same intention but it died when his LMG established a fire lane.
I then sent the Ldr, squad and MMG in AA7 to the same hex with the same intention (I want to SMOKE them to limit their ability to kill and then in advance fire if I can break them I might have a chance of winning as broken squads do not count as VP’s for exiting the board) – they survived the firelane but the leader was wounded and the squad broke when one of his squads fired PBF at them.
My half squad in DD7 ran to DD10 where the Hero and squad fired at it for no result.
With the majority of his fire having been committed I then moved my 9-1 and remaining squad in GG7 to GG8-FF8 (where the SMOKE was) to EE9 with the intention of breaking his FF9 squad in advance fire and then advancing off board but he FPF’ed at EE9 and rolled a snake eyes which eliminated both of them.
The EE7 squad died from his last squad and –2 leader in AA10 as it tried to cross the road and so I only had the 3 squads and leader in DD7 left to do anything with. They moved as a group and went into DD8 where the leader was pinned from the fire lane but the 3 squads survived, however, they were intending on moving into EE10 to try and break the FF9 458 and advance off the board but the loss of the leader denied them the movement points so I went CX and moved into EE9 where one broke and then to DD9 with the intention of breaking the CC10 squad, advancing into CC with the hero and rolling a snake eyes so we could withdraw from CC and leave the board. (A desperate grab at straws…)
As you can imagine, none of these plans worked and he took the victory although I finally broke one of his squads in advance fire (only the 2nd British squad broken for the entire game – the other was inconsequential and happened in defensive of turn 5).
ALLIED VICTORY
SO WHAT WENT WRONG?
I was happy with the attack plan and my execution of it but little hold ups snowballed into bigger problems. Losing 2 squads at the pier and dropping the MMG on turn 1 meant I could not mount an effective attack on his right flank until turn 3. The MMG was sorely missed as the 9FP in 8F1 combined with the squad and LMG already there could have put strong fire on his AA2 building and thus allowed re-enforcements entry without being under fire.
His lone British squad on the right flank never broke and was finally killed in CC in his turn 6 which probably cost me another movement phase, as it was he arrived at the exit area only one turn before my men reached it so the delays allowed him to gain good fire positions.
I thought he moved his 9-2 out of the AA2 building a bit too quick as it was hurting my troops as they entered but it also had a telling effect on the game at the exit area so I guess he did the right thing.
I can’t help thinking about the play balance and how it would have been if I had been moving last, I am sure it would have been a more exciting finish as he would have to choose who to exit and who to keep in order to defend the exit hexes but, c’est la guerre!
Overall I thought it was a tight game and very re-playable, if I was to do it again I would setup with 2 German squads on each flank and enter my troops in the centre pier with a view to extending his lines and moving through any breaches.