J41 – BY OURSELVES
Legion attacking as the Norwegians
JP defending as the Germans
ROAR (N:G – 50:51) – 20th May, 2007
Played as Live VASL – 2 Sessions (4.5 hours – due to poor internet connection this game was slow)
At last a chance to attack! I have been defending for 5 games straight now and it is really not suited to my style of play – though I have learned a lot in the process. Here the Norwegians attempt to take back a German-held town and just by looking at ROAR we can see that it is going to be a close thing!
Initial Thoughts
This looks really interesting, and after being forced up against the wall a number of times by JPs aggressive attacks it is going to be a real joy to turn that around and see how he likes it!
Again we have a scenario with Alpine Hills in effect and again the Germans are well armed, but it is the Norwegians who have the superior leadership and superior troop numbers. After crossing a relatively open piece of terrain that is criss-crossed by a gully to the North of the village the Norwegians have to capture 16 building hexes (all are single-story) in just 6 turns. The Germans start out with essentially just a platoon to guard the village against a Norwegian Company, but in turn 3 they get half a Company of reinforcements – by this time I hope that my Norwegians can be well into the village.
Like a lot of these Norway Campaign scenarios the real thing to watch for the attacker is the CVP cap (10 CVP is a win for the Germans) and game length (just 6 turns) though 16 buildings hexes is no small task either. We have had some close games in this run of scenarios and I don’t doubt that this one too will be hard-fought till the bitter end!
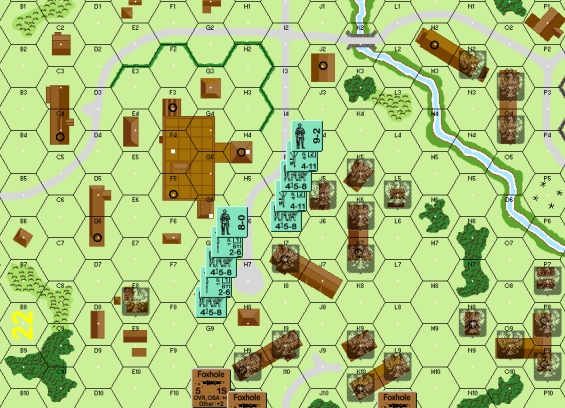
German Setup
JP has gone for a pretty-much conservative setup. He has placed all his units in a straight line as far forward as is possible. He will be wanting to hold me off long enough for his reinforcements to enter the battle. If I rush forward then he will want to inflict as much damage on me as he can, especially trying for CVP. After some of his comments in the last games about my skulking I am not sure he will be wanting to do this… sometimes it can be worth trusting your luck, but I think that he might do well to trade territory for time and pull back to save his men and shorten his lines.
I have written out his defence as initially seen; square brackets indicate forces as they are exposed through the battle.
22B9 3? [50mm Mtr 468] – This has got to be one of the Mtrs holding the flank
22G10 3?, foxhole [LMG 468]
22H10 5?, foxhole [2x 248, MMG, 8-0] – Holding the centre and a foxhole, so it has to be the MMG
22J10 4? [dummies] – 4x ? have to be on top of real units… this stack is probably a dummy
22L10 3?, foxhole [50mm Mtr 468] – This unit has to hold the most easily controlled sector of the city
Norwegian Setup
I think JP has misjudged a part of this battle. His defence looks to be weighted towards South of centre, but the easiest buildings to control are to the North of centre. Considering I shall have at least a small force pushing through the central hills on Bd. 18 and that 18J10 is probably a dummy stack then that means that the whole North side of the map is being covered by a single stack – 22L10. Also considering the large amount of woods in this area then I think that it is most likely that he has only a MTR here.
I say that the Northern buildings are so easy to control because apart from the 18R8-U10 road there are places where an attacking force is out of cover. The Gullies in this area also make approaching the battle zone easy.
With this in mind I have made the following troop placements to attack the North of the village:
18R5 (gully) 2x 457, 458, 7-0 – To CX through the gully in the first turn and push as hard as possible for the 18R8 building.
18S5 2x MMG 457, 9-2 – Prep Fire units to hit his defenders and also draw fire.
To tie down his central positions I have placed a force to cover the hill. These units will be more for taking any opportunities afforded by holes in his defence.
18Y5 2x 237 – Covering the hill
18DD5 237, 2x 457 – To clear the way to the 18DD7 building and also to cover the hill.
18FF5 2x 458, 2x LMG, 8-0 – Main Southern Fire support
I have just a single unit trying to find a hole in his Southern defence, and as JP showed in our last game in this series (J40 – Might Makes Right) a single HS is a huge threat when it comes to claiming buildings:
18GG5 237 – To draw fire and seek a Southern entryway to the village
I am pretty happy with this. I have managed to find a way to deal with the main danger I face in this game; crossing the open terrain before the village with as little loss as possible.
The Game
TURN 1-2
The game opens with a reasonably successful Prep Fire by the Norwegians. The 22J10 position is proven to be dummies and ROF is achieved allowing me to expose the MMG in 22H10. I now know that all the other positions are ‘real’ units. I move forward as aggressively as the open terrain will allow and JPs attacks are only able to cause PTCs and NMCs, which I pass, though he also scores a Hot SAN result that breaks the HS I had managed to get to the 18DD7 wooden building. By the end of my turn I had moved squads through the gully to the road and woods North of the village (18S9, R8, R7) and had placed a number of concealed units on the central hillside (18BB8, AA8, Z7). He has exposed all of his units to me now so at least I know what defence I am dealing with. The best news is that it is only a 50mm Mtr 458 covering the North where I currently have 3 squads and a 7-0 attacking.
JP does not move his units, instead he stands his ground and fires… this is a bit of a gamble which for the most part he loses. His only successful attack is to ELR break a 457 on the extreme North of the map (18R7) leaving me with 2 squads able to start claiming building hexes. Even worse for JP is the breaking of his LMG 468 (22G10) which has dramatically decreased his ability to cover my next movement turn – this unit Routs back to 22I9. He has only the 468 MMG, 8-0 (the 2x 248 recombined in Rally) to cover the middle.
There are so many gaps in the defence that I need only face single attacks before my units can pour behind his defence. My first unit to move is a HS from the hill who double-times all the way to 18J8 (thus keeping his broken 468 under DM). In shooting at this HS and the units that follows JP makes a crucial error when he SFF’s before firing his MMG! He knew that he was facing the possibility of having the MMG’s CA pointing in the wrong direction, so he used his Squad FP instead – but that meant that he was unable to fire any further than Adjacent. When you consider that the first shot by the 50mm MTR 468 (22L9) Cowered you suddenly realise that with just a few units moved (and already 3 hexes claimed) he was left with just a 50mm MTR 468 (22C10) to hold off another 6 squads! Luckily for JP the 50mm MTR went on a ROF tear and Pinned enough units to stop his defence being totally swamped, he also managed one of his ‘made to order’ snake-eyes that CRed a 457 of mine due to a CH. The final action of the turn was a concealed HS jumping into CC against this MTR unit, unfortunately I did not achieve ambush and JP was able to KIA the HS for no loss – in retrospect this was a foolish risk considering the CVP cap. I have also moved my main fire-stacks, the 2x MMG 458, 9-2 have crossed the gully (18V9) and are now ready to start attacking the village.
Again JP stands and fights… this totally surprises me, against the MMG alone there are possibly 4 different attack options available to me. As it is they were not needed; my 2x LMG 468, 8-0 (18DD7) went on one of the most amazing ROF tears I have ever seen; the 1ROF LMGs ended up having 5 shots in a row and when the smoke cleared his MMG position was reduced to a HS (made prisoner in Rout) and his broken 468 (22G8) was re-DMed which caused him to Rout away as far as the rear of the factory (22F3). To make things worse JPs attacks were totally useless with only a Pinned unit the result of standing and fighting.
With only enough time for a short session the action stopped here till we next have time. To say that I am happy with this result is a total understatement. He has only 2 Squads in operation and the other Routed so far away that it will take a whole turn’s movement for him to be able to get back into the game (assuming he can rally – which, knowing JP he will do immediately). I will be able to claim 8 buildings in the next movement phase without any way of being stopped and in doing so I shall also be setting myself up for his reinforcements. If his MTRs lose their ROF early, or miss my moving men, then I shall also be able to grab much larger amounts of territory whilst also ensuring that I have a good chance of being able to defend them against a German counter-attack. As things stand this game is really going to be a matter of whether the Germans can take enough buildings off of me in a counter-attack, or, more likely can do enough damage to me to make the CVP cap.
Norwegians: 2x 237
Buildings Claimed: 6
Germans: 248 (248 surrenders) (4x dummies)
CVP: 2
TURN 3-6
Before we started this next session of the game a quick look has showed how easy it should be to guard my perimeter; I really get the feeling that this game mine, but it is also mine for the losing if I am not careful.
I am able to rally my broken Green Squad with my first DR of the game.. this is a bonus as I can use him to guard the stream crossing and thus secure my North flank should JP make a small push through this area (as I suspect he might). It is not like JP to split his forces too much, he is likely to send just 1-2 MMC through the North and put the main weight of his attack down the South flank and through the factory. Just as an aside, if it was me counter-attacking with no CVP cap… then I would probably split the forces equally to the North and South… I would want the defence as stretched as possible. From his Prep Fire I can see that JP has come to a few conclusions about this game… he has obviously decided that he is not going to try to defeat me tactically, he seems to have decided that the capture of 16 buildings is inevitable; all his Defensive Fire shots were for high CVP units with -2 FFNAM/MO – luckily he totally failed with every shot or MC. Unfortunately I do not do much better, though I am able to capture the Northern 50mm MTR and its manning 468. I have also been able to get units to the very edges of the area that I am choosing as my ‘perimeter’ [22A10-K5-P7] to secure it from immediate counter-attack and to ensure that I strip as much concealment from entering units as possible.
His units enter the board and he is also able to rally the 468 that had routed to the rear of the factory. All of his men bar a single HS are entering South of the Stream… in fact only a single HS enters North of the factory… a HS who goes to 22J2. His sole remaining unit from the initial defence, a 50mm MTR, 468 (22C9), manages to miss my adjacent 458, mind you I am no luckier in Defensive Fire against him despite having him Encircled. His moves are aggressive to the point of bravado and he pays the price for that when a stack consisting of 9-1, 2x 468, LMG, MMG blunder through the factory to 22H4, they suffer a 4FP +1 shot that ends up breaking both 468! Other than that my shots are very poor and I even lose a HS when his Encircled 468 attacks it in CC – I also have an LMG breakdown.
Thankfully my LMG immediately repairs while JP gets yet another Fate roll in his MC (he is starting to get very despondent now) thus CRing a 468. I am able to move my MMG stack up to their assigned defensive position (22I6) – this building is made for the MMG’s; I can set up 2 Firelanes here covering most of my perimeter or with the -2 officer I can also hit any of his units that are in wooden buildings with up to 16FP+0. JP did not notice a LMG., MMG(g), 457 move in the open only 7 hexes away from 2x 467, 8-1, but he finally noticed the shot in Defensive and it hit causing me to ELR break; this is a bother, I had really wanted this unit for the other MG position I was setting up in 22G8… From 22G8 I would have been able to use the 2x LMG 458, 8-0, along with the captured German MMG to totally secure my defence. [I like this defence so much that I shall present a view of it along with the final building count.] It is obvious that JP has placed the 2x HS (22J2, 22O4) to cover nearly half the board and to stop me grabbing all the buildings on the Northern side of the board – I cannot afford to risk moving in the open even against just 2FP -2. My shots at these units have thus far been fruitless.
JP manages to pull another 6,6 out of his hat, this time on an 8FP +0 shot against a 457 I had stranded in the open (22E7 – he had just Controlled 22F6) and one of his LMG malfunctions. His moves are hesitant, not like JP at all.. but when I mention it to him he points out that it is hard to get an attack going when your men keep falling apart at the slightest provocation. As if to emphasis that point I take a shot against the just moved LMG/MMG stack and everyone in it fail their PTC… his return shot is ANOTHER 6,6 which malfunctions his only other LMG! His rampaging 468 jumps into another CC, this time against my 457 down in the woods of 22B9 – but he doesn’t score the kill this time… if he does I might be in a bit of trouble!

Ah… if only.. the defence I wanted along with the buildings controlled at games end
There is always a moment when you luck starts to change for the negative… and to make it worse, you can feel that starting to occur. For me that time came during this Turn 5.
I attempt to take more territory and also to get in close enough to help out with the Melee in 22B9, but the moving 457 is ELR broken and this presents me with all sort of difficulties. He was in trouble anyway but now being broken like this I run the real risk of having JP make it in to the village through the extreme South side as I have no-one here left to cover the approaches, I hope JP doesn’t take the time to do the maths with the Controlled buildings. To counter my fears I send my Green unit across the stream and into the Orchard hex (22P5) where he might be able to take some of the buildings North of the stream if I am able to break the HS here (I cannot: my shots are atrocious and 8FP +2 shots don’t cause so much as a single PTC on this guy by games end). I skulk with everyone I can.
With his Turn 5 things are suddenly starting to get desperate for me. He is able to get another unit into the continuing Melee and thus kill off my 457 here (22B9), then he starts swamping my broken guys with his CXing men. About the only positive is that he needs at least 2 units to force the Surrender of one of mine, thus each unit I have to surrender ends up essentially taking 2 of his out of the game for the final turn – not much of a bonus, but things are so bad all of a sudden that I will take ANY help I can get. My only saving grace was the continued good health of my LMG 458, 8-0 but that is brought undone when the Germans take a measly 2FP +1 shot that ends up scoring a 1MC! Everyone in this stack breaks which means the broken 458 here is also CRed. I now have NO ONE covering the South flank… and what is worse, I cant afford to lose a single CVP more as he is about to capture a 237. The only positive from this is I get only my 3rd SAN result in 6 games and the victim is the HS in 22O4 thus opening all these buildings for my perfectly placed 437 (22P5).
It is my last movement turn… Firstly I gobble up all the buildings I can; I now control 22 of them and that should be enough even if the German’s make taking buildings their main focus. I don’t think that will be his plan though… he used most of his Double Time capability in the last turn so this leaves him with few options. He is most likely to try to run down to surround and/or shoot my broken guys (4CVP: 8-0, 458, 237) in 22K10… so I move as many men as possible to cover all likely routes to this place; I have 1x MMG 458 in 22I6 and 1x MMG 458, 9-2 in 22J7. Foolishly I left 2 squads in 22L5/K5 just in case he tried to move his HS to take the buildings on the other side of the stream.
As usual JP has a few tricks up his sleeve and he came damn close to taking this game… it actually came down to the absolute final DR of the game…
Instead of attacking my broken guys he tried to force the CVP win by attacking my MMG units with what was almost a human wave. It was a pretty out-there kind of assault… every unit that crossed from either the factory or bypassing through 22H8 had to face anything from 2FP to 8FP with -2 or even -4 but it so nearly worked… my shots were terrible and his MCs were passed with absolute ease. The real king-pin of his move was to try to get a HS right in the midst of my men, to get to 22J6! And what is most amazing is that he so nearly did it; he faced 4 shots and up till the last he managed to pass them all, even passing with HOB and creating a Hero in the process – it was only my last shot (2FP -2) which eliminated the HS and Hero and saved me… if these guys lived in GO then I would not have been able to rout and JP would have had multiple options for CC. By the end of his movement his men had me surrounded and though I was able to rout away I had one unit, the MMG 458 in 22I6, who had to face the CC… we rolled for Ambush, no Ambush… we rolled for the attacks, with both of us at 1:1 though he had a -1 leader, he needed a 6 or less for the Germans to pull off a miracle win…
… he rolled high!
Norwegians: 237, 248, 458 (237, 437 Surrenders)
Germans: 248, 2x 468 (2x 248, 468 Surrenders)
CVP: 9
The Norwegians have controlled more than 15 Building Locations.
NORWEGIAN VICTORY
Conclusion
This came down to the very last CC, something that I really would not have foreseen at all… by Turn 2 I seemed to have such a commanding lead, but that single 50mm MTR, 468 on the South flank was really a bother, in the end he killed 2CVP of HS and assisted in the death of another 2CVP from a full Squad as well as capturing 1CVP.
I can certainly blame myself to a degree for this near loss. Our internet connection was terribly slow and this game should have finished in half the time. I was getting frustrated and irritated by the lagging nature of the game, and thus I was not thinking 100% straight. I made mistakes from impatience and perhaps even from arrogance – I just assumed I had it in the bag until the very last scary minutes.
The other aspect that did not help was the timing of some of my poor DRs. My defence really seemed watertight, but a lucky attack by him (2FP +1) ended up causing mass destruction from a single 1MC (8-0, LMG 458 both broken, LMG 458 CR). On the other hand it was the SAN result from this shot that broke the unit to the North of the village allowing me to be sure of totally controlling the required number of buildings. I also cannot complain about the dice too much; JP’s attacks in the first part of the game were atrocious and he too suffered some terrible MCs that really broke apart his attack cohesion. In the end it is always the same with small scenarios, the smaller the game the more the dice can have an effect… a few incredibly (un)lucky DRs in a CG don’t tend to unbalance the whole thing due to the sheer numbers and space involved. I also cannot complain about the DRs too much because the win was decided by a single DR at the end; with a 42% chance of it being a German win the CC DRs came good for me at just the right time!
I think that I would have to re-assess some aspects of my attack in future playing’s of this game. I lost 4 CVP just from aggressively attacking a single unit – I did not need to do that… this guy could have been bypassed. Due to losing my focus on the buildings and defending my perimeter I nearly threw the game away but otherwise things went very well, the initial attack worked perfectly and the middle game was relatively smooth.
Full credit must be given to JP here for taking advantage of some small holes in my defence to work his way in there for a near win. It was a far closer game than it needed to be thanks to JPs aggressive counter-attack. I know I have been improving as an ASL player through these scenarios, but it is obvious that I am not the only one!
This was an excellent scenario and again I must recommend it for play even if you only have a few hours to spare. We played it in 4.5 hours, though I think that if the internet was not being bothersome we could have finished it in 3-3.5 hours and it is obviously well balanced… just look at the ROAR rating!