J43 – 3rd RTR IN THE RAIN
Legion Attacking as the British
Rami Defending as the Germans.
ROAR (G:B – 104:111) – 5th Dec, 2009
Played with 68 VASL Logfiles (Sept-Nov, 2009)
This is going to be the 3rd time I have attempted to play this scenario for an AAR. Once the game was abandoned because my opponent could not commit to the time to play, the other time it was abandoned because of a streak of luck which made the game useless for AAR purposes – an AAR that states “roll lots of DR <5 for attack and have your opponent fail all his MC” is hardly much use to anyone!
Anyway, for the 3rd RTR let us see if it is 3rd time lucky!
Initial Thoughts
I really like this scenario. It has enough units to not make a it reliant on a single DR for a result, it also has AFV types which are not often encountered . This early-war stuff is fun and although the tactical principles are the same one cannot deny that Infantry with LMG or ATR can still pose a problem for AFV. I also like the way this scenario allows the British attack some space to build up a little momentum before it hits the German lines.
One of the stand-out rules for this Scenario is the Heavy Rain. This means that all shots are +1 LV Hindrance with the only exception being shots wholly within a building. Obviously with AFV in play and with a large mixture of Open Ground & Ploughed Fields leading up to the +1 Hedges or +2 Wooden Buildings & Stone Walls the extra +1 changes the complexion of the game somewhat. In previous playing’s I have found that the end result often depends on the kind of damage the Germans dish-out as the British try to get within range. Those British AFV and Infantry are somewhat hampered until they have at least reached the initial line of Hedges in the middle of the board and as the Germans I would be planning on doing as much damage to them right from the outset. With only 6 turns to mount the attack an up-front defence can do much to force the British to rush later in the game.
The Germans are a potent but brittle force, they are not blessed with the kind of the Leadership and SW that we often expect from them in the opening stages of the war but they are generally going to be setup within +2 TEM which is really going to be +3 thanks to the Heavy Rain. Every German loss is going to be keenly felt, but the British player can easily make the mistake of seeing their nearly 2:1 troop superiority as giving them some lee-way… I think this would be a mistake. The British are equally brittle thanks to the kind of terrain they must cover before they are effectively in the fight.
On a side note the Woods to the South between Columns L-V always stand out for me and each and every time I have attacked I have sent my ATR and a strong force through here. I have never met an opponent yet who placed anything more than a token defence in this area.
My last word is about the AFV. I see this as being roughly equal. The Germans have superior AFV there is no denying that, but the British numbers more than make up for it. If the Germans separate their AFV then they can be easily picked off. While the German’s AFV are effectively in the fight earlier the terrain, and particularly the Stone Wall placements mean that the British can often gain a slight tactical advantage if the Germans are not successful in holding off the first wave of the attack.
German Setup
The Germans are all set-up Concealed
O6 4x ? [ATR 468, Dummy]
P4 5x ? [2x 468, LMG, 9-1]
Q8 HIP 37L AT 228
S4 3x ? [LMG 468]
S6 3x ? [468, 8-0]
This is a setup which might cause some problems for the Germans. Essentially the only units they have to stop me making major gains early in the Scenario is the O6 stack. I have the chance to swarm past this unit and make for the N1-N4 Hedge. He has also failed to place strong contingencies for my moving to the rear of his men through the Woods; only the S4 and S6 stacks have the ability to counteract me without severely weakening his front line, and that might not be enough to stop me hitting his O6 unit from both front and behind.
British Setup
My attack is going to be 2-pronged. I have the main weight of my force (as measured in AFV and men) hitting the North of his line. There is a numerically lesser force coming at him from the South. In actuality these attacks are both equally weighted attacks as my Southern Force has the 9-1 leader and the LMG + ATR. This group is designed to infiltrate the unguarded woods and catch his AFV from the side or rear. The Northern force is to take the hedge line and gobble up the buildings. If my plan works he should be facing enemy to his front and rear.
H2 50mm MTR 247
I1 2x 457, 247, 8-0
I2 3x 457, 7-0
I8 3x 457, 2x LMG, ATR, 9-1
My AFV will see the 2x A9 attacking in the South, they will try to gain the K7-M8 Hedge first. The other AFV will be assisting in the taking of the N1-N4 Hedge.
The Game
TURN 1
The charge develops quickly in the South as both AFV and the massive stack led by the 9-1 move to their full extent. I also charge forward in the North an although I am concerned about the Ploughed Field slowing me down and giving me no cover Rami holds his fire. My units make it on unmolested and he reveals nothing.
He brings on his AFV and I blast away at the concealed units but to no avail. His only infantry movement was to place a unit upstairs in P4. The complete lack of fire is baffling.

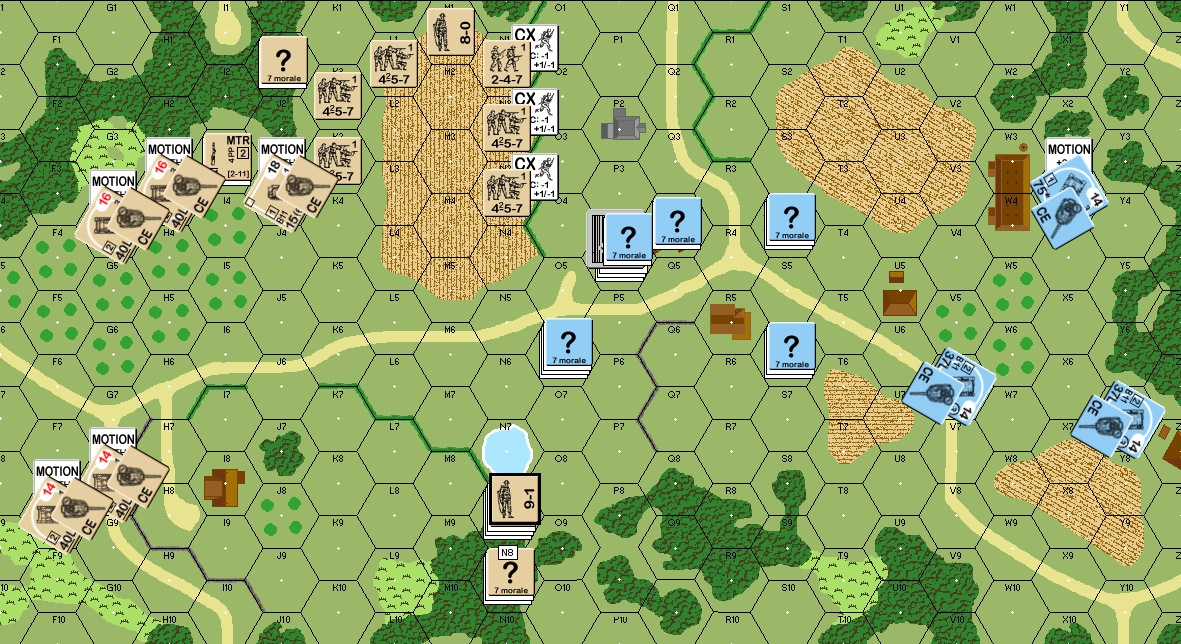
The British attack the Farmhouses where they suspect the Germans to be holding out, but as yet no shots have been fired in anger.
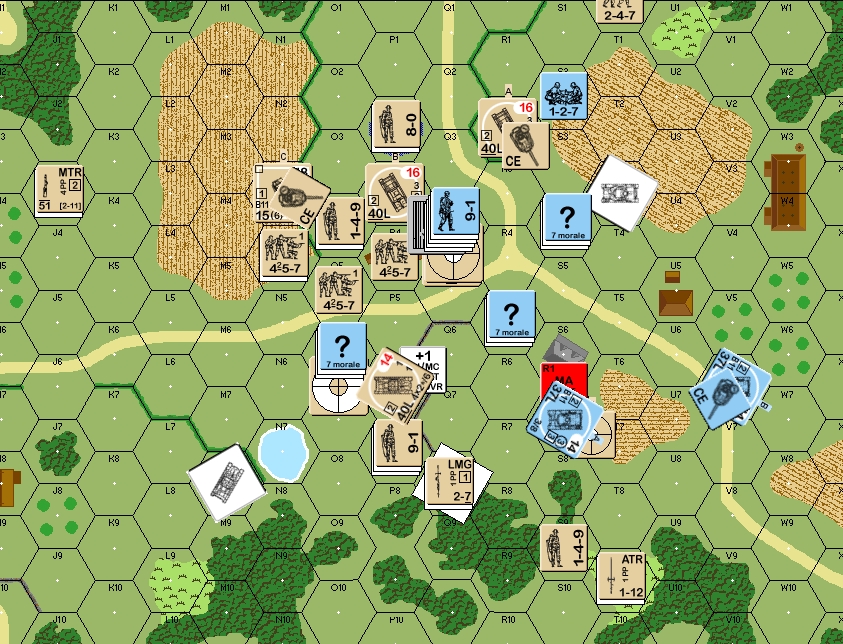
TURN 2
He still holds his fire and I am able to claim a building (P2) before he finally shoots at anything (breaking a 457 with a 468 from P4(1)). My AFV have come forward to both sets of hedges and he is rapidly becoming surrounded. His AT Gun breaks cover (Q8) to blast away at one of my A9 and completely gaks the first attempt to hit him but then succeeds with a secondary ROF shot and eliminates my AFV. I strip the Concealment from the AT Gun with a lucky 1,1 thanks to my 9-1 leader but fail to break the crew. I have taken 1 building and am starting to sidestep the village… even more worrisome for the Germans is my numerical superiority and the close-in nature of the fight, this could become a white-wash quickly if he doesn’t discover a well-spring of luck soon!
The Germans get greedy as their AT Gun fires at my 9-1, 2x LMG stack and misses with no ROF; he tried for Intensive Fire and Malfunctions the AT Gun which could prove to be a bit of a disaster. Next he tries to get his AFV into action but the first Panzer up gets smashed by the 40L gun on one of my A13 Mk. II as the Germans get overconfident and aggressive. Like many new AFV players Rami tried to attack aggressively with them. Experienced AFV players know that they are vulnerable after they have moved. Even if I did not get him in the Defensive Fire Phase I was likely to kill him in my own Prep Fire. More importantly for Rami is that the loss of this PzKw IV leaves him with just 2 AFV and give me a 2:1 numerical superiority.
Allied Losses: A9
German Losses: PzKw IVD
TURN 3
The British push forward with abandon. If the Germans are not going to shoot then I am going to move while he is still trying to setup his defensive perimeter with the remaining AFV. I attempt to sneak a HS around the back of the village to the North and charge forward with my remaining A13 Mk II; these are right up against the P4 farmhouse and the R2 Hedge The A9 is Hull Down at the P6 wall. I have also snuck my ATR into his flank; he took a shot at this ATR when I was concealed and scored excellent dice to NMC me, but unfortunately for Rami this left me with a HOB result to draw out a Hero – this is terrible luck for the Germans. I am able to break the only exposed unit (468) in the main farmhouse and then Rami gets a 6,6 result against his ATR carrying 468 in the other forward building (O6) which leads to his eliminated through FTR.
His Prep Fire from the S7 PzKw III scores a Pin result on a 458 as it sits in the hex with the captured (but not manned) AT Gun. A follow up shot with the MA of this same AFV leaves the MA Malfunctioned. I manage to get a hit with my ATR on the V6 AFV but this causes no damage and since he stubbornly insists on keeping his concealment I am unable to break his defenders in the main farmhouse.
Allied Losses: A9
German Losses: 468, 228 crew
Now that the Germans have started to expose their positions my British pile into the fight. He is rapidly being swallowed up as I work around both his flanks.
TURN 4
I take 4 Prep Fire shots this turn and should ANY of them hit it would have been a very large blow to the Germans… the lowest chance of success was 50% with a ‘7’ DR, ALL my shots are ’10’! I miss with every shot and am in a terrible position all of a sudden. How could I have possibly missed so many easy shots? My moves are based on the assumption that he is not going to change his current tactic of holding his fire to keep his concealment. I use the Mk. VIC to lock him down in the main building but because I forgot to CE the Crew I do not achieve the Freeze-Sleaze I was aiming for. I swarm the building with 3 squads so that I might go into CC with a decent chance of success or so that I might sit back and blast away next turn with a high chance of success. By blasting away at the units in Q4 I am able to enforce Encirclement and this allows me to Pin the 9-1 and a 468, I charge into CC with 3x 458 and a Hero; my men kill his 9-1 leader and a 468 but the Concealed 468 Withdraws into the lower level where is it safe from the current CC but frozen by the AFV presence.
Rami still tries to keep his Concealment, but he is very rapidly running out of options and I have isolated and eliminated all his men I have thus-far encountered. It is probably too late to change the tactics now though as I am all over him. His shots are misses… even when his sole MA functioning Pz III scores an easy hit on one of my AFV the shell fails to penetrate! His moves are very limited, an AFV Crew attempts to make his way to the W3 building and is broken in the open terrain. His MA malfunctioning AFV attempts to activate their SD, and fails but for the attempt cops shot after shot until a near-miss forces the Crew to bail, they are broken immediately. The AFV who’s shot failed to penetrate my A13 is blown apart by the return shot leaving him a Burning Wreck. Finally the sole survivor from the last CC Phase is broken when I fire on him from above with 12FP +1 and score a 2MC; he is eliminated for FTR as I declare No Quarter and that leaves Rami with just 2 concealed stacks and no AFV to hold off my entire force. I have 4 AFV who are free to move and lock him down so that my infantry can finish him off, this game is essentially done.
German Losses: 2x 468, 9-1, PzKw IIIF
TURN 5
The AFV sleaze-freeze is followed by an infantry swarm, the Advancing Fire shots are poor but it is enough to break the last leader who is eliminated through FTR. I Pin the other 2x 468 in their separate hexes. The Pinned guys are swamped by 3:1 odds backed up by Heroes + Leaders to score Ambush results and clean kills in CC. The Germans are wiped out to a man.
German Losses: 2x 468, 2x 127, 8-0
The Germans are Eliminated
ALLIED VICTORY
Conclusion
I have to admit that this defence really had me thinking about its positives and negatives. I have never seen anything like this outside of a Campaign Game. In a CG occasionally your opponent will hit your defences with such over-whelming force that your only option is to keep your head down and turn to whatever religion is most appropriate to you; this tactic is one of last resort though. In our game Rami consciously chose to play like this right from the outset and as I mentioned in the introduction I believe that Turns 1-2 are essentially where the Germans need to grab this game by the scruff of its neck.
While I find the strategy intriguing I have to admit that there are a number of flaws in it which I was able to exploit. It completely handed over the initiative to me, I chose when and where to attack and what the likely odds were to be. While the SAN mechanism can hurt to person doing the most shooting generally ASL is a game which favours those who take many shots, if those shots fall within the dice bell-curve then probability will play its part – also the more you shoot the more potential there is for exceptional dice (2, 3 or 11, 12).
In CG gaming one of the reasons why Concealment Skulking is so effective is because of the variable nature of the Defender’s composition. That front line COULD be a mass of dummies with OBA or MGs zeroed in on the locations. The line COULD appear empty but be stocked with the entirety of the HIP forces available to the Defender… the unknown becomes an effective weapon to use against the attacker. In this scenario after the first position was revealed I had a pretty good chance of guessing the rest of the disposition of his forces and since the HIP Gun was also revealed early in the game there were no nasty surprises to hold me back.
A positive about this defence was that it really slowed me down. All Rami needed was a few lucky DRs and I would have been behind schedule for the assault. With a bit of luck on his side the outcome of the game could have been dramatically different. Relying on luck is not a sound tactic, win or lose my concerns about his Skulking would have stayed the same, but one of the many things I like about Rami as an opponent is that he learns fast, applies that learning at the fore-front of his plans and is not afraid to think outside of the box.
AFV is a new world for Rami and his use of his Panzers showed it in this game. Even though ASL is primarily a game of Infantry combat successful AFV use can still turn battles just like in real life. His lack of mobility cost him his AFV though he can genuinely argue that bad luck robbed him of some dead-certain return shots. In fact luck has thus-far played its hand in a number of our battles and I am thankful that Rami is willing to play on for the day when it all turns to bite me on the butt.
After 3 attempts to finish this scenario I am still not tired of it. I think it is a exceptional situation and would happily play it again at any time. It provides some complex problems in a small playing field and with a limited time frame… thus it is suitable for playing even in only a few hours. If you have not played it yet I think you are missing out on a real treat!