J44 – AUDACITY!
Legion attacking as the Polish
JP defending as the Germans
ROAR (P:G – 54:54) – 4th June, 2007
Played as Live VASL – 2 Sessions (4.5 hours)
Again I get the chance to attack, this time it is late in the Norwegian Campaign and my Allies are trying to “lose with a victory”. Here we see a Polish attack on a town lightly held by the Germans.
Initial Thoughts
Wow… what a mess the initial setup makes. There are masses of German Blue units along their line (in the Eastern Buildings of Row ‘M’) and a smattering of French Blue (actually Polish troops) along the North Edge and on the central road. Again we have Alpine Hills in effect and again all the buildings are single-story and wooden. To top it all off there is Mud – though the roads are paved for movement purposes allowing for a little bit of manoeuvre relief.
The MMC are almost all Elite for the attacking Polish while the Germans only have half Elites and half 2nd line units. With half of his force as ELR 3 447’s the Germans might have to watch how they expose themselves to fire since they are only a step away from Conscript status. The French have 2x H39 to play with, a nice touch… but the Germans have a 37L AT Gun to counter that and the Turn 3 French reinforcements (3x Trucks with Passengers). The Germans also have a great mix of SW from the ubiquitous 50mm MTR to an ATR; they also have 4 AT Mines. Both the Germans and the Polish use French MMGs but the Germans can use them without Captured penalties, while the Polish cannot.
To win the Polish must take 10 buildings hexes while losing less than 19 CVP… this might be tough, the AFV alone are worth 5 CVP – but obviously with the ROAR score sitting equal this must be pretty well-balanced. Also due to the initial setup the Poles have no obvious places to attack first… and the sequential setup (German, Polish, German) and German 1st Turn means that the Allies don’t get to even be sure that they will survive the initial Turn. The Germans can actually move everyone forward in their first Turn and thus put the reinforcing Poles (slogging it through the mud) under quite some pressure as soon as they enter!
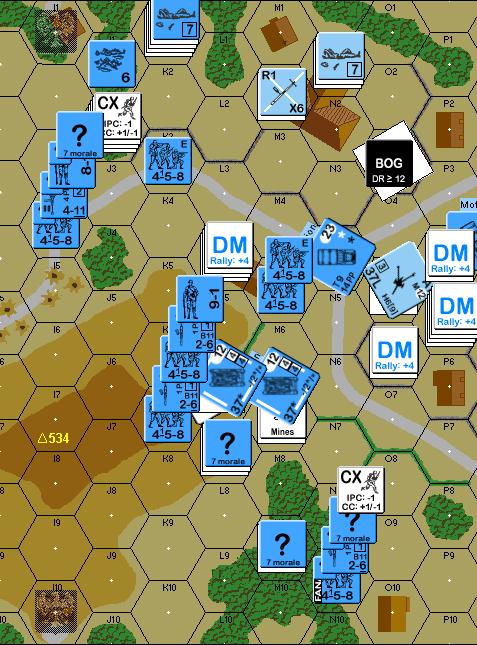
German Setup (Part I)
JP has made some interesting moves with his initial setup.
As usual with concealed units I have written down the location of the concealed stacks, the exposed units are enclosed within Square Brackets.
M1 3x ? [LMG 468]
N1 2x ? [447]
M2 2x ? [237]
N2 2x ? [dummies]
This first group is guarding the M2 building, I expect a few of these to be dummy stacks as JP will be wanting to setup a strong central defence to stop me gaining the 10 buildings necessary for the win. Mind you, as the AT Gun is probably going to be around this area he might be stacking MMC here to stop me knocking it out early. He will probably attempt to move some of these units forward while under the cover of concealment.
M5 8x ? [MMG 468, ATR 447, 237, 8-1]
O5 [37L AT Gun 228] – An obvious but effective location for it
M6 2x ? [dummies]
M7 5x ? [50mm MTR 447, 237, 7-0 – 1 AT mine]
These are likely to be mostly ‘real’ as the Germans can easily defend the roads and hills with so many troops and make it very hard for me to gain access to these buildings. Again I expect JP to use his first turn to put these men into strong positions to block my Turn 1 Reinforcements. He will probably move some guys up the Hill and will certainly put a lot of men in L4.
M10 2x ? [dummies]
Probably a dummy, though he might try to reinforce the hill with this unit to stop my Turn 3 reinforcements
Polish Setup
I have setup the ‘road’ units in a single line to stop him smashing me with his first shot and to force him to face the possibility of a 3-hex firegroup return attack… I need him to waste initial shots against me so I can bring on my reinforcements without molestation. I also need to stop him getting to J4.
G6, H5 458
I5 LMG 458
The Northern units are setup to give me a bit of strength for building busting and also so that I am not putting all my eggs in one basket if he does take the chance to move his men into CC in the first Turn. He might also use his 9-2 leader to direct an attack against these guys and could possibly cause a lot of carnage!
I1 458
K1 2x 458, 7-0 – They could be lost in a first turn CC and really handicap me for the game!
German Setup (Part II)
JP has put all his eggs in the one basket and placed his entire final group ready to attack my men on the road:
G7 2x LMG 468, 9-2
Now that the setup is done I can only await his initial turn to see what his motives are for the attack. My guess is that he will be aggressive in this first turn to grab the excellent LOS opportunities denied to him because of his setup locations.
The Game
TURN 1-3
The ‘Eggs in One Basket’ group on the hill use Spraying Fire to hit both my G6 and H5 units – but the shot doesn’t work, I pass both the MCs! When we fire back he is not so lucky and ends up with both his MMC broken! His Rout options are so limited that he can only run to E7 where his MMC will be quickly captured thus eliminating a quarter of his force in the first turn! (JP actually thought about surrender at this point as this is a terrible blow). Another thing that doesn’t go well for JP is the accidental movement of a dummy stack into my LOS as they (and a lot of his force) head up the hill to Level 2.
I Capture the broken guys in my turn! What a bonus, but it was tough I had to go CX to ensure that I could slog it through the terrible mud fast enough. In an effort to get moving I completely zone out and move an LMG 458 into the LOS of a 50mm MTR on the hill – the MTR fires and doesn’t get a result; the manning squad fires and HOB me thus creating a Fanatic MMC with a Hero! His 9-2 is Low Crawling across the hill to try to escape the Polish dragnet. My moves are not too adventurous, I don’t push past the K1 building in the North and I ease my way up the Hill in the map’s centre. I don’t want to take unnecessary losses, I have a great advantage here and need only keep up the pressure until his defence cracks. My reinforcements mostly entered in the centre through the B6 woods – this was to capture the MMC, I sent my 60mm MTR(dm) with a manning HS to C2
The Germans lob 50mm MTR shells at the Prisoners and Guards but ends up malfunctioning the MTR! He does balance this out with his second shot which CRs a 458 off snake-eyes. Other than that JP just skulks on the hill to avoid my shots (though he now sends the MMG 468, 8-1 up the hill) and gets aggressive in the North as he moves Adjacent to my 3x 458, 7-0 in K1 – I shoot at one of the adjacent units and though I strip ? I miss scoring any result – but in reply he shoots and misses too; I thought he would use a concealed unit to go for CC and the CVP but instead he just retreats and re-gains ?. His 9-2 has managed to escape as my shots at it were terrible misses.
JP rallies the 9-2 but destroys the MTR, I malfunction my LMG with it’s first shot though. Mt AFVs come on as Platoon Movement and they make it safely to the road at the base of the hill (F6, E6), the rest of the men move as a stack along here too and also make it to the base of the hill. My Guards with his load of 2x Prisoners retreats to the rear of the map. I kill a HS off of a lucky roll causing a CR but in Movement I completely blank out and neglect to skulk the 2x 458, 7-0 in K1 and as a result they are all broken by an average attack from his MMG followed by terrible MCs! Another 458 from here was broken when he attempted to move adjacent to the M1 building.
Turn 3 is where I take stock of the situation and start to realise that I have not moved far, though I have certainly condensed my attack on the Hill. JP suffers a poor rally phase again when a HOB goes horribly wrong leaving his Conscript Squad (ELRed last turn) Disrupted. I blast away at his MMG stack, as he does at me, but his shots are effective (breaking a 458, 8-1) and mine are not. He does make a brave move to try to capture my Routed 3x 458, 7-0, but it goes horribly wrong when I take a long-range 4FP +0 shot and he ends up broken, again the rest of his moves are to the rear and h is obviously about to quit the hill, he now only has the MMG 468, 8-1 and a 447 up there now.
I capture another building I10 and also manage to break the 8-1 who was with the MMG – when his MMG fires in Defensive it immediately Malfunctions! My truck-borne reinforcements arrive and they drop their men off along the road (MMG to to go F5, rest to head into village or up the hill), I send the trucks forward to be used to cut off Rout paths or even to be killed for a bit of Burning Wreck assistance (they are only a CVP each and I can easily afford that now). His defence is really crumbling fast, but i am yet to find the AT Gun and are finding it very hard to bust into the M1 & M2 buildings.
Polish: 248
Buildings Claimed: 3
Germans: 2x 237, 50mm MTR (2x 468 Captured) (4 dummy)
CVP: 1
TURN 4-6
Unfortunately the Disrupted Conscript rallies which means the ATR he has with his is also back in the game, he also repairs the MMG! Luckily though, instead of standing and holding me back some more JP decides to run for the village… he essentially sets up a hedgehog bordered by the P3-N4-N6-P7 road, though he has the MMG with the 9-2 and a broken 8-1 in M7. As he runs to set this up I shoot at a 7-0 moving in the open, but my MTR malfunctions with its first shot; the 7-0 was heading for N2 but in getting there he is broken, leaving his with 2x HS and a 7-0 broken in this building as well as a LMG 468. JP also has a 2x ? stack in K1 and L9 but they have to be dummies as he still has 4x ? left and these are the only stacks as yet un-exposed.
I have to push, so push I do! I send my AFV along the L6 ridgeline and JP exposes his 37L AT Gun (O5) but it misses its shot, as does the ATR and the CCV that occurs when I VBM Sleaze the MMG stack (with now-rallied 8-1) in M7. This hex also contains a 1 AT minefield, but that too fails to make an impact and despite the rather ingenious trap (AT mines in a place sure to call for some VBM Sleaze) I manage to freeze the vital troops here. This really open ups the floodgates as I place a LMG 458 9-1 on the hill top (K7) to fire down into the village and have the other AFV go Hulldown in L6 (thus giving him 6AF vs the 9TK of the AT Gun). A Hot SAN hits my Guards so I have to send a unit back to stop any escape attempts. I then take some reasonable risks in attempting to force my way into the Northern building – but these fail spectacularly when 2x 1MC cause the breaking of both moving stacks (2x 458, 9-1 off of a 1FP -2 shot in M4 and then 2x 458, 8-0 in the L0 Woods)… all of a sudden things look bleak but then it all turns again when JPs loses the MMG crew in M7 to a 4FP +1 shot, and then the remaining 2 leaders attempt to CC my AFV and end up KIA from my AFV scoring snake-eyes! What an unbelievable run of bad luck he has had!
So we are at the German turn 5 and JP’s position is looking more tenuous by the minute… I have claimed 5 buildings but will claim another 2 with just AMs in my next Movement Phase. He fails to rally the sole remaining leader (a 7-0 in N1) leaving him with no leaders. he has a single LMG 467 in GO in the north (M2) and has 2.5 GO MMC in the middle guarding the AT Gun. My forces are all over the place, though I too have a lot of broken men, but I also have some FP at my disposal and he knows that. So apart from a few shots with the 37L AT (4 shots, all turret hits, so only 3TK – all fail to kill the M7 AFV) and also from M2 where he manages to malfunction his last LMG, he skulks…
Unfortunately skulking is no good if you remain in LOS. My return shots are lethal. My hill-based AFV (L6) scores a hit with his MA on P5 (1.5MMC) – they both break, then the last GO unit (a 247 in P4) is broken by my 8FP shot from M5…
With only the 37L AT Gun Crew still able to defend the 3 buildings in the centre there is nothing to stop me swarming them and easily scoring the win. He surrenders.
Germans: 9-2, 8-1 (4 dummy)
CVP: 1
An untenable position for the Invaders.
The Germans Surrendered.
POLISH VICTORY
Conclusion
This game was essentially lost right from the outset really because all the German’s eggs were placed in the one basket. He took a reasonable chance with the initial shot of the game (Spraying Fire vs. 2 hexes of units) from the G7 units and it did not pay off. The return shot was lucky and caused a catastrophic loss of half of his Elite Squads in the first Defensive Fire Phase. This might not have been so bad if thought had been given to Rout paths, but the only viable Rout option was to E7 and this caused the loss of a quarter of the German force in the first turn.
How often does this happen… where a setup is made with the intention of nothing out of the ordinary happening and that is then exactly what happens! I guess that my years of playing against JP (and his generally amazing luck) have taught me to prepare for the unexpected so that I would not have done this initial setup. I would have put those men up on the Level 2 hill where they still had a great chance of hurting the men on the road (12FP -1 or 2x 6FP -1 with Spraying Fire) but would have been safe AND would have stopped K1 from gaining concealment.
JP had terrible luck through most of the game… though note that every time I moved a stack and got fired upon it broke from top to bottom!
Anyway… all-in-all this is a fascinating scenario, there is a lot to like about it. The Mud makes the small-sized board manageable and the action in this game is kept at a furious pace due time constraints of the turn limit and mud-caused movement limitations. I like the balance of these forces involved in this game and while I am happy for the win I would have liked also to see how effective my attack would have been if JP has not lost a massive part of his force early on. This Scenario appears to be extremely well balanced (see the ROAR score) and I highly recommend it!