J6 – ST. BARTHELEMY BASH
Legion attacking as the Waffen SS
Rami defending as the US.
ROAR (SS:US – 14:9) – 4th July, 2009
Played with 48 VASL logfiles (Jul – Aug, 2009)
Rami and I were looking for another game to put his developing AFV skills and knowledge to the test. I asked him for a choice of scenario and this was one of the ones he suggested. He thought it looked simple enough with it’s small size, but with Bocage and Extremely Heavy Mist as well as a maze of overlays this is a really messy scenario to setup and visualise.
Initial Thoughts
Prior to the US setup the SS must choose entry points for their 3 attack groups. This makes things tough for the SS as the 4 roads allowed all head through to a central crossroad (hH2) and are mostly surrounded by excellent ambush terrain. Also, only 1 of the options (eH5) allows much chance of flanking the US positions.
When we look at the forces involved in this battle we see that it is going to be a really nasty bunfight. The SS have 2 AFV Platoons comprising a total of 6x PzKw VG and 2x PzKw IVH. As this is a combined assault they are supported by a Platoon of HT mounted Panzer Grenadiers. Along with the quite awesome array of AFV the Germans also have a 9-1AL.
Against this is a few platoons of 666 with a Baz’45 for every 2 Squads as well as a pair of MMG and a HMG. Even more importantly are 4, yes 4x 76L AT Guns!
Now, remember that this little mass of forces is going to clash on a set of Deluxe Mapboards. To win the SS have to get 5 Fully tracked AFV off of a single hex… that is a straight-line journey of just 15 hexes. The US get to setup all over the main crossroads through which the Germans must travel and the terrain is littered with Bocage. About the only thing I have in my favour is that there is an Extremely Heavy Mist which adds a +1 per hex fired, including +1 in-hex!
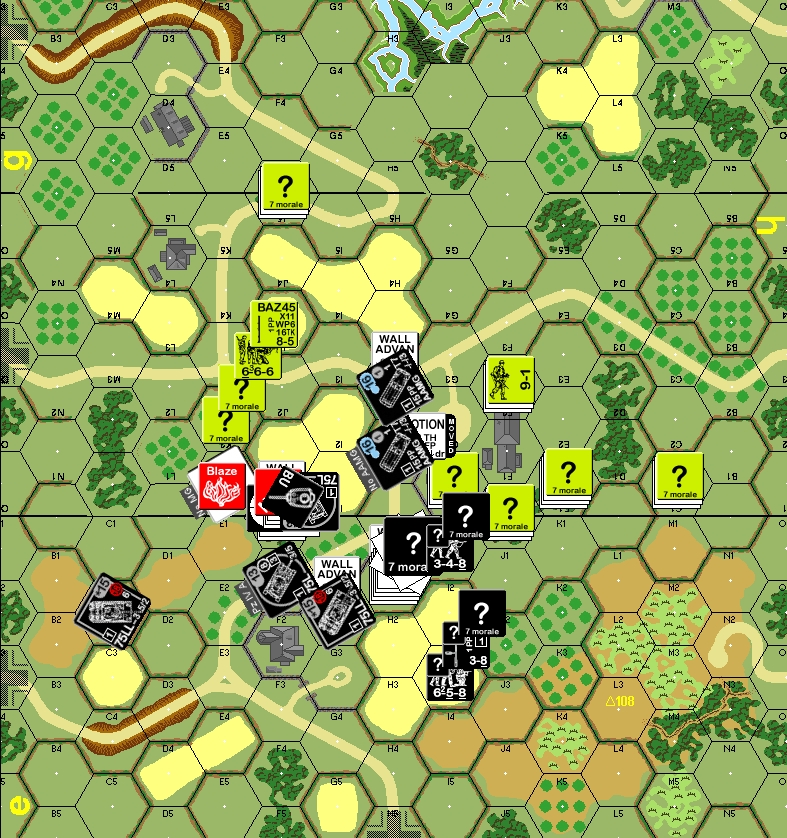
US Setup
With all my forces starting off-board he gets to setup 100% concealed. I shall note down his men as the game reveals them.
Units in Red are HIP.
hC1 Baz’45 666
hD2 MMG 666, 8-1
hE5 HIP 76L 227 (CA: hH2/I3), Baz’45 666
hF1 MMG 666
hF2(1) HMG 666, 9-1
hG1 Baz’45 666
hH3 HIP 76L 227 (CA: hH2/I3)
hJ0 HIP 76L 227 (CA: eF1/G1), 666
hJ1 8-0
hK2 Baz’45 666
Roadblock hB3/C2
It is hard to get much of a read of what Rami has done here. He has men all over the place and obviously I cannot see any of the AT Guns. Due to the excellent armour of the Panthers I have to assume he is setting his Guns up with the intention of either scoring Side and Rear hits or trying to hit my Underbelly as I cross Bocage. I am not too concerned about his infantry, mine should be more than a match for his 666.
Waffen SS Plans
There is no denying that this is a tough proposition for the SS. About the only thing in their favour is the great frontal armour of the majority of their AFV (18AF vs the 17TK of the US AT Guns) and the Dense Mist. Still, if the US have any experience in these matters then they will set up their HIP in such a way so as to get side or rear shots on AFV to give them a good chance of a kill.
I had chosen the 3 entry points as:
– eH5 is the entry hex for the HT group
– eA3 is the entry point for the mixed Panther and PzKw IV group
– hO3 is the entry point for the Turn 2 Panther group.
Upon seeing his forces placed I have decided that my original plan is still valid. I am going to try and envelop his men in the hF1 building complex with my infantry while using the AFV to pin them down and then bypass through gaps in the defensive line. Of course I am expecting his Roadblock to be placed in such a way as to force me to have to smash through the Bocage as some point, so when possible I shall go ‘off-road’ and take the long way around… there are enough gaps in the map to minimise the time-loss and Bog opportunities for my AFV.
My HT men will disembark as quickly as possible; they can really mess with him if he lets me. I am not yet sure what I shall do about the HT LMGs. I think I might leave them on some HT to give me extra Overrun and attack options, otherwise I shall give them to the SS to make them 8FP stacks.
All my AFV start off BU, I am not going to risk losing Panzers to SAN results!
The Game
TURN 1
My first AFV to enter the map is a Panther VG to take overwatch over the battleground (eC2) although the Mist precludes much firing this position; behind Bocage he will give me the chance to move right into action when the prime targets are identified. Next cab off the rank is a PzKw IVH and its initial move draws the first of the crew-manned AT Guns out of hiding as I bypass into it’s hex (hJ0), the US shots go wide allowing me to not only Sleaze Freeze it but also draw a pair of LMG 658 right up next to it for CC. I scoot a Squad off through the back fields to out-flank the US in the Villa whilst sending most of my AFV along the road in a mass. The other Squads and HS are covering the main road (hH0-H2) which is a prime place from which to attack his main infantry concentrations. CC sees the AT Gun Crew eliminated and the 666 in this hex held in Melee but this 666 also manages to KIA one of my 658 and the leader in return.
The US do well in Prep as a Baz’45 666 eliminates an unarmed SPW 251/1 – I probably would have concentrated on a target which was of real danger though as SPW 251/1 without their LMG are of minor value to either side. His men pull back and don’t really force the fight which allows me to take shots at the Melee; the 6ML US unit breaks whilst my 8ML SS is safe… this clears up this little mess especially when he is eliminated as he attempts to Withdraw. At the end of the first Turn I have already taken out one of the AT Guns to no loss for my AFV. Importantly I have also claimed the main choke point (hH0-hH2 road) for the first part of the game. It is hard to not feel satisfied with this progression thus far.
SS Losses: 658, 8-1
SPW 251/1
US Losses: 666, 227 Crew

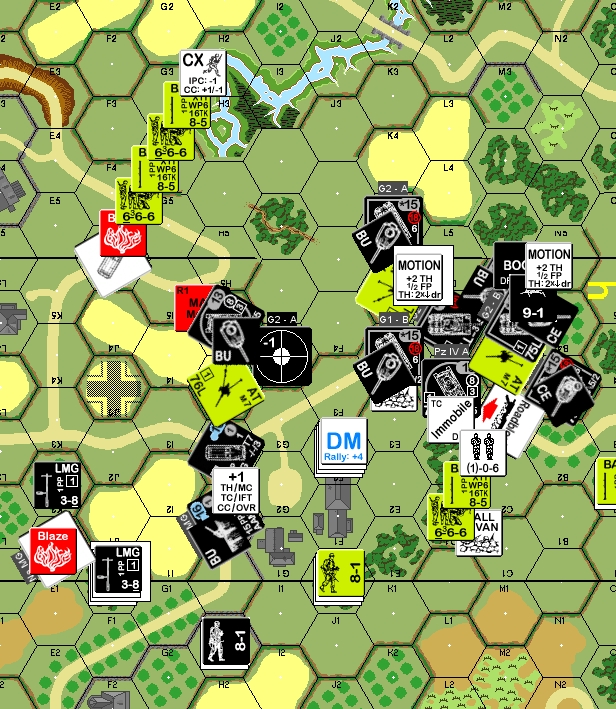
The battle has immediately become up-close and dirty as the SS swarm the town and the US have little chance to react.
eH2 is 348, LMG 658, 8-1, 2x SPW 251/1 (motion)
TURN 2
I am really rushing him and trying to crowd his men as much as possible. The last lot of Panthers arrive (from hO3) and this means I can literally swarm his men from 3 sides. He starts to open up with his infantry but my AFV are BU and I am not that concerned about Infantry losses in this game. Rami is yet to reveal any more AT Guns which is making me sweat: that is good to see, I am glad he is learning to be more patient with his traps! However, the Mist +1 really messes with his shots and that is why I am getting in as close as possible to try and CC him. My shots are reasonably effective despite sending a 666 Berserk and having one of my PzKw IV MA Malfunction. I am able to Wound, Break and then KIA a US 8-0. By the end of the turn I have cleared out the area to the South and East of the hH3 crossroads, I am also firing ATT at the Grainfield behind the Bocage to try and flush out his last AT Guns – there have to be some here. CC is no good for me as I miss him and lose a 348 CRed in an attack.
Rami pretty-much stays in place and is brave enough to not show his remaining AT Guns. His men fire and do pretty well for themselves, they score a Break which leads to a HS Surrendering – this unit was pressuring the Villa against overwhelming odds. In Defensive Fire the SS open up with their vast FP and start to clear out possible AT Gun positions and gain increased Aqr on probably AT Gun locations.
SS Losses: 348 (348 Surrenders)
US Losses: 666, 8-0
TURN 3
My first shot of the turn Gak’s the MMG I captured when I assaulted the Villa area last Turn. I start to move and I am of the opinion that there are few places left where he can put his AT Guns, so I am rushing them with my non-MA AFV and MG-armed HT. The first AT Gun shows up in the predictable hH3; it fires once, then with IF and completely fails to hit my no-MA PzKw IV with both shots! I OVR him for his impunity and am lucky enough to get the break. I estimate that I am really left with only 3 possible places for the last 2 AT Guns; the hE5 Woods, the hF2 building and hD2 Woods. His Roadblock finally shows itself in hC2-D3. I use a HT to find the next AT Gun with a Freeze Sleaze in hE5. In attempting to scout hD2 with a PzKw IV (or become a burning wreck – hey, either work for me if it gives me better TEM) I attempt an ESB roll for a shutdown and end up immobilised for my troubles! I move the first of the Panthers up towards the board edge and despite having to cross Bocage I am able to end up only a single move away from the exit hex by the end of my turn. This move also reveals the last of his AT Guns (in the unexpected hC4) who attempts to save himself by firing on the Panther bearing down on him (he misses and is Broken in an OVR attack). Rami’s shots against my AFV have been terrible this game, it is only in Defensive Fire against my Infantry where he can hit me and hurt me and this is not going to help him much now. My AFV are now all crowded around the exit area and all of his AT Guns are exposed. I have both my PzKw IV out of Exit VC contention (1x Immobilised, 1x MA malfunction) and a Panther is Bogged as well.
Rami has no choice now, with no AT Guns he must get close enough to either CC or Baz me, this means taking risks for low odds shots. I am able to CMG his 9-1 leader and 666 when they try to get close for some CC action, but miraculously they avoid being CRed by a 4MC CH from the 75LL of my Panther! He really has just 2 units with Baz to take shots at me as I run off-board and I use the Immobilised Pz IV to gain Aqr for SMOKE on the hex that they shall both have to shoot through, his odds of a Baz hit are incredibly low, but it is better to be safe than sorry! He misses with his AdvPh Baz shots but jumps into CC with a 251/1 (hJ5) and managed to kill it with ANOTHER low CC attack! Unfortunately Rami has managed to get a Baz ’45 666 to hA2 and that is likely to cause me some problems when I make a run for it.
SS Losses: 348, 658
SPW 251/1
US Losses: 3x 227, MMG
The SS are poised to make it off the board at the expense of their infantry support.
The US have flooded back but also suffered terrible losses
TURN 4
My first action is to successfully place SMOKE in the only hex through which Rami can shoot at my AFV as they exit and this greatly improves my chances. I move the foremost AFV first in an attempt to clear the way and waste his Baz shot… he takes the shot which frees up my later AFV but he also manages to hit my AFV for the first time this game. The Panther is Eliminated but thankfully not Burning. It all comes down to my Bogged Panther, if he can free himself with MP to spare then the game is almost certainly mine this turn. I roll and the dice come up 1,2… with a huge sigh of relief I am not only mobile but also left with plenty of MP to spare and the AFV easily makes it off the board as the last Baz shot sails wide with terribly poor odds for the hit. It is a simple matter of counting out the numbers (and passing the Bog +1 checks for crossing Bocage) as the last 4 AFV make it off-board for the win.
The SS exit 5 AFV from hA3
SS VICTORY
Conclusion
Normally I love playing ASL with VASL. I think it can be a beautiful experience as VASL can really make the boards look so different with the ability to turn it white for Snow or to transform Grain -> Ploughed Filed etc. However this was a very, very ugly game to play on VASL. Deluxe ASL is designed for a LOT of units in large hexes, this dramatically changes the way that the game works. Since VASL does not have the ability to zoom in any further then the images I posted above this REALLY impinges on the ability to play scenarios that are this tight. I actually found this scenario to be quite frustrating and in the end was quite happy when the game finished.
As far as my game was concerned I think I got lucky… Rami was in a bit too deep in this scenario and was not able to use the Bocage or the AT Guns to their best advantage. I was able to swarm him and tie up his forces so that they could not move fast enough to close down the exit hexes. The few times when he did have a chance to shoot at my AFV the odds were heavily stacked against him and his dice were not lucky at all – his CC rolls were almost god-like though! I have the feeling that on almost every level Rami was overwhelmed and he was only able to deal with the infantry attack against the Villa with any level of confidence. Personally I feel this was my fault… I should have suggested another scenario to him because right from the first view of the scenario card I knew this was going to be tough – sorry Rami.
I am not sure if I can recommend trying this scenario out… I certainly caution against trying it with VASL in the program’s current format. The more experienced player should take the US as I feel only experience will give them the edge they need to place those AT Guns in sweet spots and keep the infantry moving.