J76 – ULTIMATE TREACHERY
Legion attacking as the Japanese
Zeb Doyle defending as the French
ROAR (F:J – 32:24) – 31st March, 2007
Played with 45 VASL logfiles (April – May 2008)
With 2 games down (J69, J70) in my playing of the Journal 4/5 Thai Campaign scenarios the Allies and Axis are standing at 1 win each. This one seems to be pro-French but I am determined to turn those ROAR stats around. The first time I attempted this game it was against JP, but the dice were so biased in one direction that the Japanese were almost wiped out by the end of Turn 2, this sort of crap is hardly AAR-worthy. Since JP and I are now playing the Operation Veritable CG I put out the call for another opponent to help me finish these next 2 games.
Initial Thoughts
My first thought was “Wow… what a lot of pieces in such a tiny map!” We are using less than half a map board here and even though we are in Indochina we are not using PTO (I suppose because it is actually a city fight)
The Japanese have to take 45 or more of the 74 available building locations on this map while the French can force a win if they take at least 18CVP.
To hold the line and bleed the Japanese aggressors the French have a 50/50 mix of Green and 1st line troops, 2 leader (-1 total) and a HMG, MMG and LMG. They do, however, have a FT-17M.
While the Japanese have no AFV they do have a fairly potent force with 1st and 2nd line troops and 3 leaders (+0 total thanks to a 10-1 and an 8+1 leader). Their SW are a pair each of LMG, MMG and Knee MTR. They are unfortunately barred from Banzai Charges due to SSR3 and this includes T-H Hero Banzai Charges; I assume this means that T-H Heroes can only be created by the ‘In-Hex / Adjacent Method’.
French Setup
Zeb has gone for a very spread-out defence, he has not even got LOS to many of the positions which I am to setup on this will give me the option to attack without interdiction and then be facing him down with Concealment.
He has placed the HMG in Z2(2) – This is an interesting location as it forces me to come to him… though I can help my chances by Encircling him since he is on the upper levels.
The MMG is in EE4(1) – Again an interesting location, it stops me flanking him to the East but is otherwise there to gain concealment and stop me taking this building with ease.
His tin-can AFV is situated in BB5. I suppose from here he wants to stop me forcing the infantry away from the road and then attacking down the centre. I have plenty of Street Fighting opportunities with him here though.
All his other units are spread out and mostly in row-houses and therefore unable to Fire group! This is great, as I am sure I can crack his front line by the end of Turn 2.
Japanese Setup
With his men being spread out and also unable to support each other in the East due to the row-houses I am going to find this an easier attack than I had dared hope for. The dice will very influential in this game thanks to the need for the Japanese to move in the open and move fast. My plan is simple, I need to hit him hard and keep the pressure on until the line cracks, then I can hound him to death.
The T7(1) unit was placed to stop him gaining Concealment and while most of mine were able to be concealed this will be ultimately irrelevant due to the aggressive movements I have planned.
My 10-1 and his 2x MMG 228 will be sited on the level 2 of T4 which will give me plenty of options to hit him hard should he stand and fight.

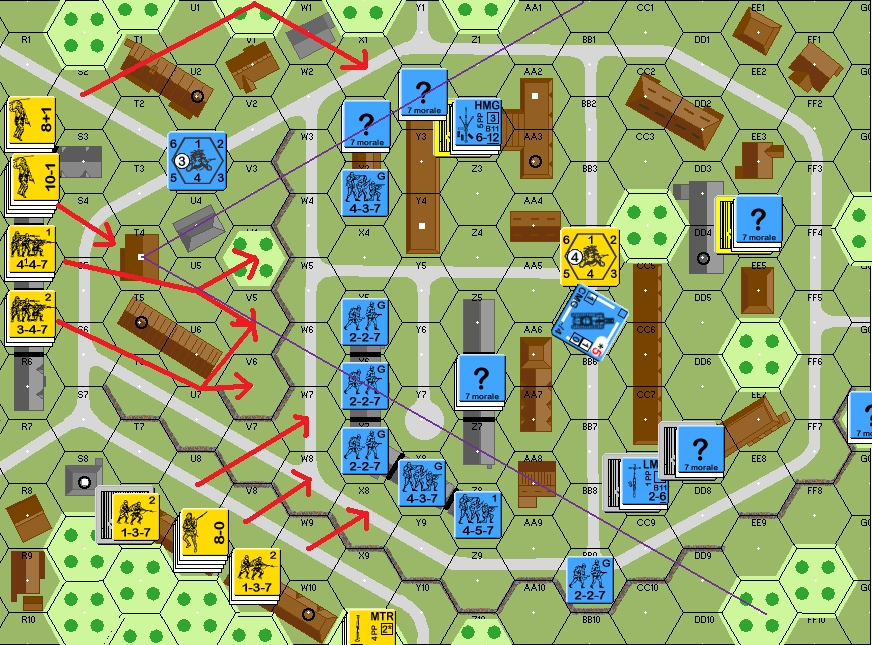
The planned Japanese attack
The Game
TURN 1
The game begins with some Prep Fire from my MTRs; the first attempts SMOKE but fails to have any, the second is successful and is able to hit his CC8 LMG position with +3 SMOKE. With ROF I am able to cover another hex with SMOKE and in doing so open the door for my men to rush into possible CC in the first turn. Movement sends IJA MMC rushing forwards and I use the 2nd Line troops as Storm Troopers to draw fire and get nice and close to his men; I end up with 1x 347 stripped from this little adventure. In his defensive he smashes my MTR HS with his HMG for the first shot and then gets a breakdown with the HMG as he goes for the CR… that is bad luck as I think the French are already under pressure from the ferocity of the Japanese attack. My Advancing shots make no headway against the French in their Stone Buildings, but I am able to kill a HS in CC and claim a row house hex.
Rain starts to fall and cancels out my SMOKE. He deploys a Squad but fails to repair his HMG which is a huge bonus for me. His moves are all in one direction, backwards. Only 2 dashing units expose themselves to my fire and I am able to get a Pin result on one of them. Defensive Fire is otherwise hampered by the lack of targets or their good TEM. He moves back into line and prepares for me to attack his next line of defence.
Building Locations Controlled: 2
French Losses: 227
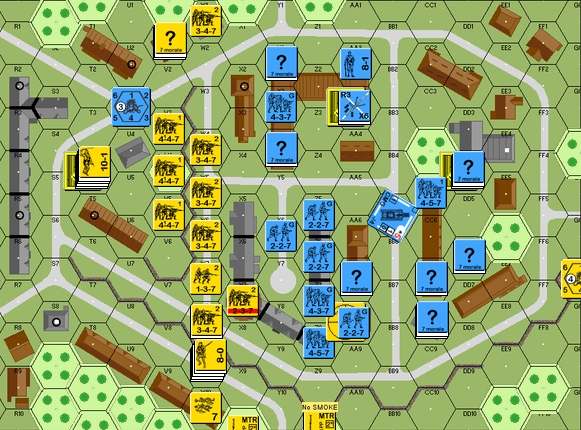
The initial Japanese assault is successful
TURN 2
The rain continues and he manages to repair his HMG. My men charge forward and though he gets a few hits the damage is light to me (2x Strips, 2x 127 Break)… a pair of SAN results breaks a 437 and kills a 7-0, so that is a win to me. My own Advancing Fire is terrible though… I miss with most shots and even when I do hit he passes his MCs with ease but most of the targets I shot at he Voluntarily Broke anyway, so all’s well that ends well. In the Advance Phase I jump into CC all along the line and end up killing 3x Squads for the loss of a single HS! This battle is easily slipping towards the Japanese and as expected I have really cracked his line open now.
Rally Phase brings out the brutality in my 8-0 Leader, he manages to ELR both HS down to Conscripts… sigh… Zeb doesn’t Prep, he runs again and this is now a little more dangerous as I have units covering likely escape routes. My attack rolls are pretty impressive, but I have yet to roll a MC fail for him yet – so at least the luck evens itself out there. In passing a MC he called in a Hot Japanese Sniper and this guy finished off a broken HS. Neither of us have any Routs and in CC he manages to kill a HS of mine while I do not get any luck in return.
Japanese Losses: 2x 237
Building Locations Controlled: 17
French Losses: 227, 437, 2x 457, 7-0
French CVP: 2
The French continue to fall-back while the Japanese surge forward
TURN 3
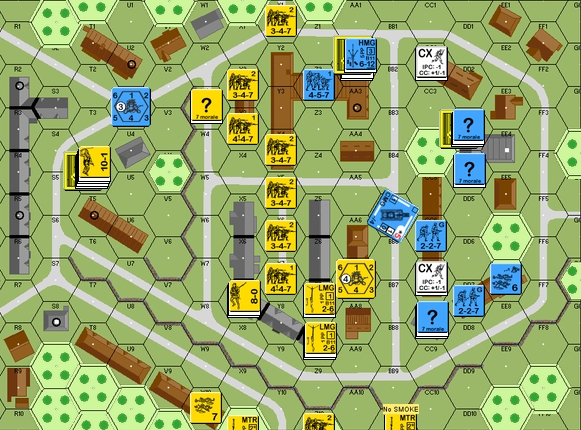
The poor French just cannot take a trick. When the H2H CC was won in the AA2 building (through a 6,6 which also allowed his 457 to withdraw) I think Zeb sensed a possible bit of good fortune coming his way, unfortunately another 6,6 during Rally came along to turn his smile into a frown. I also lose a HS as my Japanese Leader shows that neither he, nor the Emperor, will take “no” for an answer. My men surge forward against the almost non-existent resistance; he has pulled back to beyond the BB1-BB9 road, with only 2x GO Squads and a 8-1 and HMG in the AA2 building. Unfortunately this is the turn when his dice decide to go crazy and 2x 1,1 results manage to wipe out 3CVP of my units, luckily the 1,1 results also caused Cowering so he was unable to use his ROF to advantage. My advances are to push up as far as possible but the road stops me from getting adjacent to him, I am not willing to go to that extreme yet… I attack his AFV with Street Fighting and continue with the run of CC luck, the AFV is Wrecked.
A pair of consecutive 1,1 pop up in Rally for Zeb (that is 4x 1,1 and 2x 6,6 in about 12 rolls for Zeb) and he has a 457 HoB to a 458 and a 227 HoB to a 237. Again he turns and runs, though he also transforms his position in the AA2(1) location into a formidable fortress with 2.5 Squads, a HMG and a 8-1 leader. He leaves me no shots, but I do gain Aqr with my MTRs to on the Stone Building at CC8 to make sure I can SMOKE him out should he move into there and should the rain stop!
Japanese Losses: 2x 126, 347
Building Locations Controlled: 34
French Losses: 227, FT-17M
French CVP: 5
The French in the Western building have a formidable position
The Japanese assault in the Centre/East is halted momentarily by the roads open terrain.
TURN 4
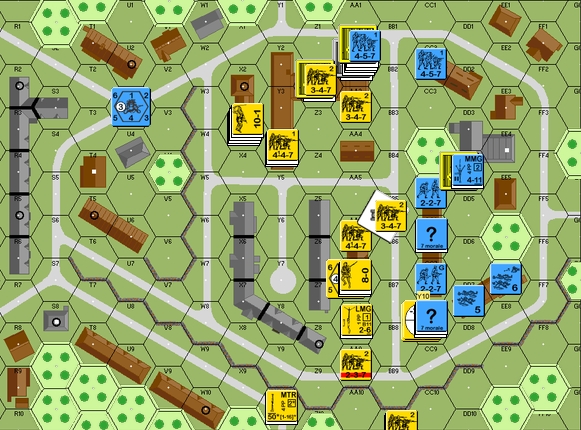
The French are facing me down as I must now cross the road to get to him in CC, this turn will really be the one that decides the outcome, if I fail badly here then all I shall have is a pair of MTRs to stop him running back to reclaim buildings, if I hold the Melees or force him to run then I shall easily have the required number of buildings and can defend from this point on. I start the turn poorly with a WP roll – pity it is still raining! Prep Fire erupts along the whole line but my rolls are so bad, and the only time I hit he manages to pass the 1MC… I have been so badly done-by with the French MCs (which I have rolled for him since it is a VASL logfile game!). When it comes to my movement I wonder to myself how much money I would have if I got a dollar for every time in a logfile game that the dice ran super-hot for the defender and super-cold for the attacker in a sure-fire win situation for the attacker… the French don’t miss a single shot and the Japanese pass just a single MC, even getting a 6,6 to make sure that a 347 suffers a CR break from just a MC… and even when MCs are passed they turn out to be Pins… perfect for the defenders! At least there is a bit of poetic justice when an Advancing Fire shot scores an unlikely result. It is in CC though that the Japanese really start to make the French suffer… I have 4 separate attacks and kill all my targets (5CVP worth) while he is only able to kill a single Japanese 347 in return, also the result means that I now have him encircled in the AA2 building.
The French have their final turn and it is a non-event, I had expected them to rush at me and try to win back some territory, but they did not, instead they chose to defend the territory they had already taken and to not put their men in any more danger. With this we accepted the inevitability of the Japanese victory and although we could have taken it though to the last turn to be sure we both accepted the result and stopped them game (Though, for Zeb’s pride’s sake I am more than willing to accept that this game came down to the last turn!)
Japanese Losses: 237, 347
Building Locations Controlled: 48
French Losses: 2x 227, 237, 457
French CVP: 9
The Japanese control >44 of the Building Locations
JAPANESE VICTORY
Conclusion
There is a bit of controversy that came up for us at the end of this game and I am thankful to Zeb not only for pointing it out to me but also for the way in which he handled it. It is here that I would like to point out that this game will be memorable for the gentlemanly and respectful fashion in which it was played… a number of rules questions and controversies came up (often I was the one who was wrong!) but in each and every case it was handled in a mature and sportsman-like way. This kind of opponent is a ‘keeper’!
The victory conditions state that the Japanese must control 45 or more building LOCATIONS… now maybe I am just ignorant and have spent my life playing other ignorant opponents, or maybe there are few VC that are worded this way, but I have never before noticed that although one can Control a Building one still has to take all the Locations within that buildings to fulfil this sort of VC.
A26.14 states that “An armed, Good Order Infantry MMC… in any hex of the building can gain Control of the building… as long as the conditions of 26.11 are fulfilled.“ Ok, I think to myself, than all I have to do is waltz though his empty buildings and they are mine… which is true… BUT not true for the Locations within them!
Again, the rules (A26.11) state: “… a side gains Control of a Location… by occupying it with an armed, Good Order Infantry MMC without the presence of an enemy ground unit...” and later “After successfully securing a building by Mopping Up (12.153), a player gains Control of the building and all its Locations.”
In other words, the Japanese have to either walk through EVERY one of the 45 hexes they aim to control, or Mop Up the multi-hex buildings (which is a Prep Fire action leading to a TI MMC and cannot be done if No Quarter is declared) to win this game, while attacking a numerically similar French force in good Defensive terrain in just 4.5 Turns! Man… no wonder this is so heavily biased towards the French.
When we discussed this at the end of the 4th Turn we both had independently agreed that the achieving of the 45 Location minimum was something that the IJA could easily do, so complete was their dominance by this point – however, I would hate to have to lose/win any game off of a rule like this, and I shudder to think about playing this sort of game in a tournament. I would also have to note that although it is a ‘reality argument’ and thus irrelevant to The Game I cannot see how one can Control a building and yet NOT Control the Locations within it… what is the point of Controlling it but not Controlling it?
We now have to analyse how the Japanese managed to win this game…
Without a doubt the French setup gave the Japanese a HUGE advantage… it lacked concealment and it was not able to mutually support in the East due to the Row-houses blocking multi-hex fire grouping. As my friend JP (a master of the Defensive Arts) says “Setup decides the first half of the game and can take away the initiative before the battle begins”; in this case the Japanese had the initiative and never really lost it for the whole game. Also Zeb continually pulled back to new Defensive positions, which is normally excellent tactical advice for a Defender, but not when the Attackers have limited Time and need to take terrain. The Japanese are ferocious in attack and that might have had a large part to play in his tactical withdrawal (they won about 90% of the CC in this game) but a few MMC being left behind as speed-humps might have slowed the Attack down enough. Also the AFV did not move from its location during the whole game and thus it was fairly impotent except when the Japanese chose to close for the attack. Certainly losing the HMG for a turn early on was a blow to the French, but they gained 1.5 MMC back from amazing Rally rolls to form a lethal hedgehog in this building and they also benefited from the Rain which stopped my SMOKE usage.
I enjoyed this game, though against a less friendly opponent it might have been frustrating. However, considering the poor balance issues I cannot say that I would be in a hurry to play it again… if it was about Controlling buildings and not Locations then this would be a much better balanced scenario, but as it stands I think it is going to be a French win the vast majority of the time.