J90 – THE TIME OF HUMILIATIONS
Legion attacking as the Japanese
James Thompson defending as the French
ROAR (F:J – 12:11) – 22nd July, 2008
Played with 62 VASL Logfiles (Jul-Aug, 2008)
I have finally made it to the end of the 4 Journal’s Thai Scenarios. This will be against the 3rd opponent I have played for these games.
Initial Thoughts
The Japanese have 2 ways to win this scenario. They can either get 25 Exit VP off of the middle of the Eastern board edge (at least 15VP must be infantry) or they must control the 13 huts which are on Overlay 1 on Map 38 by game’s end. There are no HIP and both sides have AFV. The French get reinforcements (AFV and Motorcycle infantry) in Turn 3.
The Japanese have a mixed bag of forces available to them. They have a smattering of their Ha-Go and Te-He AFV which will actually dominate the battlefield considering the poor French AFV (FT-17C and a pair of FT-17M) and AT options. Infantry numbers are 12.5 MMC for the French initially with 4 MMC coming in as reinforcements, these are all 1st-line though. The Japanese have 16 MMC but over half of them are 2nd-line.
SW sees the French with a single MMG and 3x LMG but they also have one of their excellent 60mm MTR and an ATR. The Japanese have 2x LMG, 2x MMG and 2x 50mm MTR though these are all dm where possible.
The terrain is fairly open and not PTO, though Irrigated Rice Paddies are littering the back half of Bd 35. There is a Railway Line Embankment running through the mapboard which is cutting the initial entry area of the Japanese off from the French setup area.
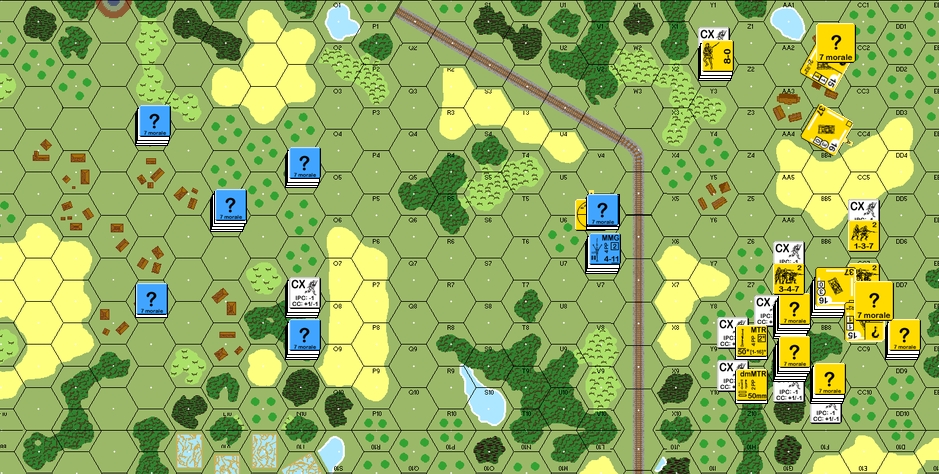
French Setup
He is setting up to face the most likely line of advance – through Bd. 38, the Rice Paddies are too formidable an obstacle for them to seriously be considered attacking through.
All units are on Bd. 38, all units are initially concealed
J3 4x ? [2x 457, LMG]
J7 2x ? [457]
L5 5x ? [2x 457, LMG, 9-1]
L10 4x ? [2x 457, LMG]
N4 4x ? [2x 237, 60mm MTR]
N10 3x ? [2x 457]
V5 5x ? [2x 457, MMG, 8-0]
V6 4x ? [ATR 237]
He has not placed many units forward which will allow me to move quickly in the first turn and also be prepared to meet him should he rush towards the Railway Embankment. If he pulls back to avoid my superior FP then he will face the problem of having me take the RR and gaining a useful place from which to support my attack with AFV and MG fire.
Japanese Plans
I am going to be making a large and weighted attack on the centre of the map to utilise the cover available from the 38AA8 Woods. Most of my men and all my SW are attacking this way. Up along the Northern edge of the board I shall be sending a small force of a 3x 447, 8-0 and 2x AFV to make sure he has to split his forces to deal with this 2 pronged attack – it is a small attack but the nature of the terrain means he cannot ignore me; these will be a useful Banzai force too. This Northern attack is useful in that it can also force him to choose between getting his reinforcements straight into the battle or getting them in safely.
The Game
TURN 1
My men ease on-board with the leader-led SW stacks making it to the woods easily thanks to CX. I lead with single units where I will be in LOS so that I can strip his concealment without too much risk of loss. He opens up the biggest stack on the Railway Embankment very early to reveal 2x 457 with an 8-0 and MMG; they miss their shot but have ROF which manages to CR and Pin a 2nd-line Squad; however he loses his ability to fire after that. Despite the loss of the HS I am quite happy with the first turn’s moves. I have been able to push up quite close and have placed a number of units in the front lines where they can re-mantle their SW ready for next turn’s push. He will have to either leave his initial locations or try to hold off my entire force with just a few units. I am also happy to have placed 2x AFV and 3x MMC, 8-0 up along the Northern edge without loss, he is going to have to do something about them or risk being Banzai’ed or cut off.
Jim’s men basically hold position, though the pair who were guarding the paddy fields make a move towards the expected line of Japanese advance. His shots in Prep Fire are off target whilst I use my Fire Phase to gain a single AFV Aqr and to re-mantle my SW.
Japanese Losses: 137
A solid mass of IJA troops approach the light forward screen of the French defence.
TURN 2
I am able to WP his 2x 457, MMG, 8-0 position which manages to break his leader and the 457 manning the MG whilst also Pinning the other 457, this is a huge result which gives me the ability to move forward with some confidence. My men surge as far forward as they are able, I am going to rush his initial positions with force, though I am sending the Northern group along the Northern edge of the Railway Embankment whilst my 2x MMG 228, 10-1 is sneaking over the RR to make for the 38R8 woods. I rush my 2x LMG 447, 9-0 stack at his sole remaining concealed units on the RR line, this attack is shielded from his other units by the mass of hindrances and the WP SMOKE, but he doesn’t fire… this must mean that he has the ATR here, anything else would have shot at me as I moved. Sure enough it was an ATR but it’s low-odds attack against the small and moving Japanese AFV is not lucky enough to hit. I am almost as unlucky when a bunch of shots only Pin his ATR HS but in in CC I am able to kill this HS with no loss. His 457, 8-0 cannot Rout and must Surrender, to which I declare No Quarter; the 457 who remained in the in this hex is safe after we both fail in our H2H CC attempts.
He continues to only tinker with his Defensive line, no shots are taken and only the 2 units who were watching the Paddy Fields AM to gain a Hindrance-free position from which to attack my next turn movements. He has had his initial line crushed for little damage to my Attackers but thanks to the concealment and wide-open killing ground stretching in front of me he is still in a decent position. I fire in Defensive with an 8FP shot into the WP SMOKE to try to affect the H2H Melee, I score a HOB (Berserk) result for me and break the French 457; the Berserker finishes off the French unit in CC.
French Losses: 237, 2x 457, 8-0
TURN 3
I immediately send my AFV forward, he only has MTR and LMG to attack them with now and that is a risk I am more than willing to take. I make a few moves to try and draw some fire and succeed in getting a 2nd-line MMC KIA but all the rest make it as I push their movements to the limit. I am sending a number of HS down the open central area between the 38Q5 and 38R5 Woods as the majority of my force is heading into the Woods themselves; while this is risky thanks to the excellent French MTR my superior number, position and FP should force the issue even if he does get some MTR success. My AFV have got almost all his positions covered should he choose to drop his concealment though the Hindrance-thick terrain does make it difficult for me to get a decent chance of hitting him. I again score a bit of luck in Advancing Fire when a 1FP +0 shot breaks a forward 457, but otherwise this has been a fairly uneventful turn as far as shooting goes.
The MTR is revealed as it Airbursts on my Northernmost stack leaving me with a Wounded ELRed 8-0 (now a 7+1) and stripping a 447. My shooting continues to be relatively poor with AFV shots hitting but not causing damage or shots generally missing, however when I do hit I cause devastating damage as my MC rolls for the French have been terrible this game (sorry Jim). His defenders continue to hold their ground as the Southern stacks pull back, they are the ones who are hit the hardest and he is left with just a single GO 457 down there now against a formidable IJA attack.
Japanese Losses: 347

The Japanese continue to push forward as a solid mass but the terrain stops the French from concentrating their Defenders
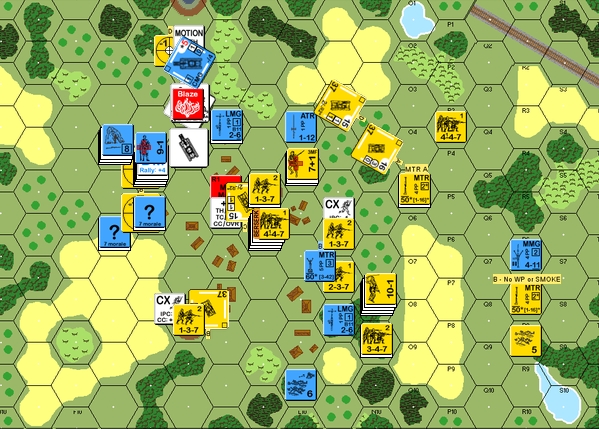
TURN 4
I try to use my most distant MTR to fire SMOKE to cover this turn’s moves, but he fails and is left without SMOKE or WP. The other MTR is able to drop WP on his MTR position though and reveals the concealed 237 in this hex who suffers FATE and is eliminated by the WP, the French MTR HS survives easily. I drop some more SMOKE to cover my line of attack. The IJA force grinds on as yet again we are able to essentially expend our full MP moving forward. The AFVs race ahead to freeze the MTR HS and then the wounded 7+1 attempts to get his revenge when he leads a stack of 3x MMC on a lethal Banzai charge into this position (which Jim manages to hit thanks to a 1,1 result; this strips a 447 and CRs another Squad). Still, the effect of the move is to allow my AFV to be in position for his reinforcements which are due in his next Movement Phase. I send another AFV forward to take a shot at the lone 457 in the South, I fail to score any damage but am able to DM a broken 457 and also place this AFV in position to support my attack over the next turns. He uses this lone Southern 457 to break a HS which frees up my movement in this area though to be sure I OVR him and leave the mobile AFV in his hex to tie him up. He has some more luck in Defensive Fire when his LMG manage to stun an AFV, in fact he does very well with most of his shots, the only difference being that I am passing a fair proportion of my MC. Advancing Fire cleans up the last unit in the South and gains some AQR on the other units.
Thankfully his LMG is ineffective and my AFV survives to take on the approaching reinforcements. He is entering his AFV from as NE as possible, which will put him right into the LOS of one of my Ha-Go but I am unable to score a kill on the 37mm French tank, I do gain Aqr though. His motorcyclists enter and dismount to shore up the defence of the most rearward buildings. My shots are useless, though I do score a breakdown on my own LMG!
French Losses: 2x 457
TURN 5
My first shot of the turn leaves his FT-17C a Burning Wreck. Then my MMGs with the 10-1 leader get involved and with the help of my anti-French dicebot he suffers a number of breaks before I roll a breakdown for one of these MGs too. I send a sacrificial 127 with a French ATR forward to pressure his AFV and draw some fire, this works but at the cost of the HS – from this a Warm SAN is called who Wounds his 9-1 though. Things really start to go crazy this turn with the French suffering a Malfunctioned LMG as they shoot at a freeze-sleazing AFV and a French SAN pinning an IJA 447 (worse than a break in the context of this game). I have him under an enormous amount of pressure and now is the time to push as hard as I can to try to gain the territory necessary to score the win and to ensure he doesn’t recover in time to put up a valid defence. Unfortunately his men, when they do shoot, seem to only get KIAs and I lose a 447 moving in the open right at the end of the Phase. He has no Defensive Fire (his men are pretty much tied down by their own attacks and my AFV) but again the dice rear their ugly head as a 4FP +2 shot scores a NMC and his 7ML French maintain their terrible MC record. As a way of repaying him one of my Ha-Go manages to malfunction his MA (which is a bit of a bother). The IJA surge forward and start to claim buildings as his broken men pull back. I am forced to spread out a little to avoid a nasty 2x 457, LMG in J4 but otherwise it is all going well. Unfortunately while CC goes well for me in the South he also does well enough to kill off 2 of my MMC for 1 of his which might put me in a bit of danger down in the lower buildings.
Rain starts to fall but it shouldn’t affect us in this now-close battle. His Prep sends the 447 with the malfunctioned LMG Berserk (Japanese, what else can happen with HoB?). The French are lethal when they do actually manage to take a shot, they have got their 4th CR/KIA from only 6 shots! He has almost no moves so we slide straight over to Defensive Fire… and in keeping with the theme of the game my first shot, with a Captured French 60mm MTR, is a hit which causes a NMC… and that NMC is a fail… the French MC DRs have been impossibly bad.
Japanese Losses: 3x 127, 447, 2x 347
French Losses: 3x 457, FT-17C, FT-17M
The IJA start to gobble up buildings as the French are left reeling
TURN 6
I lose one of my MMG through a failed repair attempt. My AFV have a hard time being motivated when all by themselves but I am able to get 2 of them moving enough to freeze up his 2 most potent units – he only has 4x MMC still in action and 2 of those have very restricted LOS. My Berserker is the 5th CR/KIA result from his 7 shots against infantry… ouch. The loss of this moving unit and the fact that it was only this firing unit who was able to shoot this turn essentially means that the French resistance is now non-existent. It is either stitched up with in-hex AFV or broken with nowhere to run. My Advancing Fire is pretty useless with only a 2FP attack managing to cause any damage as 3x broken French Squads are CR since the dice continue to victimise Jim’s MCs. Finally a 4FP +2 shot whips out a 1,1 result to ELR break one of the 4 MMC he has left and to ensure I control the Northern-most buildings. Another 457 is eliminated in H2H CC.
The French are unable to rally any of their units and a half-hearted set of shots in Prep Fire leaves them totally exposed to the remains of the IJA force. This is a battle that the French cannot win and they Surrender.
Japanese Losses: 126, 447, MMG
French Losses: 3x 237, 457
The French Surrender
The Japanese Win
Conclusion
This was a fun game though it did have some rather unusual trends with the dice. Basically the French (when they shot) seemed to pretty much only score KIA or k/ results but when they took a MC they almost always failed. In the end I would have to say that this seemed to balance out reasonably well, because despite these DRs I think it was essentially the French setup that let them down in this game.
With just 2 units forward against my entire force Jim was always going to find it hard to keep the front door closed against the Japanese, the fact that the IJA managed to score WP hit on the most useful French position just covered up the fact that I had a large amount of FP ready to Prep should both my MTRs miss with their WP or SMOKE attacks. Once broken the up-front defenders had nowhere to run and we wiped out easily. This seemed to be the theme of the game as the Japanese juggernaut would then roll on to the next set of forward defenders and be able to focus all of their FP on them too with little harassment from the deeper French units. Even though I had some poor turns of shooting I ultimately had so many different attack options that eventually something was going to hit, and unfortunately almost all hits left the French broken. In response the French often found over half their available units out of LOS of IJA units or with so many hindrances between them and targets that firing was hardly worth it.
Tactically I believe the French should have 2 main aims:
1. DELAY the IJA: The Japanese have a lot of ground to cover for either Win option and it might be a useful tactic to defend up front in depth while bringing the reinforcements on to cover the deeper buildings and to support the initial French forces as they withdraw/rout. I would be aiming to hold the IJA back in the RR:Em until at least turn 3 and preferably turn 4.
2. DEFEND IN DEPTH: This map is a maze of hindrances and a large part of the result here was decided by the limited number of shots available to the defenders while the attacker was able to make multiple attacks at single hexes. The French need to have mutually supporting defenders to force the IJA to pay for every hex they take. There is a patch of Open Ground in the middle of Bd. 38 and the only other cover is Woods which is a perfect target for the French 60mm MTR (as Jim showed). The French might want to consider going on a foxhole digging spree in the first 2 turns.
I would also like to point out that in a total brain fail both Jim and I did not notice that the IJA AFV we Radio-less. When I noticed my mistake in Turn 2 I apologised to Jim and placed all my AFV under stun counters (no Move, no Fire, all Aqr removed) for a single turn to make up for the error. Although I don’t think too much damage was done by this oversight I felt I owed him some compensation. Generally my AFV performed at about the 50% mark with their individual movement NTCs.
I enjoyed this scenario and would quite happily play it again as either side.