J94 – KEMPF AT MELIKHOVO
Legion playing as the Russians
Roger Whelan / rdw5150 playing as the Germans
ROAR (R:G – 44:54) – 4th November, 2006
I had responded to a call for a log-file VASL game that would be short and preferably set in the ETO, both myself and my opponent, rdw5150, quickly agreed on this interesting little battle from Journal 6.
Initial Thoughts
It all looks very nasty; a small map with some modifications to make the LOS very tricky indeed (hills are grain and there are no upper storeys in the buildings). There are 6x 447 vs 6x 467; the Russians have a 45LL and ATR as well as a variable entry time KV1 M41. The Germans have a rather mean looking Pz III(Fl) and a Pz IVH with an 8-1 armour leader. The victory conditions for this 4 .5 turn game specify that the Germans must control 3 buildings, all of which are clustered close together… Victory for the Germans will require speed and luck, while the Russians can focus on holding off tactics.
Russian Setup
3Y6: (HIP): 237 ATR – A nasty little surprise for any outflanking tanks!
3X3: 447 – To make him move cautiously at first and to strip ?. Will need to hold flank as long as possible
3V4: (HIP) 45LL AT – The jewel in the crown of my defence. Almost guaranteed a side shot if not discovered first
3U6: 7-0, 447 LMG – To hold the last building and provide a fall-back rally point. Will also cover U5-U3 road
3T4: 9-1, 447 MMG – To scare him into a frontal attack and to be ready to help hold the 3S3 building
3T6: 447 – This guy will be my ‘strategic reserve’
3S3: 447 – I am required to have a unit here and a 447 is less of a gamble than anything else!
3R3: 447 – I am required to have a unit here and a 447 is less of a gamble than anything else!
I hope to be able to surprise his Pz III with the AT gun in 3V4; I am sure he will not suspect it here and from this position I will be assured a great chance of a side hit! Against the front of the AFVs this gun can do very little, but against the sides he is likely to be lethal! Also, should worse come to worse the AT gun can help hold the 3V3 building and stop a flanking attack through here… my biggest fear is that the Germans will stumble upon him due to some aggressive movement to outflank me.
The ATR position is to make sure that any AFV sneaking around here has something to think about… there is little chance I can get a kill with this guy but an ambush attack might catch him with his pants down. Also the HS here might be lucky enough to score a 2FP -2 attack against any infantry moving through this area.
At the moment my intention is to skulk and delay rather than slug it out for a kill… time is short and to slow him down is just as good as a few successful attacks!
My opponent has set-up quite conservatively, they are all bunched around 4T5, and none of the infantry are riding the AFV.
The Game
TURN 1
As expected the Germans make a direct bee-line for the 4T10 area… though not without loss. Either a calculated risk or an LOS oversight allows me to fire with 4FP -2 at a 467 as he moves into 4R9 – resulting in a kill! What a great start of the game for me… it is not like there are many German squads, so every loss has to hurt! The Pz III ends up in 4U10 and this is perfect for me… he is committed to entering the road right in front of my AT Gun. His ‘reinforcing’ units enter under CX and double time down the frontal flank area… it looks like he might be trying to enter the grain at the well-covered 3X3 building; a natural choice for an attack on the rear building. This is confirmed for me by the placement of the Pz IV in 3Y1 who fires to Aqr at my 447 in 3X3.
I just skulk for my turn and thus present him with no targets for his Defensive Fire. I had lost the ? on a 447 from the first building (3S3) so I Advance this guy in 3R3 where there is a little more range separating him from the masses of FP covering this building. I also take the chance to escape his Aqr-ed hex by Advancing the 3X3 447 to 3V3… by the end of this turn I have all possible attack routes to the 3S3 building covered by 3x 447 (3V3, 3S3 and 3R3) as well as the 9-1, 447 MMG (3T3).
German Losses: 467
TURN 2
His turn opens with a flurry of fire and the placing of an Opp Fire counter on the guys in the area facing down the 3S3 building… this leaves just a single 247 free, and it is he who braves the Russians just across the street from his location (he ends up broken in Defensive Fire). The Pz III starts to move, but stops at 3U2… an excellent location as he is not only out of my AT Gun’s LOS, but he is also able to long-range attack either the 447 (3S3), or the 9-1, 447 MMG (3T4); to protect the MMG I was forced to not fire him during Defensive Fire to avoid the 12FP +0 attack from that terrifying FT! As it turns out the FT shot is a miss at 6FP +0! Phew…
On the flank his 8-1, 467 LMG stack stroll across the road (3Y4) towards the grainfield and wet themselves when my HIP 237 opens up on them with 2FP -2… they needn’t have worried, I roll box-cars and miss by miles! My cross-eyed HS is broken by the return fire in Advancing Fire… alas… and rout well away from the battle – a great ambush ruined by evil dice! His final move is the Pz IV to 3X2, it was pretty scary for a moment there.. I thought he was going to rumble straight into my AT position… but luckily he stopped short. Advancing Fire was generally useless, though he was kind enough to malfunction a LMG (3T1).
My turn is another massive skulk-a-thon with the 3S4 grainfields being well-trampled by the constant traffic. I have decided that I am going to focus my defence on keeping the 3S3 and 3T4 buildings since he is moving very slowly and all I shall need is another turn of playing ‘keeping’s off’ to feel confident of success. I do have a large scare when the 447 retreating from 3V3 to 3V5 gets the attention of the Pz IV. A shot hits him as he passes through the hex holding the HIP AT Gun but thankfully it is not enough reveal the guns location! Wow… that really was a terrible moment! By the end of my turn the positions are as shown below. 3S4 holds 9-1, 2x 447, MMG.
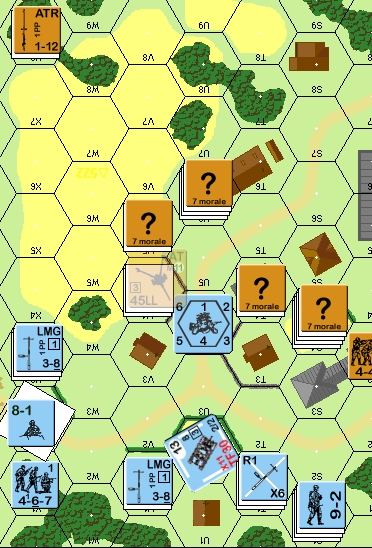
Showdown in Melikhovo at the end of Turn 2
TURN 3
Things are again not going well for the poor Germans with the malfunctioned LMG being removed in Rally. At least he finally has an attack stick as my 3R3 447 is broken by some Prep Fire – but this has ensured that the 9-2, 467 MMG are not moving this turn, so that is a fair trade. He then totally surprises me with a 247 bravely rushing through 3S3 before being broken as he double times it to 3T3! (This HS was eliminated in Advancing Fire by the massive 24FP +1 from 3S4). Emboldened by this HS’s audacity the Germans move in really close… The Pz IV makes it to the 3U3 crossroads, and then a 467 is KIA-ed by my 7-0, 447 LMG in the rearmost building as he moves through this same hex. I think Roger forgot that a moved/motion AFV doesn’t provide any hindrance to fire (D9.3), and this later proves to be the undoing of the Pz III as well! My AT Gun was very nearly exposed when a 467 LMG moved to the 3V3 building… but the MMC stopped there and that left my Gun free to spring the attack on the Pz III when he trundled onto the road (3T2) attempting to get into position for an attack on the grainfield holding all my forces. Loading up APCR and carefully aiming for the thinly armoured side my gunners scored a hit with their first shot and that was the end of that! The Gun was also able to break the 3V3 467 with ROF in Advancing Fire and then, in the clincher, managed to kill in CC the 8-1, 467 LMG that had Advanced into the Guns hex – despite being PINned (don’t blame me, Roger rolled the snake-eyes for me!). At this point my opponent surrendered, there was no coming back from here…
German Losses: 8-1
2x 467, 237
Pz III (Fl), LMG
Russian Victory
Conclusion
Well, without a doubt, this was a very dicey game with all of the luck coming down on the Russian’s side. By the end of Turn 2 I was feeling that unless the Germans made some massive gains in Turn 3 then they were in trouble anyway, but the DRs gave us no chance to test that hunch.
Firstly I was very pleased with the positioning of the AT Gun, it was a risk, but no more so than placing the gun in a more conventional position and hoping that the dice-gods bring a lucky frontal armour penetration. From this position I was able to hold it back until the time came to hit the prize. That FT AFV is deadly, but only when it is within 2 hexes of a target… and that means it must almost certainly come within 3V4’s LOS. I must admit that Roger surprised me with the Pz III (FL)’s move to 3U2, from here I could do little against it while it was able to flame either 3T3 or the vital 3S3. Also, if I had not managed to get the ‘flank-protecting’ 447 back to 3V5 then a 467 would have probably gone CX and entered the HIP Gun’s hex, and that would have ruined my little plan!
SSR 4 makes it clear that at least one 447 must be in each of the victory buildings… but after playing this game I would probably consider next setting up the 9-1, 447 MMG in the 3S4 grain hex and using the ‘free’ turns as the Germans approach to dig a foxhole. A 447 under a ? counter could remain in the 3S3 building to keep the Germans head’s down, forcing them to move more cautiously towards this building. The only flaw I can see with this is that the Germans get to move last in the game, so if it comes down to the final turn the Russians will have to Advance into the building and brave the Germans entire turn.
Obviously the KV-1 did not get involved in the game, I rolled poorly for it’s arrival. It’s presence is a good enough deterrent for too strong a flank-attack though and I feel that despite it’s absence I benefited from having it in the OoB.
From the German point of view. My mate JP made the observation that the 3V3 building seems to offer a natural entry point into the rear of the village. I tend to agree with this and wonder if the axis of the German attack should not be more down the U-X hexrows rather than the more conventional R-T. Without a doubt the German commander is going to have to be VERY aware of the time constraint. In e-mail conversation both Roger and I knew that even at the end of Turn 2 time was starting to run short.
In all, despite the dicey nature of this play I can say that I very much enjoyed the game. The scenario has all the makings of an interesting one for re-play. It may be small in size but there are enough tactical options available for a cunning commander to play a few tricks and mind games on his opponent.